My creative SCA journey on stuff I make and research I do…mostly in fibers (wool prep, spinning, weaving, tablet weaving) and glass beads, but could also include costumes, camping, cooking, and any other creative things that strike my fancy.
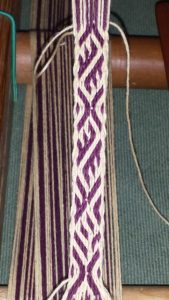
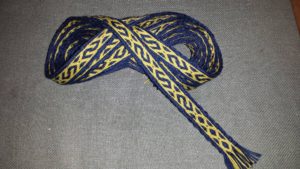
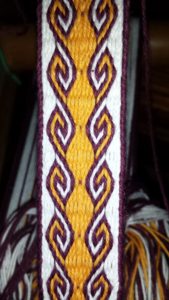
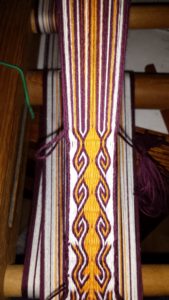
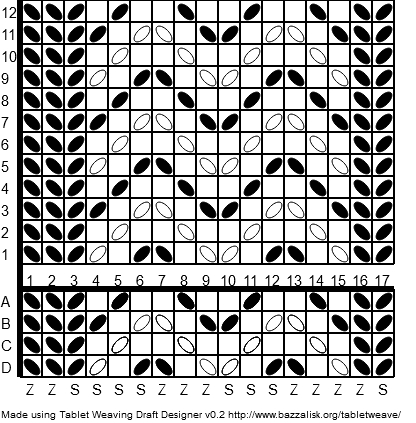
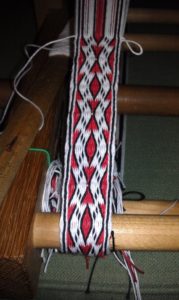
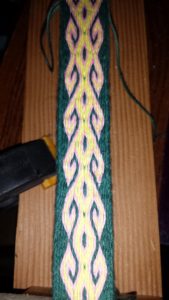
Edit! Updated pattern!! After looking at the extant piece and my pattern, I decided that the little blue <> on the sides didn’t belong, so I adjusted it and came up with this!
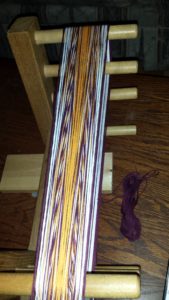
Border cards are now the 4 cards on each side which will need to be flipped every few repeats to deal with the twist build up.
As the weather cools in the northern hemisphere (and life begins anew in the southern lands) we are minded of the upcoming holidays and thinking ahead for gift ideas for those we love. If you have a Medieval enthusiast on your list, I may have an idea for you! Have you been shopping for reliquaries and coming up empty handed? Vendors all out of slivers of the one true cross? Finger bones of Saints on back order? Well, never fear, fellow weavers—you can create your own relics–the sleeve of St. Bertille!
Born in the early years of the 7th century, Bertille was born to a prominant family in Soissons, France, about 60 miles/100 km northeast of Paris. As a child, she spent her time in prayer and doing “serious duties”, not wanting to spend time doing frivolous things, and as she grew up, she found the world to be tempestuous and despised it. She found comfort in prayer and conversations with God. About the year 630, shortly after it opened, her parents brought her to the Jouarre Abbey in the city of Brie, about 20 mi/30 km SE of Paris. We don’t know how old she was when she arrived, but I would guess between 15 and 20 years.
She was educated by the Abbess Thelchildis and was known for her humility and self-denial. She was committed to aiding the sick and caring for the children being educated at the monastery. When Chelles Abbey was founded, with tremendous support from Queen Bathilde in 646, Bertille was chosen to be its first Abbess. 20 years later, that Queen retired from Royal service, as her son took the throne, and moved to Chelles Abbey, where she lived until her death in 680. The Abbess died 12 years later, in 692. Both were buried at the Abbey and about 200 years later, both had been canonised as saints. Her feast day is November 5th.
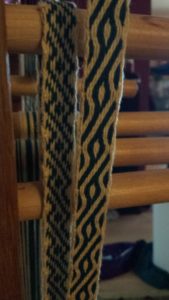
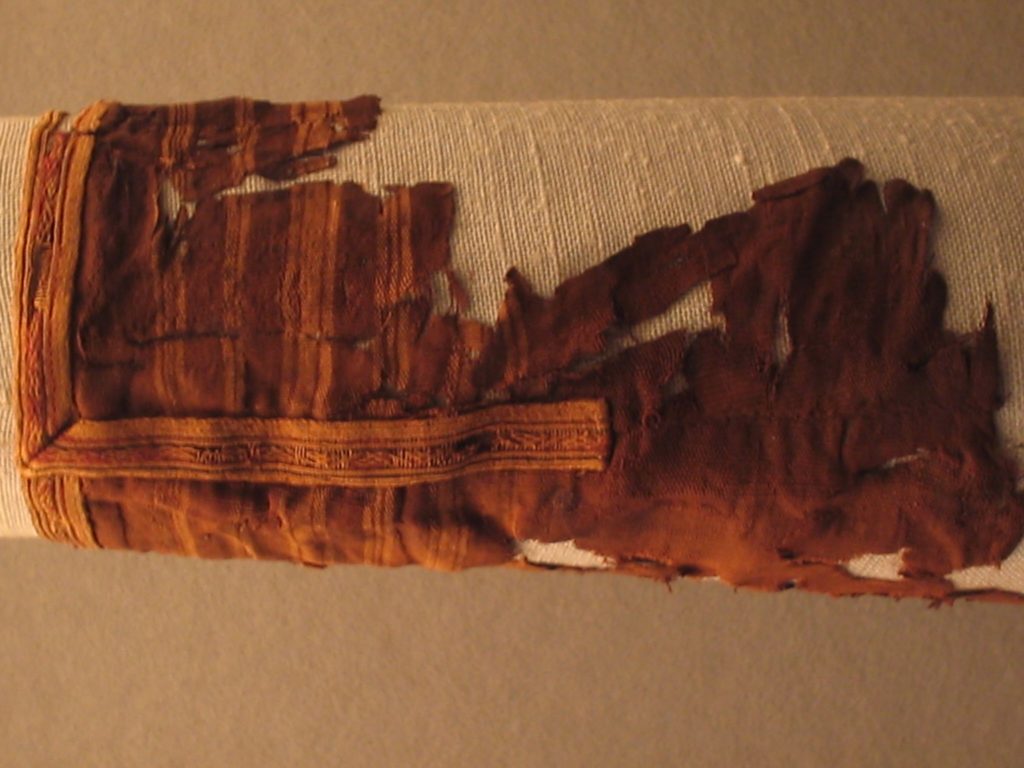
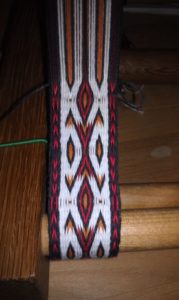
The sleeve and tablet woven trim from St. Bertille, late 7th century.
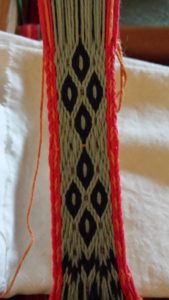
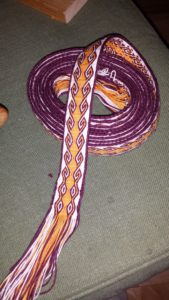
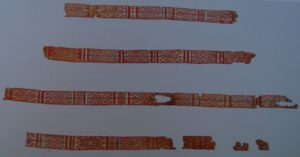
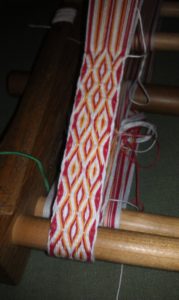
Among the textiles, at least three tablet woven pieces were found there—although, their garments were moved in the late 9th century, and displayed as saint relics for passing Pilgrims, then later moved again during the French Revolution to spare them from destruction, so we’re not really sure which woven piece belonged to which woman. Despite the rough handling, the fragments held up remarkably well, and so much detail can be seen on them. The pattern I’m going to share with you today is a bit of tablet weaving on what is presumed to be the Abbess’s sleeve. The extant piece is 9 mm wide, made from silk in red, yellow and dark brown. 2/3 of that width is border cards, so this center design is a very fine 3 mm wide.
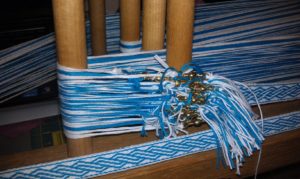
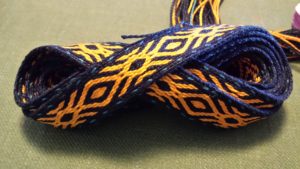
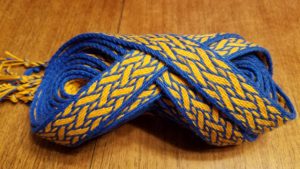
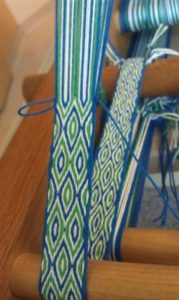
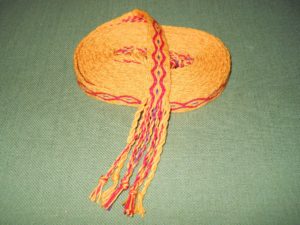
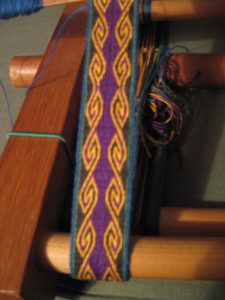
Kingdom of Caid, created in 1978, comprises the regions of Southern CA, Southern Nevada (including Las Vegas) and Hawaii. Sounds like a party! Their colors are blue and white, but looking at their banner, it also has yellow in the laurel wreath and crown, so I’m adding a third color because this pattern lends itself well to using three colors…so let’s do that! Grab your looms and let’s get to work!
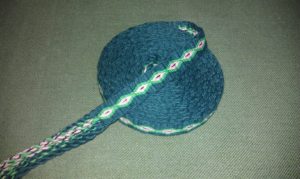
The last video for the Hallstatt 152 skip hole may have been a bit too advanced for a beginner, so here is a very easy skip hole pattern for beginners!
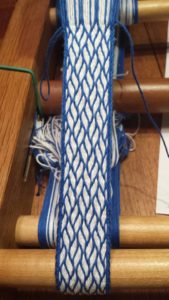
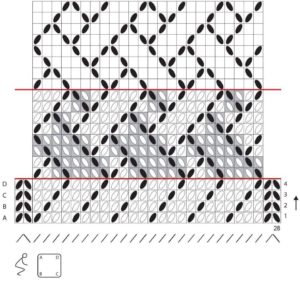
The original band was found in Hægebostad in the southern part of Norway and dates to about 500 A.D. The tablets in the central area were threaded with only two threads per tablet, the border tablets with four.
The three graves at the Snartemo farm were excavated over an 85 year period, between 1847 and 1933, which uncovered a number of fantastic pieces, including a sword, glass beakers, gold rings and more, dating to about 500 AD. Grave II (excavated in 1878) and Grave V appeared to be those of a warrior nobleman, both containing remarkable textiles, including the bands we know as Snartemo II and Snartemo V, the latter being significantly more complex than the former. The simpler band from grave II was woven with 17 tablets in two colors of fine wool using the skip hole technique. It measures 0.9 cm, but colors have not been determined as no dye analysis has been done. Lisa Raeder Knudsen did a study of the extant piece and said, “In Bjørn Hougen’s book “Snartemofunnene” 1935 a drawing is shown, but the analysis is not correct.” More recent in-depth studies have been done very recently; the link is below.
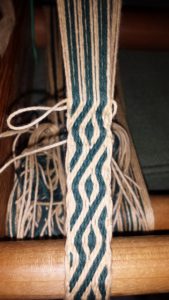
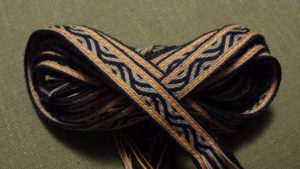
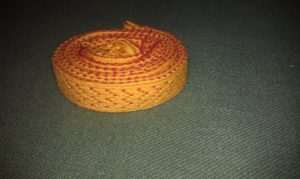
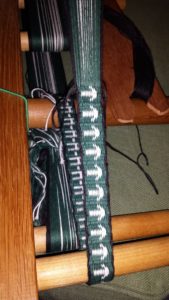
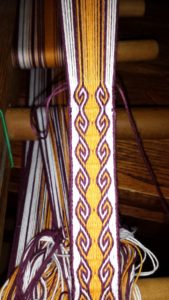
As part of my Laurel Kingdoms project, this piece is celebrating the Kingdom of Meridies, which was created in 1978 from the Kingdom of Atenveldt in the Southeast United States. Its borders currently encompass the entirety of Alabama; almost all of Georgia; a sizeable chunk of Tennessee; a bit of Florida; and small portion of Kentucky. Their colors are black and white.
This pattern is completed by simply turning all the cards forward, throwing the shuttle after each quarter-turn. When the threads become over-twisted or after a chosen number of repeats–often I switch after 12 or 16 repeats–turn all cards backwards, throwing the shuttle after each quarter-turn. Easy as that!
Now, there is the new technique that was found in a recent discovery of a rolled hem. I could type up all the directions and details, but all of that can be found at their web site here: https://www.vestagdermuseet.no/snartemo-ii-narrow-band.
I hope you’re all enjoying this series and learning a lot in your weaving escapades! Let me know if there are more patterns you want to learn!
The last few weeks have been a flurry of research for teaching a class at An Tir Collegium on A Brief Survey of Tablet Woven Bands, being an overview of extant tablet weaving pieces and patterns to reproduce them. It was a few weeks of preparation prior to the class, but I was able to put together a 50+ slide PowerPoint presentation. It had pieces from 500 BC Austria to 14th century Germany, and from countries all over Europe from Scandinavia to France. I arrived in the classroom a few minutes early, but spent several more struggling to get the computer to work properly. Once we made the magic of technology cooperate with me, I looked up and realized that the classroom was not just well-attended, but standing-room-only! I thought I’d have a small handful of students and it was more than 25. No worries. I’ll just panic a little. AAAAAHHHHHHH!
After we finally got the computer working, it went well! Most of the students were either novice or beginning weavers; only a couple were intermediate or advanced. The feedback I got was mostly excellent, which was very encouraging. I even was pulled aside by a couple of students later and told that they really enjoyed the class and that a few things that I mentioned were particularly helpful. 😀
A few days later, I sent a copy of the slide show to a prominent tablet weaver in Germany who gave me some really good feedback–just a couple of minor corrections and marking some images that I had missed–but she said, “It is one of the best summaries I’ve read.” That is high praise from such an esteemed source! (Giddiness ensued!)
My goal for teaching the class was to have as many pieces done in my own hand as possible. The more slides I added, the fewer examples I had…so I needed to get some work done. In preparation for this class, I made a few woven pieces to pass around. They are:
14th Century German piece. Original was brocade (of course), but this is a very close facsimile in a threaded-in version. This one was still on the loom, which was great for students to see all set up with all the cards needed for it…all 28 cards.
Dublin Dragons. Original was also brocaded. I think this is even prettier than the original. It’s great fun to weave, too!
Hallstat 3, Austria, 500 BCE. This was found in a salt mine with several other woven pieces. The colors were remarkably well preserved due to the salt. This one was fast and lovely to work, and I find it so remarkable how complex the pattern is, and this in 500 BCE…the technique was already very advanced at this time. In Mistress Madrun’s class, she mentioned how much our weaving skills have declined in the last few centuries compared to what it was back then.
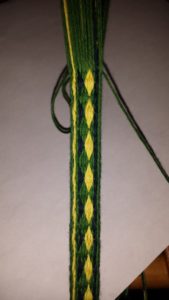
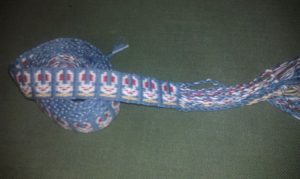
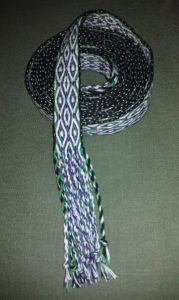
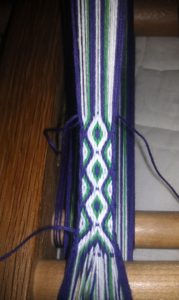
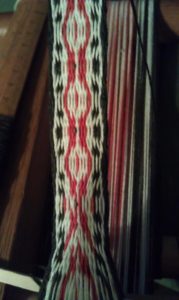
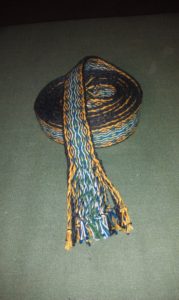
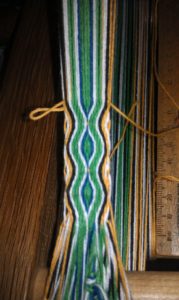
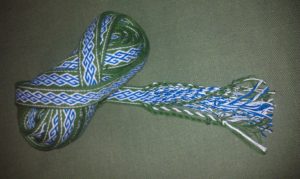
Right now I’m working on a piece that has a repeating motif from the Merovingian Queen Bathilde in Chelles, France (above). I’m not as impressed with this selection of colors (below), but I wanted to choose something from my badge/arms. I think the blue and green are too similar in tone, or maybe there is too much contrast with the green and white. I’m not entirely sure, but I have a taker for it when I finish the other 3 yards of it. It’s kind of slow going and the twist is building up on it rather quickly. This would work much better in a warp-weighted version, if I had something set up to work on.
I have a list of about 20 other pieces in a binder, ready to go, that I’m looking forward to making, and a few patterns that I plan to make more than one length of, in various colors.
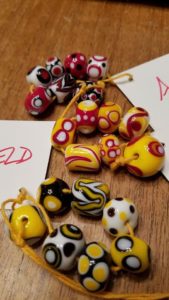
While I was getting ready to teach, I also had a commitment to make beads for the Lampworkers Guild. These are for Aethelmarc, Northshield and Avacal. Each grouping has one bead for An Tir’s sitting Queen and the others are gifts to the Queens of other Kingdoms, which I believe are sent to them at events in February and August.
I’ve been doing a bit more weaving lately. Risking repeating myself (although, duh, I can edit it later), here’s what I’ve done recently.
Back in February, I finished the green “bees feet” weave that I did in really fine thread. It took me about two years to finish all of it. What was I thinking? I dunno, but it turned out really great!
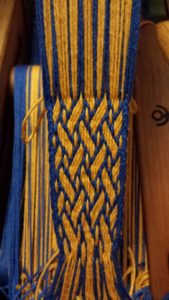
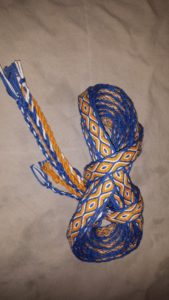
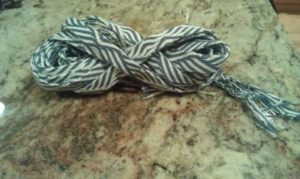
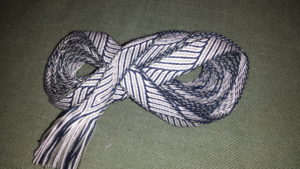
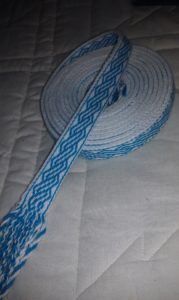
Then I warped up a couple pieces in blue and yellow in the Snartemo II pattern. This is the period skip-hole weave that goes together really fast and is beginner-level EASY! I really like this one.
After that, I did a woven piece for Baron Evrard in the Birka 22 pattern. I still need to get that to him. This one is a more advanced level piece that requires following a particular order of turning cards in opposite directions. It’s easy to get yourself turned around (get it…turned around?)
And I did another piece in WSU Cougar colorway…
Then I warped up a new piece (after I found my Applesies book again!), pattern #11. This is listed as “challenging”. This one has 50 steps to the repeat.
Fifty steps.
Fifty.
I’m not memorizing this ever.
The one thing I really need to do is make new kirtles for the camping season. I need someone to measure me because doing it yourself is difficult/nigh impossible.
OK…now we are at a current post. For the moment, I’m going to stop going back and adding posts that are 2-3 (or more) years old. So many of the photos are missing now that I don’t know what it was I was doing at the time when it says “Saxon weave” since I did a half dozen of them. So what I’m going to do is post pictures of stuff I’ve done without all the blah-blah-blah that went with it them, but just grouping them together into styles with a brief description. Now that I look at it, I did a lot of weaving in the last five years.
Skip hole weave
I really like this one. I believe that it’s period (I’ll have to find the documentation again). Super easy and looks great. It was a test piece so it’s only a couple yards.
Threaded in Weaves
This one I did as a commission in 2012. Unfortunately, she never picked it up and never paid me for it.
BUNNIES! I made this for the Shire of Shittimwoode to put in their prize box. This was from the Robin & Russ Handweavers’ book.
This pattern I think I found on the Loomy Bin.
Variation of the Loomy Bin pattern
From EQoS on Deviant Art
I love this pattern.
I’m not kidding.
Seriously.
I really love this pattern.
Really…really….
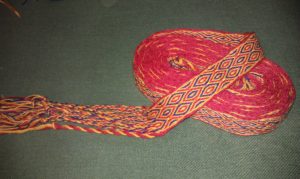
Gorgeous in RED!
I love it even more with really fine thread.
Simplified version
And another one…
And another…
Yet another version…
I think I made this one up. Meh.
Anchors Aweigh! This was for a high school buddy to be made into suspenders.
I drafted this “Tyr” pattern for Tyrssen of the Midrealm. He was a middle school friend who I discovered was also in the SCA. 😀
Super wide band for Molly McGurn! This was also my design, although to be honest, I kind of strung this up at random.
I think this one got donated to the Barony…An Tir and Aquaterra colors.
A better pattern of An Tir and AQ colors.
Another with An Tir colors only
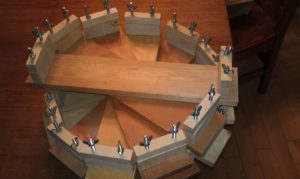
Prototype of a surfboard loom for teaching a class. Mostly worked.
So I made a whole stack of surfboards for the class!
Got some six-hole cards. Mostly didn’t work on the inkle loom. I bet they’d work fine on a backstrap or Osburg type loom with a much longer working space. I’ll have to try that sometime.
Egyptian Diagonals
This was assigned to me as a challenge by Master Fiacha. This is super ugly, but I learned how the colors moved with the cards.
This piece was what I worked on after a failed attempt at a Dragon Head weave. I gave up on the dragon heads and made more Egyptian Diagonals instead. I love the dark blue and silver-grey together.
Ram’s Horn Pattern
Not a period design, but very cool-looking and popular among the Historic Tablet Weaving folks!
Small test piece….just a bookmark.
Brocade Card Weaving
Didn’t like doing it. That’s as far as I got before I decided it wasn’t for me.
Saxon Weaves
This next group has a few documentable pieces and are all double-sided patterns. I want to get back to making more of these now that I have translated the GTT patterns onto a more easily-accessible Excel spreadsheet.
Saxon weave, 5-6th century, Cambridge.
Anglo-Saxon #8
Anglo Saxon 6a:
Anglo-Saxon 6d
Tried using fishing spinners….with little success.
Snartemo weave
6th century Norwegian and really easy to make. 25 turns forward, 25 turns back.
Birka weaves
Birka 6
Applesies & Fox Noses
Still working on this one. It’s also made of really fine thread and I’ve been working on it for about a year.
The end of January is nigh upon us and I have several things to show…at least in beads and a bit of weaving.
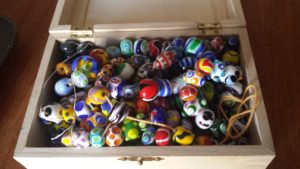
First, there’s me…I set up a table at Ursulmas where I made beads for the weekend. While there was a demo display booth contest, there were significant limitations as to what I could do given that I was going to be actively demonstrating beadmaking. Where the booth was located (unknown prior to set-up)? What I can display that isn’t flammable? Is there a banner and how do I hang it? I can’t bring a tent or pop-up with a roof, so what can I bring for ambiance? So many questions. I brought the color copies of Callmer’s beads and brought all the old beads I could find that I store in a small treasure box. Unfortunately, there’s a lot of old & ugly beads from my first months of bead making; I had strung them on dental floss and hung them over the treasure chest on the table. I need to pull those aside and keep them somewhere else…like decorating the garden or something. Some of my later beads were loose in the box, and the newest ones were strung on mandrels on the table.
I was told there was a banner for the Kingdom Lampworkers Guild, and it would be delivered Saturday morning. I found the current banner design posted on the Lampworker’s web site; the banner was made for a previous event, but the design was not fully vetted by the Heralds, so it is currently an unofficial banner (not passable, apparently). Since the Lampworker’s Guild does not have a device registered with the College of Heralds, I had some discussions with a couple of them at the event to come up with a new passable design.
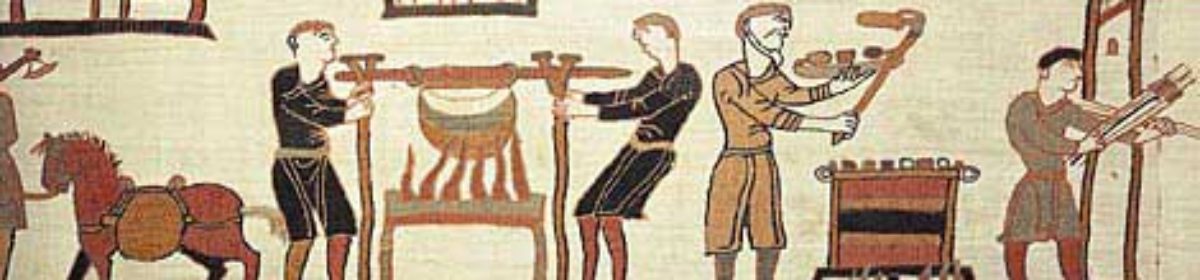
In any case, the banner might not be understood by the public, so just to make it clear to passers-by, I made a lettered banner that simply reads: “Lampworkers Guild” in a font called King Harold, matching the lettering from the Bayeux Tapestry. I hung it using the packaging tape I had with me on the exposed pipes in the frigid hall. It ended up being the only banner, as the Lampworker’s banner ended up not arriving after all.
Although I didn’t mean to be the exclusive lampworker working the booth, I was the only one there for more than half of the weekend; Aenor joined me for a while on Sunday, making a few beads in the frigid hall. It was so cold on Sunday that the bead release was not drying and we walked around with our plastic buckets of vermiculite looking for a heat source. The portable heaters outside were turned off to save fuel; they said they were only heating the building at night (which didn’t make any sense–no one was in the building at night). I dipped the mandrils and more than 90 minutes later, the bead release was still wet. If you heat them using the flame, the stuff dries too quickly and either cracks or explodes off the mandril.
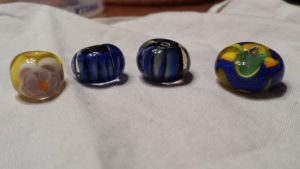
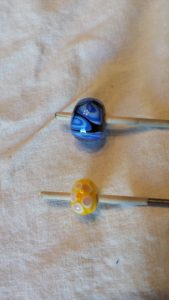
Because I had more than 16 hours of uninterrupted time to make beads, I was able to finish almost 40 beads over the weekend, using just under two tanks of propane–I was able to make several more after returning home. I finished all the beads I needed for the Kingdom gifts to Caid and Glen Abhann–they’re not due until July Coronation, so I got the Gold Star from the Guild head. 🙂 There are more than I need here, so I will send on the best 20 of each colorway.
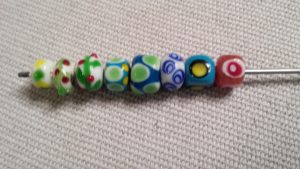
Here are a few that I made over the weekend, in addition to the Caid and Glen Abhann beads…I also made a few as part of a commission for Jadwiga. She chose six others that I failed to photograph before she came to pick them up.
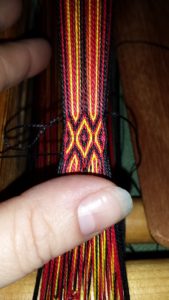
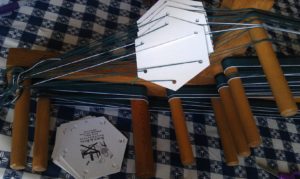
I am also doing a little card weaving. I finished the weaving for Tyrssen of Middle Kingdom and warped up a new one on the loom.
I brought the loom with me to the event, but didn’t do any during the weekend. The booth next to mine was occupied by Demo Winners, Emma and Nigel, who covered their table with weaving and leatherworking items. I placed my loom on the edge of the table, next to hers, to add to her display. This one is strung up with Perle cotton, using just over four balls of strings–one yellow, one black, and two red–in #8 floss. I had quite a time finding extra red floss, and ended up having to replace it with a readily-available color. Red 666 was available during the holidays, apparently, but not later, but everyone was carrying Red 321. I had to un-warp six cards, and I’ll use those threads in a later project, I suppose. While this is more expensive than using the cotton warp, the cost of materials is still under $20, it comes out lovely and shiny, and the cards turn smoothly. I have a couple other projects in mind that I might try, using these threads as a substitute for silk.
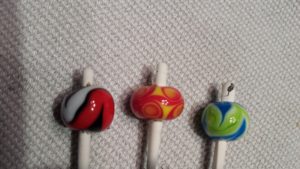
I’ve made quite a few beads! Some are really nice!
And some are pretty ugly…they are rather experimental, so don’t abuse the artist too much. I was trying to make some Islamic Folded Beads, but found that they are tediously long to build and don’t always turn out right. In other words, my skill level is not yet up to that standard.
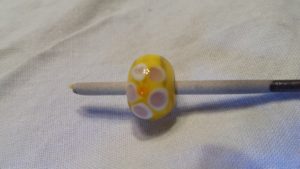
I started another technique that involves using a pointy tool, much like a dental scraper, but thicker and stronger. I made the core of the bead then added stripes and dragged the tool over the surface of the glass, deforming the stripes, which looked very much like the folded beads, and took a fraction of the time. Many of these turned out pretty cool, but others didn’t do as well…a bit lumpy and coarse. One had a fatal flaw that caused…well…
…sudden bead death. I didn’t get this one into the vermiculite fast enough, so it cooled down too quickly, causing stress fractures. I could glue it back together, but there’s no telling if other fractures might appear later.
The perle cotton tablet weaving is coming along. I have about a yard done so far on this particular piece. The threads are pretty fine (#8 DMC perle cotton, found at any fabric or craft store) and slick, which makes the cards turn so smoothly…like buttah! The cost of materials is a bit higher, but not astronomically high. We’re talking about $12-15 spent for this project so far…maybe more if I need to use another $3 skein of thread for weft…instead of $5 for an entire project. Yeah, it’s about triple or quadruple, but still cheap for what it is.
My plans in the not-too-distant-future (say, summer) is to build something like this:
It goes with my sheep-to-shawl plan. You know…take the fleece from the sheep and turn it into a wearable garment.
1. Make loom.
2. Spin fibers.
3. Weave into cloth.
4. Full cloth.
5. Make something from cloth, like a 10th century Danish apron dress.
If I can finish all that by next January, I can enter things into Kingdom Arts & Sciences. I was told (by a supportive Laurel friend) to enter three things: loom, woven stuff and beads. I think I can do it…but I’m going to have to do some serious work over the summer.
This goes well with the advise I received from *another* Laurel friend, who said to stay within a particular scope of time/culture when you enter Kingdom-level contests. In her experience, being “all over the map” doesn’t show as well as being a bit more focused.
I’m thinking I should build a prototype of the loom first; try to build it out of really cheap materials, like 2″ x 4″ and 1″ x 2″, then make a more ‘natural’ product out of cut trees. I can’t even imagine what I’d need to do to cull trees from the neighborhood or out in the wilderness somewhere. Maybe someone in the SCA has a piece of property they’re willing to let me cut a tree from. First things first…build the prototype.
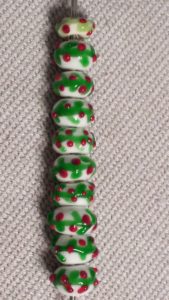
I’ve made a bunch of beads lately. This set of 10 (11) were made for my dear friend, Heide, who wanted to make bracelets for her sister and mom. Heide grew up on a cranberry farm near Aberdeen, so when she saw the first bead I made, she said “CRANBERRIES!” and commissioned 10. I was happy to make them for her and threw in the 11th bead free! OK, technically it was the first bead, and it wasn’t the prettiest, but she loves them anyway.
Then I was messing around with different colors and techniques, tools, and trying out some stuff with clear glass. I don’t particularly care for working with the clear stuff–it seems to need a lot more heat and takes longer to melt, but it can create some really cool effects.
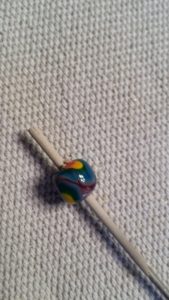
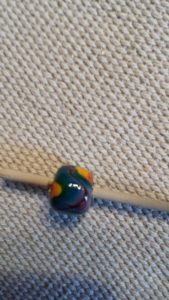
This one I call the Diversity Bead. 🙂
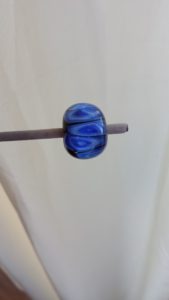
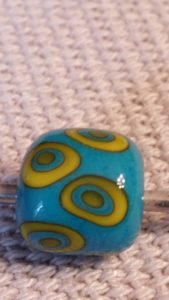
I love the chemical reaction I had with these two colors–I need to get more turquoise.
I finally got the weave done–it’s so lovely! I don’t know what I’m going to do with it…although I think it’ll end up on an apron dress.
Since the loom was now free…I warped up some yarn on the inkle loom to make the band for Frigga the Loom. I’m thinking I need to get it on the rail and start attempting to weave. I need to figure out where to set it up in the house–probably the front room, but I need to rearrange some furniture first.
I’ve been watching a card weaving Facebook page and several people have asked about how to do the Ram’s Horn pattern. It’s not a beginner’s pattern, for sure, but with an understanding of how the cards are set up and turning patterns of the cards, you, too, should be able to produce a lovely woven Ram’s Horn band. Sounds easy enough, right? Don’t worry–go step by step, and you’ll have this one by the horns!
Now, it should be noted, for those who are big into the recreationist groups like the SCA, this is not a period piece. Historically, the only mention I can find is from a web site that reads: “The Ram’s Horns pattern popularlized by Crockett’s “Card Weaving” book comes from the 20th century Anatolian (Turkish) belts and it has not equivalent in archeological finds.” http://weavedmagic.deviantart.com/journal/Origins-of-most-popular-tablet-weaving-patterns-394709084
So let’s get to the full color demonstration of this pattern! READY?
If you’re not sure if you’re going to like it, or if you suspect you might get frustrated from trying and pitch it across the room, you may want to try a short piece first. Don’t warp up the loomzilla for this first project. When I first tried this pattern, I did one-yard lengths for each thread, just to test it out. I ended up getting about a foot done before I knew I needed to do a larger piece!
Supplies needed:
3 colors of carpet warp or crochet cotton thread–I used Maysville 8/4 Carpet Warp. It’s good stuff, heavy duty and will make great belts, bag straps, and heavy trim (it’s not delicate and as flexible as finer threads, but a great place to start).
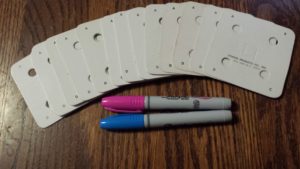
22 cards–mine are the store-bought 3″ cards with ABCD labeled in clockwise order. (European cards are labeled in reverse)
1 loom–I use an inkle loom that weaves up to 4 yards of trim, which makes it portable and if I need to run to grab the phone or pick up the kids, I can set it down and walk away. Can’t do that with backstrap weaving.
When choosing the thread, you will need a light color, a medium color, and a dark color. High contrast is important in this pattern!
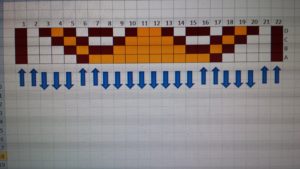
You will warp it up with the #1 card on the left; #22 card on the right, reading the pattern just like reading a book. The next thing to note is that, for this pattern, you should have the top surface of the cards facing *left*. If you have the cards facing right, the pattern will show up on the bottom side of the weaving. Also, and the pattern (above) has the rows lettered backwards–D, C, B, A. (If they were lettered A, B, C, D, you would have to face your cards to the right–good tip to note for when you find future patterns!)
Ominous music sounds!
This is the pattern for the dreaded Ram’s Horn pattern. Some people dread it, but it’s really not that bad! I love this pattern and I’ve made a few pieces with this pattern and while it’s not from the Medieval period (for those SCA recreationists out there), it sure looks great and the technique of turning the cards is all the same from ancient times.
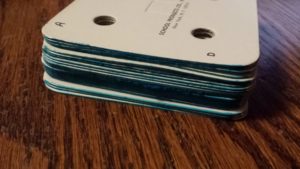
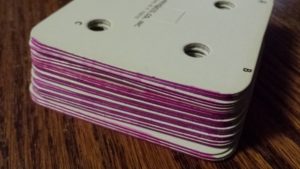
First, a note. I mark my cards. In this set, I’ve colored the AD side blue, and the BC side pink. This is the way I can tell when I’m back in the home position.
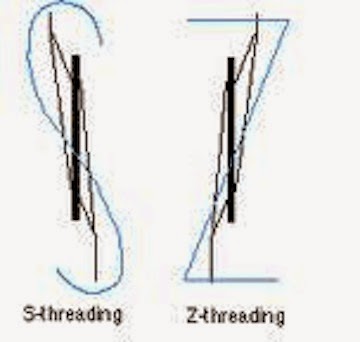
Just a refresher: Each column in the pattern is marked with S or Z. Some patterns will be marked with \ for S or / for Z, but since this font doesn’t have a significant slant, it can look a bit more confusing, so I’ve used the letters instead. Many new weavers get confused about how to do S and Z threading. This is one of the best diagrams I’ve found to remind yourself how the threads go through the cards.
You’re looking at each card from its side–the S threading has the yarn coming through the front of the card towards you; the Z threading has the yarn coming through the back of the card towards you.
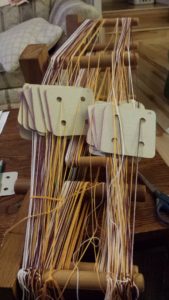
Now you’ve got the pattern, the threads, the cards, and a refresher on S and Z threading. Go ahead and thread up your loom…I’ll wait. (I often put in a movie that I’ve seen a dozen times so I have something to listen to while I work.)
Hot mess….
[dooo-do-dooooo…deee-daaah-dee….]
OK. Now your loom is threaded and you have a shuttle loaded (I recommend using the same color as the thread on the border–in this case, a dark red–to make it blend in, but some people like to make it stand out as an added pattern on the edge. Your choice!) Ready to start?
The pattern alternates between the cards moving together, as a pack, for four quarter-turns, and then some of the cards turning in opposite directions for four quarter-turns.
There’s no place like home!
To begin the pattern, turn all the cards so it has A & D at the top (the blue side), like the image above. This is the “home” position. Throw your shuttle and turn the cards one quarter-turn away from you (forward). Do this for four quarter-turns away from you, then for four quarter-turns toward you (back), throwing the shuttle after each quarter-turn, just to anchor everything together and adjust your tension.
Visual cues in sorting cards–the ones nearest you will turn toward you; the ones further away will turn away from you.
Then you can start splitting the deck! The cards now will turn in groups in opposite directions for four quarter-turns. First separate the cards into groups. Slide the cards 1 & 2 toward you, 3-5 away from you, 6 & 7 toward, 8-15 away, 16-17 toward, 18-20 away, 21-22 toward. See the picture above? That’s how it should look.
This might help give you a visual…
Now the cards will turn in the direction that they have been placed. The cards closest to you will turn towards you (BACK); the ones further away will turn away (FORWARD). Turn all cards a quarter-turn and throw the shuttle. Turn another quarter-turn and all the cards will have the red side facing up. Make two more quarter-turns, throwing the shuttle between, until the cards are back to the home position again.
Once at the home position, all the cards will turn together for four quarter-turns. Since the first two cards were turning back in the last round, *all* the cards will turn back in this round. Turn back for four quarter-turns, throwing the shuttle between each quarter-turn.
Then, split the deck again, same as before. Repeat and you will see the ram’s horns appear! Yes, you will see a dimple after each repeat. Don’t panic! When you switch directions in turning the cards, a tiny hole can appear in the middle and the weft shows through. If you don’t want the dimple, you can change your weft thread to match the middle, but then it’ll show on the border, unless you also change the border color to match.
So, in brief, here’s the turning directions:
1. Turn all the cards four quarter-turns BACK, throwing the shuttle between each quarter turn. End in the home position.
2. Slide cards 1-2 back, 3-5 forward, 6-7 back, 8-15 forward, 16-17 back, 18-20 forward, 21-22 back. Turn cards 1/4 turn in opposite directions (forward cards forward; backward cards back). End in home position.
Repeat steps one and two to your heart’s content!
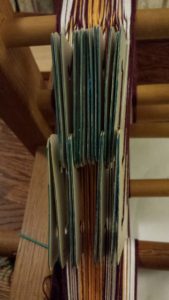
Some strings, like people, are more twisted than others.
The observant weaver will note that since some of the threads are always turning back and the rest turn forward four and backward four, that some of the threads are going to build up a great twist in it. This will shorten the warp length for those threads, but not the rest, causing tension issues.
Some people have tried (with varying success) to use fishing spinners that will untwist the threads as you go. This is great if you’re doing backstrap weaving or have a long span that your warp is spread out, but I use this inkle loom and the twist builds up between the cards and the first or second peg and stops there. You *can* move the twist down the entire length, around each of the pegs to get the spinners to untwist, but it’s time-consuming and can be frustrating.
The other thing you can do is carefully untie the threads that are twisted, untwist them, and re-tie…this is also time-consuming and can be frustrating. I’ve done it…a couple times.
But the other option that works well with this pattern is to simply change directions to untwist every few repeats. You could do every couple of horns, six horns, eight horns…whatever you desire. The question is, at what point in the pattern do you change directions?
In this pattern you were repeating steps 1 and 2, now you have to take steps 3 and 4 to go the opposite direction!
3. Slide cards 1-2 forward, 3-5 back, 6-7 forward, 8-15 back, 16-17 forward, 18-20 back, 21-22 forward. Turn cards 1/4 turn in opposite directions (forward cards forward; backward cards back). End in home position.
4. Turn all cards for four quarter-turns forward. End in home position.
You will repeat this pair of steps until the twist builds up in the opposite direction. Then you’ll change directions again, finishing step 4, then going back to step 1 and 2.
Now you can weave your Ram’s Horns and show your Advanced Card Weaving skills to all your friends!
Good luck!
Elewys of Finchingefeld, GdS, JdL
Barony of Aquaterra, Kingdom of An Tir
Frustrated with spools of thread bouncing all over the place or having to keep the spools in bowls that inevitably tip over, I decided to make myself a cheap Lazy Kate. At first, I looked at the scrap lumber I had sitting around and wondered if I could find a drill bit, and where I would find the nails, and setting up the table saw to cut things….and then decided to make it a bit simpler.
Here’s what I did…
Found a box in the garage from our most recent shipment of medical supplies. We get a few of these every month, so there’s no shortage here, in a variety of sizes and shapes. I picked a smallish one.
I found a 1/2″ dowel in the wood shop, just the right size to fit through the center of the spools of carpet warp.
Poked a hole about 2 inches down from the top edge of the box large enough to fit the dowel in.
Threaded the dowel through and eyeballed it so it was relatively straight and level, and pressed down on the cardboard on the opposite side of the box.
Used the scissors to make the hole on the other side, and threaded the dowel through.
Mounted the spools onto the rod, which greatly increased the speed at which I could warp my loom!


 Variation of the Loomy Bin pattern
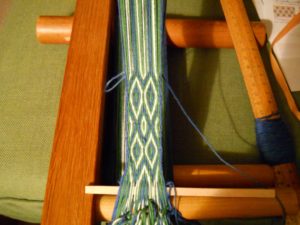 From EQoS on Deviant Art
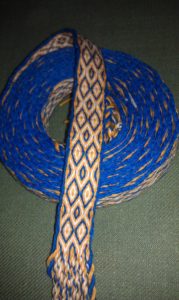

 Gorgeous in RED!
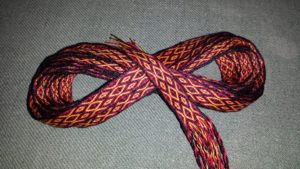

 I think I made this one up. Meh.
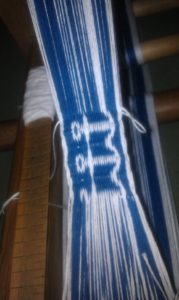
 A better pattern of An Tir and AQ colors.
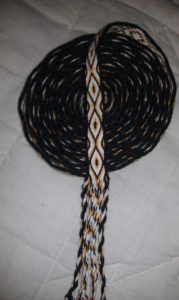 Another with An Tir colors only
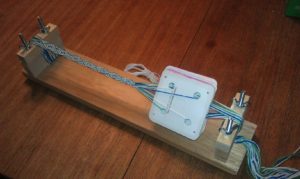
 Small test piece….just a bookmark.

 Anglo-Saxon 6d