My creative SCA journey on stuff I make and research I do…mostly in fibers (wool prep, spinning, weaving, tablet weaving) and glass beads, but could also include costumes, camping, cooking, and any other creative things that strike my fancy.
The last few weeks have been a flurry of research for teaching a class at An Tir Collegium on A Brief Survey of Tablet Woven Bands, being an overview of extant tablet weaving pieces and patterns to reproduce them. It was a few weeks of preparation prior to the class, but I was able to put together a 50+ slide PowerPoint presentation. It had pieces from 500 BC Austria to 14th century Germany, and from countries all over Europe from Scandinavia to France. I arrived in the classroom a few minutes early, but spent several more struggling to get the computer to work properly. Once we made the magic of technology cooperate with me, I looked up and realized that the classroom was not just well-attended, but standing-room-only! I thought I’d have a small handful of students and it was more than 25. No worries. I’ll just panic a little. AAAAAHHHHHHH!
After we finally got the computer working, it went well! Most of the students were either novice or beginning weavers; only a couple were intermediate or advanced. The feedback I got was mostly excellent, which was very encouraging. I even was pulled aside by a couple of students later and told that they really enjoyed the class and that a few things that I mentioned were particularly helpful. 😀
A few days later, I sent a copy of the slide show to a prominent tablet weaver in Germany who gave me some really good feedback–just a couple of minor corrections and marking some images that I had missed–but she said, “It is one of the best summaries I’ve read.” That is high praise from such an esteemed source! (Giddiness ensued!)
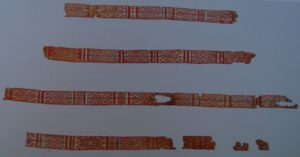
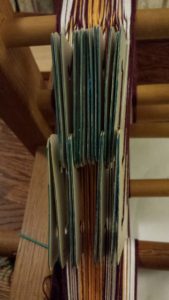
My goal for teaching the class was to have as many pieces done in my own hand as possible. The more slides I added, the fewer examples I had…so I needed to get some work done. In preparation for this class, I made a few woven pieces to pass around. They are:
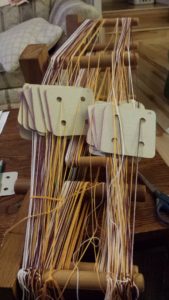
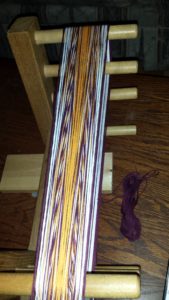
14th Century German piece. Original was brocade (of course), but this is a very close facsimile in a threaded-in version. This one was still on the loom, which was great for students to see all set up with all the cards needed for it…all 28 cards.
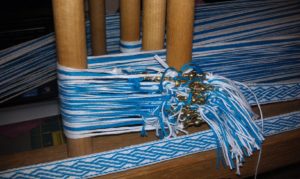
Dublin Dragons. Original was also brocaded. I think this is even prettier than the original. It’s great fun to weave, too!
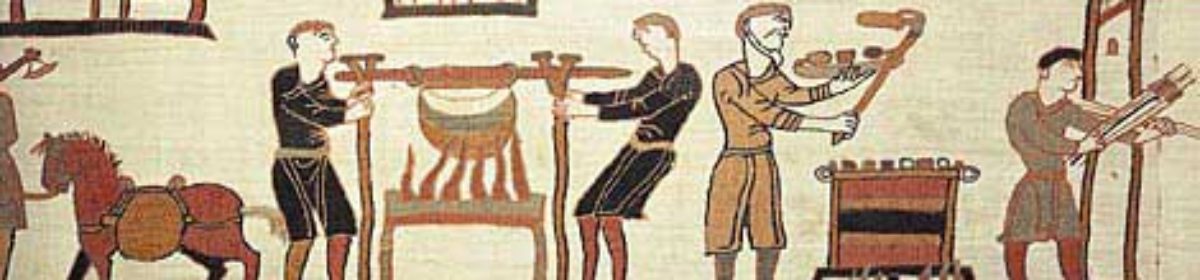
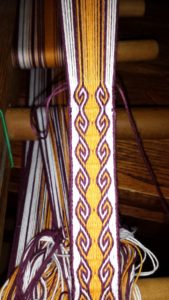
Hallstat 3, Austria, 500 BCE. This was found in a salt mine with several other woven pieces. The colors were remarkably well preserved due to the salt. This one was fast and lovely to work, and I find it so remarkable how complex the pattern is, and this in 500 BCE…the technique was already very advanced at this time. In Mistress Madrun’s class, she mentioned how much our weaving skills have declined in the last few centuries compared to what it was back then.
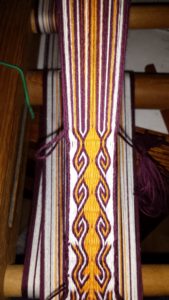
Right now I’m working on a piece that has a repeating motif from the Merovingian Queen Bathilde in Chelles, France (above). I’m not as impressed with this selection of colors (below), but I wanted to choose something from my badge/arms. I think the blue and green are too similar in tone, or maybe there is too much contrast with the green and white. I’m not entirely sure, but I have a taker for it when I finish the other 3 yards of it. It’s kind of slow going and the twist is building up on it rather quickly. This would work much better in a warp-weighted version, if I had something set up to work on.
I have a list of about 20 other pieces in a binder, ready to go, that I’m looking forward to making, and a few patterns that I plan to make more than one length of, in various colors.
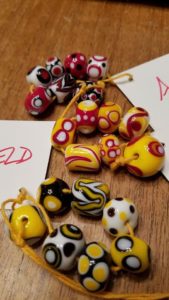
While I was getting ready to teach, I also had a commitment to make beads for the Lampworkers Guild. These are for Aethelmarc, Northshield and Avacal. Each grouping has one bead for An Tir’s sitting Queen and the others are gifts to the Queens of other Kingdoms, which I believe are sent to them at events in February and August.
A few weeks ago, I was greatly anticipating entering Kingdom Arts & Sciences in 2015 with my warp-weighted loom–something I had never seen anyone work with in An Tir. After the Kingdom event was over, I started eagerly looking at some of the entries that starting appearing on Facebook. I was a little discouraged to see an entry this year that included…yes, a warp-weighted loom. My first reaction was “dang it! I wanted to be first!” Then it was, “Now it’s going to look like I’m copying.” It was, admittedly, a little disheartening, but still left room for my own interpretation. The loom she used was for card weaving, not for fabric. I had a nice chat with my Foster Laurel (whose identity shall remain a mystery for now)…she has been a great sounding board when I have questions or get discouraged on my Artisan Journey (let’s not say Laurel Track…who the hell knows where this journey will end?). I relied on her greatly when I had a personal issue with another member, when I had frustrations with a judging panel, and yesterday, when I was stung by the surprise of someone else doing stuff with the loom that I thought only I was doing.
After she talked me down off the ledge, and I had a night to sleep on it, I realized that my journey and her journey may cross paths, but we are on different journeys. Hers was to do card weaving on a warp-weighted loom; and mine is to make a sheep to shawl project. I even have the wool!
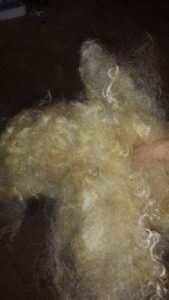
Many thanks to HL Godith of Goosefoot Mead for providing this bag of goodness! This award-winning fleece needs to be washed, carded and spun and will — hopefully — be a finished garment someday.
This is from a sheep named Sprite from the sheering in 2006. She’s been holding onto several fleeces for all these years and was happy to give it a new home for this endeavor. Thanks, Godith!!
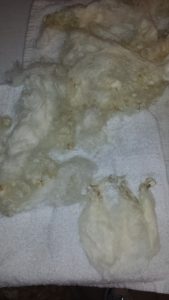
Sprite was a Romney-Border Leicester cross and she grew some really nice long-staple locks. When cleaned, it’s just lovely, isn’t it?
However, before it got to this lovely, white color, the fibers had to be cleaned. This is the gross part. It’s full of burrs, grass, hay, and…yes…poop. Mostly the poop is just on the edges of the fleece–the belly and bum–but the rest of the fleece is oily and dirty. The oil is lanolin, which is the stuff they put into lotions and things, so working with this stuff will certainly keep your hands soft!
There are a few different techniques for washing fleece. Some say use screaming-hot water (140-160 degrees F) and lots of soap (a cup of dish soap per fleece). Others say lukewarm water and a couple ounces of soap are just fine. I tried a few different techniques to see what worked best with this fleece.
The thing to avoid is turning your fleece into felt. To make felt from wool you need three things: water, heat, and agitation. Swooshing the fibers around in screaming-hot water is the recipe for woolly disaster. Some fleeces will felt as soon as you grab the kettle…others will withstand all kinds of abuse without felting. The trick is to figure out what you can do without turning your lovely fleece into a nasty mess.
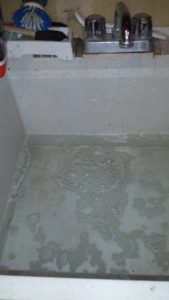
So first you run some water into your wash basin (sink, bucket, pot…whatever you want to use) and put some soap into the water. You put the soap in after the water is run–you don’t want suds, you just want the soap in the water, and gently swish it around. Take a couple handfuls of the dirty fiber–you only want to wash a few ounces at a time–and pull the visible grass, burrs and poo from the fiber.
Place the fiber into the water, and press down gently. Don’t stir or agitate–just make sure it all gets wet. Wait 10 minutes while the oils and dirt come off the hair. Yeah, the water will look gross. It will be an amazing change from the yellow stuff you put in to what you pull out, even after the first soak.
Carefully pull the fiber out and let the water drain out of the wool. Pull the plug on the sink, and refill with water–same temperature as before. If you put hot wool into cold water or vice versa, the temperature change can cause it to felt. Poof! Ruined wool. Add more soap, repeat process.
You can repeat the process a couple more times, washing and rinsing the hairs, pulling any grass or seeds you find as you go. I pinched or rubbed some of the tips to get some of the gross color out of the hairs, but it didn’t all come out (the darkest bits in the lower right of this picture went back into the bath for a bit more washing). When you’re satisfied, lay it out on towels or a sheet to air dry in the shade.
Once dry, you can comb out the fibers to get it ready for spinning. I don’t have wool carders, which start at $50 and go up from there. I opted, instead, to buy a small $7 cat/dog brush to use to comb out the fibers…see how that works. So far it seems to be going OK!
So now I have a pile of fluffy white stuff, ready to spin!
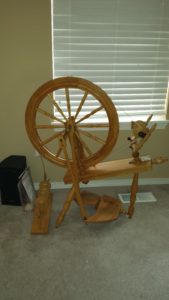
Heide has entrusted me with her amazing spinning wheel, which I will hopefully be able to figure out how to use. I got a very quick tutorial last weekend and hoped enough of it stuck to be able to make some fluffy stuff into string.
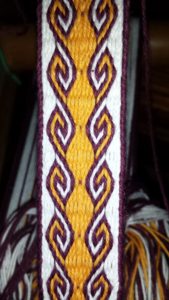
I’ve been watching a card weaving Facebook page and several people have asked about how to do the Ram’s Horn pattern. It’s not a beginner’s pattern, for sure, but with an understanding of how the cards are set up and turning patterns of the cards, you, too, should be able to produce a lovely woven Ram’s Horn band. Sounds easy enough, right? Don’t worry–go step by step, and you’ll have this one by the horns!
Now, it should be noted, for those who are big into the recreationist groups like the SCA, this is not a period piece. Historically, the only mention I can find is from a web site that reads: “The Ram’s Horns pattern popularlized by Crockett’s “Card Weaving” book comes from the 20th century Anatolian (Turkish) belts and it has not equivalent in archeological finds.” http://weavedmagic.deviantart.com/journal/Origins-of-most-popular-tablet-weaving-patterns-394709084
So let’s get to the full color demonstration of this pattern! READY?
If you’re not sure if you’re going to like it, or if you suspect you might get frustrated from trying and pitch it across the room, you may want to try a short piece first. Don’t warp up the loomzilla for this first project. When I first tried this pattern, I did one-yard lengths for each thread, just to test it out. I ended up getting about a foot done before I knew I needed to do a larger piece!
Supplies needed:
3 colors of carpet warp or crochet cotton thread–I used Maysville 8/4 Carpet Warp. It’s good stuff, heavy duty and will make great belts, bag straps, and heavy trim (it’s not delicate and as flexible as finer threads, but a great place to start).
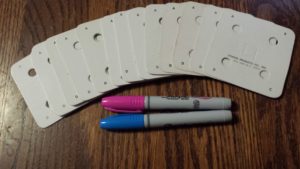
22 cards–mine are the store-bought 3″ cards with ABCD labeled in clockwise order. (European cards are labeled in reverse)
1 loom–I use an inkle loom that weaves up to 4 yards of trim, which makes it portable and if I need to run to grab the phone or pick up the kids, I can set it down and walk away. Can’t do that with backstrap weaving.
When choosing the thread, you will need a light color, a medium color, and a dark color. High contrast is important in this pattern!
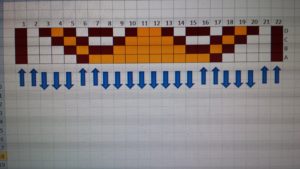
You will warp it up with the #1 card on the left; #22 card on the right, reading the pattern just like reading a book. The next thing to note is that, for this pattern, you should have the top surface of the cards facing *left*. If you have the cards facing right, the pattern will show up on the bottom side of the weaving. Also, and the pattern (above) has the rows lettered backwards–D, C, B, A. (If they were lettered A, B, C, D, you would have to face your cards to the right–good tip to note for when you find future patterns!)
Ominous music sounds!
This is the pattern for the dreaded Ram’s Horn pattern. Some people dread it, but it’s really not that bad! I love this pattern and I’ve made a few pieces with this pattern and while it’s not from the Medieval period (for those SCA recreationists out there), it sure looks great and the technique of turning the cards is all the same from ancient times.
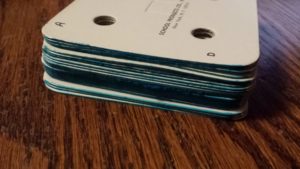
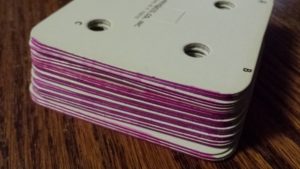
First, a note. I mark my cards. In this set, I’ve colored the AD side blue, and the BC side pink. This is the way I can tell when I’m back in the home position.
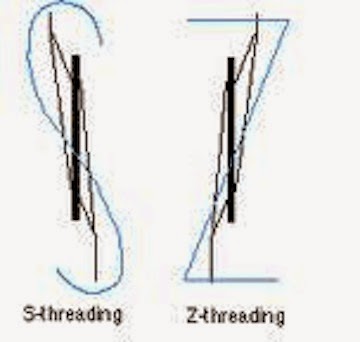
Just a refresher: Each column in the pattern is marked with S or Z. Some patterns will be marked with \ for S or / for Z, but since this font doesn’t have a significant slant, it can look a bit more confusing, so I’ve used the letters instead. Many new weavers get confused about how to do S and Z threading. This is one of the best diagrams I’ve found to remind yourself how the threads go through the cards.
You’re looking at each card from its side–the S threading has the yarn coming through the front of the card towards you; the Z threading has the yarn coming through the back of the card towards you.
Now you’ve got the pattern, the threads, the cards, and a refresher on S and Z threading. Go ahead and thread up your loom…I’ll wait. (I often put in a movie that I’ve seen a dozen times so I have something to listen to while I work.)
Hot mess….
[dooo-do-dooooo…deee-daaah-dee….]
OK. Now your loom is threaded and you have a shuttle loaded (I recommend using the same color as the thread on the border–in this case, a dark red–to make it blend in, but some people like to make it stand out as an added pattern on the edge. Your choice!) Ready to start?
The pattern alternates between the cards moving together, as a pack, for four quarter-turns, and then some of the cards turning in opposite directions for four quarter-turns.
There’s no place like home!
To begin the pattern, turn all the cards so it has A & D at the top (the blue side), like the image above. This is the “home” position. Throw your shuttle and turn the cards one quarter-turn away from you (forward). Do this for four quarter-turns away from you, then for four quarter-turns toward you (back), throwing the shuttle after each quarter-turn, just to anchor everything together and adjust your tension.
Visual cues in sorting cards–the ones nearest you will turn toward you; the ones further away will turn away from you.
Then you can start splitting the deck! The cards now will turn in groups in opposite directions for four quarter-turns. First separate the cards into groups. Slide the cards 1 & 2 toward you, 3-5 away from you, 6 & 7 toward, 8-15 away, 16-17 toward, 18-20 away, 21-22 toward. See the picture above? That’s how it should look.
This might help give you a visual…
Now the cards will turn in the direction that they have been placed. The cards closest to you will turn towards you (BACK); the ones further away will turn away (FORWARD). Turn all cards a quarter-turn and throw the shuttle. Turn another quarter-turn and all the cards will have the red side facing up. Make two more quarter-turns, throwing the shuttle between, until the cards are back to the home position again.
Once at the home position, all the cards will turn together for four quarter-turns. Since the first two cards were turning back in the last round, *all* the cards will turn back in this round. Turn back for four quarter-turns, throwing the shuttle between each quarter-turn.
Then, split the deck again, same as before. Repeat and you will see the ram’s horns appear! Yes, you will see a dimple after each repeat. Don’t panic! When you switch directions in turning the cards, a tiny hole can appear in the middle and the weft shows through. If you don’t want the dimple, you can change your weft thread to match the middle, but then it’ll show on the border, unless you also change the border color to match.
So, in brief, here’s the turning directions:
1. Turn all the cards four quarter-turns BACK, throwing the shuttle between each quarter turn. End in the home position.
2. Slide cards 1-2 back, 3-5 forward, 6-7 back, 8-15 forward, 16-17 back, 18-20 forward, 21-22 back. Turn cards 1/4 turn in opposite directions (forward cards forward; backward cards back). End in home position.
Repeat steps one and two to your heart’s content!
Some strings, like people, are more twisted than others.
The observant weaver will note that since some of the threads are always turning back and the rest turn forward four and backward four, that some of the threads are going to build up a great twist in it. This will shorten the warp length for those threads, but not the rest, causing tension issues.
Some people have tried (with varying success) to use fishing spinners that will untwist the threads as you go. This is great if you’re doing backstrap weaving or have a long span that your warp is spread out, but I use this inkle loom and the twist builds up between the cards and the first or second peg and stops there. You *can* move the twist down the entire length, around each of the pegs to get the spinners to untwist, but it’s time-consuming and can be frustrating.
The other thing you can do is carefully untie the threads that are twisted, untwist them, and re-tie…this is also time-consuming and can be frustrating. I’ve done it…a couple times.
But the other option that works well with this pattern is to simply change directions to untwist every few repeats. You could do every couple of horns, six horns, eight horns…whatever you desire. The question is, at what point in the pattern do you change directions?
In this pattern you were repeating steps 1 and 2, now you have to take steps 3 and 4 to go the opposite direction!
3. Slide cards 1-2 forward, 3-5 back, 6-7 forward, 8-15 back, 16-17 forward, 18-20 back, 21-22 forward. Turn cards 1/4 turn in opposite directions (forward cards forward; backward cards back). End in home position.
4. Turn all cards for four quarter-turns forward. End in home position.
You will repeat this pair of steps until the twist builds up in the opposite direction. Then you’ll change directions again, finishing step 4, then going back to step 1 and 2.
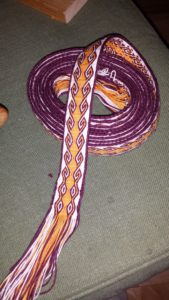
Now you can weave your Ram’s Horns and show your Advanced Card Weaving skills to all your friends!
Good luck!
Elewys of Finchingefeld, GdS, JdL
Barony of Aquaterra, Kingdom of An Tir
The final camping event of the season has come and gone (for me, anyway), and now am taking some time to reflect on some of the happenings and thinking about how to prepare better for next year. I’ve been camping for 25+ years, usually just cooking for myself or sharing a kitchen with my small family or a couple friends. However, my household and the group I usually camp with is growing with the addition of new friends (and a couple kids), so like many growing households, we need to take notes on how things should be done while cooking for larger groups…or not.
Earlier this tourney season, I had a *Very Bad Experience* with a shared kitchen. I was very happy to receive an offer to buy into a kitchen, which would require my help with cooking and cleaning, but greatly reduce the amount of things I needed to pack and prepare. This seemed like a great alternative to hours of set up and cooking all my own meals. However, at this event there are many things that went wrong–so comically wrong–that has made me wary of buying into a camp kitchen ever again. While I’d love to share the whole grizzly tale with you, I do not find that it would benefit anyone by naming names (or dates or locations). However, it does lend to beginning a list of parameters and tips for running a successful kitchen so we can all avoid these problems in the future. You can parse some of the errors of the *Very Bad Experience* from the points I make forthwith.
These methods and tips can be helpful for running any size kitchen, whether it’s two people sharing food, or a sizable household, or even a kitchen serving the Royals and all of their Retinue. It’s all a matter of scale.
To begin, there are at least four different groups involved in any kitchen that we’re talking about here. The manager of the kitchen for the duration of the event, I’ll call the Lead. Under the Lead are Head Chefs (could be one, if it’s a small kitchen or if there is only one person who is an adequate cook, or perhaps a few of them taking charge of various meals, which can be especially helpful for large kitchens). These people will be the ones in charge of preparing each meal. Anyone actively working in the kitchen is the Crew. And there are those who buy into the plan, who may or may not be working in the kitchen at all; I’ll call these people the Patrons.
As the Lead, your duties include meal planning with the chefs, shopping (or delegating that assignment), creating the work schedule, and collecting payment. The Lead should also choose who will be the Head Chefs of each meal, preferably people you know well enough to understand their abilities, personalities, and leadership qualities. Once you get on site, your job is to make sure the teams report in, that they all get a tour of the kitchen so they know where everything is, go over the final menu, ensure that things start on time and run smoothly, and fix problems as they arise.
Meal Planning is a complex issue.
Be sure that you have your portions correct. One loaf of bread is not going to make enough French toast to feed 20 hungry people.
Test all recipes to be sure that it will come out as you want and that you have all the ingredients on your shopping list.
If you are cooking for people with allergies & intolerances, be sure to communicate with those people to be sure you don’t have an issue with cross-contamination. Don’t cook or prep the allergens on the same surface as the food that they can eat. Illness and anaphylaxis are not good ways to spend an event weekend.
Besides allergies, some patrons may have other dietary needs, such as avoiding red meat or sugar. Adjusting menus can make patrons happy, but that doesn’t mean that the one vegetarian will dictate the menu for everyone else–it means that while everyone else is having roast beef and turkey sandwiches at lunch, they will have egg salad or peanut butter.
TIP: Just like the lone vegetarian, don’t let YOUR dietary quirks dictate what everyone else eats; ask your Patrons for feedback. Not everyone will want to eat low-fat, gluten-free, sugar-free rice cakes with organic garlic goat cheese…especially if it dramatically increases the cost of the meal plan.
Similarly, if you are cooking for children, be sure to have simple, familiar fare to keep the young ones comfortable and pleasant to be around.
Publish the menu well in advance so any problems can be identified before the shopping trip.
TIP: Set up a Facebook page for that kitchen and invite Patrons to join the discussion.
Keeping a simple menu will minimize prep and the risk of ruining the food, keeps the patrons happy (especially kids!) and keeps the costs lower.
The Lead should NOT cook every meal all weekend (or two weeks…). In fact, ideally, the Lead, especially in a large kitchen, should not cook at all. DELEGATE RESPONSIBILITY!
Head Chefs and Crew need to divide up the responsibilities for prep, cooking, and clean up. Make sure that the work assignments are communicated ahead of time and posted somewhere in the kitchen.
For a large kitchen, I recommend having at least three Head Chefs:
Breakfast Chef: that early-riser who is annoyingly chipper and organized in the wee hours of the morning, even before coffee is served.
The Lunch Head Chef…or perhaps would be more appropriately called a Lunch Captain. This is something that a less experienced (or terrible) cook that wants to help out somehow and can be safely relied upon to lay out lunch meat, cheese, condiments, and bread. Perhaps also mix up lemonade and iced tea. If this is a Royal kitchen, this may also include making up plates to be delivered to the Royals, wherever they might be (in a meeting, watching the tourney, etc.)
A Dinner Chef and Crew can take on the big evening meal. This chef will have to be very flexible to accommodate the fluctuations of schedules that always occur at events. If you’re cooking for sitting Royalty, this is doubly true! Make sure that food is hot and ready when they are. Check with their staff to get the timing right.
The Head Chef will report on time for prep and round up their Crew to assist. Assign tasks to your Crew based on their abilities (a 5 minute team meeting can accomplish this), and accept help when offered.
Trust your Crew to know what they’re doing, and be mindful of tasks that can be done to keep the crew busy.
TIP: DON’T BE THE EVERYMAN! Trying to do it all will only leave you tired, grumpy, and could drive away your Patrons (especially if your attention is diverted from your job and you burn the meal). Designate one person to help with all the odd requests–the lemonade needs mixing; someone wants to borrow the lighter; someone else needs paper towels. This is not the job of the Lead or the Head Chef. Your team knows where it is, let them find it. Worst case: TELL them where it is and they’ll get it. Stay focused on your task.
The Lead and set up crew should arrive early on site. The kitchen and all its food products should be there well before the first meal is to be served. If you plan on providing dinner on set up night (Friday), be there when site opens, set up the kitchen first, and make the food available for the Patrons as they arrive on site. Bring a crew to set up your sleeping quarters, if necessary.
TIP: Set up night should be kept simple; try having soup and bread or another heat-and-serve meal instead of something complex. Either way, it requires minimal kitchen use, can be prepared in advance and just warmed up on site and can be left to simmer while you set up your own camp (supervised by a member of your crew, of course). As Patrons roll in, they can pop in for a quick bite when they arrive or during a break in their own set up.
Make sure that there is a backup plan. If the Chuck Wagon blows a tire, who will feed your Patrons until you can get there? If you are running late, be sure to communicate with others who are already on site so they can spread the word.
TIP: Be sure someone else in the household has a stove and Emergency Rations to feed people should you not be there in time. Alternatively, be ready to reimburse everyone for a missed meal. Don’t forget to apologize for being absent. There may well be several people who counted on that food to be there and now they will have to source a meal from somewhere else, either through begging or buying. Since food merchants are becoming more scarce, begging from friends may be more likely, or even leaving site.
Post serving times so your Patrons know when to stop by for meals, and your Crew will know when to report to work. Be mindful of your Patrons’ needs! Is one of your Patrons part of the morning herald team? Helping at gate late at night and in need of a midnight snack? Or a member of Retinue or Royalty? Having a schedule and sticking to it will avoid confusion and heartache.
Breakfast should be *served* at least 30 minutes to an hour before the day’s first meeting, which is usually 8 a.m. That means getting things ready at 6:30 or 7:00 a.m. and having food ready by 7:00-7:30. At the very least, hot beverages (tea, hot chocolate, apple cider and coffee), fruit and some kind of bread product (muffins, bagels, etc.) should be available for those who have to grab-n-go before the normal breakfast hour.
Lunch can be do-it-yourself sandwiches with all the condiments out for an hour or so midday, or make sure your Patrons know where to find all the meats, sides, and condiments for self-service.
Dinner times may have to be flexible depending on court times or other activities.
TIP: Posting mealtimes, again, is vitally important, especially if there’s a change in court schedules or other activities. This posting board can include menus and ingredient lists, serving times, Crew assignments and schedules, as well as personal messages for each other. Communicate to your Chefs, Crew and Patrons so they know the plan!
Cleanliness and Wash Stations
All chefs should have food handler’s permits (if it were my kitchen, I would require it…but I’m a stickler for that sort of thing), and any crew handling food should get one or be familiar with the basics.
NO smoking–not even those electronic smoking devices–in the kitchen. Ever. Seriously. Ever. While the e-smoking devices are not technically “smoke”, it’s one more thing to distract you from your duties and an unclean object that you handle in between food. Take care of your nicotine habits before and after work, not during.
Have a wash basin and hand soap (not just hand sanitizer goo) available for all Chefs, Crew and Patrons to use before touching any food. We’re camping in a cow field, people. Let’s keep things reasonably civilized.
You must have a garbage can (or two) to scrape leftovers into and wash station available after meals. Pots and pans (and anything SUPER dirty) washed last. A rubber scraper can help get most of the chunks off before going into the wash basin.
Cover the garbage and take bags to the dumpster as each bag fills to keep away flies, yellowjackets, and hungry carnivores. Yes, we’re probably safe, but you know there are wild animals–notably bears, coyotes and cougars–not too far away, and they can easily smell those leftovers!
Provide snacks, sides, and late-night nibbles for those who might need to fill in a little around the edges.
Many hands make light work. Everyone should work their shift and stay until it’s done and clean.