Veils!

One of the things I’ve always thought is that for the SCA participant, no matter how good your costume kit looks, it always looks MUCH better with some kind of head covering.  Whether it’s a complex cap and veil or a simple coif or flat cap, there’s nothing that can add to the Dream like a medieval headdress.

In that vein, I’m working on my veil kit.  I now have all the pieces complete except one; I just have to finish rolling the hem on one piece.  I’ve been looking at a few different web sites for 14th century (or thereabouts) head coverings.  As you saw, I already had a fillet “pie” hat, a pleated fillet hat, and the barbette and coif (in the form of a St. Birgitta cap).  These were pieces I made about a year ago, and they have stood up pretty well (although storage and transport has made them a bit wrinkley).

end-of-nov-2015-5647  hat-2

These are really quick and easy to put on when in a hurry to get out to court or a meeting.  However, I decided I really needed to improve the set a bit and augment to the hat collection.  Additionally, I wanted to add some variety and some extra sunscreen protection for my extra-fair skin.

I was looking at Katafalk’s site and decided to follow her instructions to make a more formal veil kit.  First, I made some improvements to the St. Birgitta cap.  I deconstructed it, re-shaped it, and sewed it back together.  https://katafalk.wordpress.com/2014/01/16/st-birgittas-cap/

birgitta-old

The old cap was cut square, gathered, and the slit up the back had pulled out some, so it was too long.

birgitta-new

The fabric was cut at an angle and the entire bottom length was gathered, the slit shortened in the back, and the straps were re-attached.  They’re still a bit long, but I will make more adjustments as I wear it.

birgitta-on

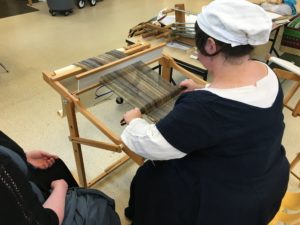
This is what it looks like on.  It’s still a bit poofy in the back, but it may improve with better straps or additional fitting.

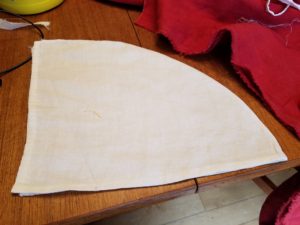
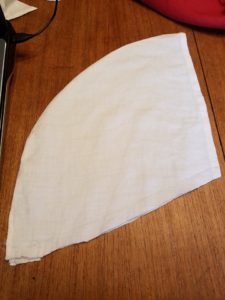
Then I went to her Wearing-My-Veil tutorial and made the pieces she outlined in her blog post.  https://katafalk.wordpress.com/2013/11/06/wearing-my-veil/

It includes an 8 cm x 44 cm forehead cloth, a piece that measures *approximately* 100 cm by 50 cm (hers was a little bigger, but I ran out of fabric), and a giant circle that’s about 90 cm in diameter.  Note to those thinking about doing this project–get 1.5 yards of 55″ wide lightweight linen.

When finished it will look something like this.

veils

I can also make a frilled veil to attach to it later, if I decide I want to try to make one.  At this time, there are dozens of frilled veils around the Kingdom and I don’t want to look like a Bandwagoneer.  In the meantime, I’m going to have more layers to protect my skin during the summer when I inevitably forget my sunscreen at home.

Midwife Apron

Originally posted Sep 4, 2015

15th Century Apron - Eme's Compendium: 15th Century Apron - Eme's Compendium

This simple apron looked ideal for the messy, clumsy person I am.  I routinely ruin shirts by dripping and spattering all over them–usually something oily that never comes out–and I have realized the great importance of aprons.  I have a couple at home that I usually forget to use while making spaghetti and frying hamburger.  While camping, I get distressed trying to figure out how to prevent similar accidents from ruining my garb.

Aprons that tie at the waist are just not enough to protect my clothes.  Most people wouldn’t find this to be the case since most people are a lot taller than me.  The spatter zone is just below the waistline.  For me, however, the waistline is often below the cooking surface, so the apron serves only to wipe my hands after washing, or perhaps to aid in picking up hot things.  What I needed was something that extended higher than my waist.

I began doing searches and I found quite a few images of these types of aprons:

More of the odd "midwife" apron from a Saxon lineage book. Das Sächsische Stammbuch' [subtitled as:] 'Sammlung von Bildnissen sächsischer Fürsten, mit gereimtem Text; aus der Zeit von 1500 - 1546' is available online from the State University Library in Dresden: More of the odd "midwife" apron from a Saxon lineage book. Das Sächsische Stammbuch' [subtitled as:] 'Sammlung von Bildnissen sächsischer Fürsten, mit gereimtem Text; aus der Zeit von 1500 - 1546' is available online from the State University Library in Dresden

Das Sächsische Stammbuch’ [subtitled as:] ‘Sammlung von Bildnissen sächsischer Fürsten, mit gereimtem Text; aus der Zeit von 1500 – 1546’ is available online from the State University Library in Dresden

Apron. Late Middle Ages on the upper Rhine. I've made this apron for myself for event camping.: Apron. Late Middle Ages on the upper Rhine. I've made this apron for myself for event camping.

(Note only said:  Late Middle Ages on the upper Rhine)

Zwei Wunder aus der Kindheit des hl. Nikolaus Hans Traut Nurnberg, Ende 15.Jhr BNM-Munich Inv.NR MA 2789: Zwei Wunder aus der Kindheit des hl. Nikolaus Hans Traut Nurnberg, Ende 15.Jhr BNM-Munich Inv.NR MA 2789

Zwei Wunder aus der Kindheit des hl. Nikolaus Hans Traut Nurnberg, Ende 15.Jhr BNM-Munich Inv.NR MA 2789

c 1488 Century Apron, Detail of the birth of Mary. - Eme's Compendium: c 1488 Century Apron, Detail of the birth of Mary. - Eme's Compendium

15th Century Apron - Eme's Compendium... back view: 15th Century Apron - Eme's Compendium... back view

What I realized, after doing a little reading and observing similarities between images, is that all the women wearing these aprons are attending a woman giving birth.  Yep.  Midwife aprons.

Geburt Mariens Dieses Bild: 000400 Kunstwerk: Temperamalerei-Holz ; Einrichtung sakral ; Flügelaltar ; Frueauf Rueland der Jüngere Dokumentation: 1488 ; 1488 ; Wels ; Österreich ; Oberösterreich ; Stadtmuseum: Geburt Mariens Dieses Bild: 000400 Kunstwerk: Temperamalerei-Holz ; Einrichtung sakral ; Flügelaltar ; Frueauf Rueland der Jüngere Dokumentation: 1488 ; 1488 ; Wels ; Österreich ; Oberösterreich ; Stadtmuseum

Geburt Mariens Dieses Bild: 000078 Kunstwerk: Temperamalerei-Holz ; Einrichtung sakral ; Flügelaltar ; Meister von Mariapfarr ; Salzburg Dokumentation: 1495 ; 1505 ; Mariapfarr ; Österreich ; Salzburg ; Pfarrkirche: Geburt Mariens Dieses Bild: 000078 Kunstwerk: Temperamalerei-Holz ; Einrichtung sakral ; Flügelaltar ; Meister von Mariapfarr ; Salzburg Dokumentation: 1495 ; 1505 ; Mariapfarr ; Österreich ; Salzburg ; Pfarrkirche

Well, when you have a need…you make it work.

This is a terrible selfie…I can’t take full-body selfies.  I don’t have a full-length mirror or ridiculously long arms, so the bathroom mirror will have to do.  After doing some experimentation, I found that the width of fabric was not quite loose enough around my ample hips. I tried using just rectangles to add girth, but it just didn’t look right, so I added gores to the sides.   Now it looks very similar to the images I found.

This was a fun experiment and is almost ready to wear this weekend…just a little hemming at the bottom and it’s ready to go!

So how did I construct this?  Super EASY!  I had some yardage of medium weight linen–super soft and fairly thick (some of the images look like they might have been made from a fine linen, but I used what I had lying around).

I measured from my chest–just above the Girls–down to just below my knees or mid-shin.  (Keep in mind that I’m super-short, not just regular-short, and stand a whole whopping 60″ tall), and came up with 36″ as a good length.  You should measure yourself to get a number to fit your physique.

I lopped off a yard of the fabric–36″ x 60″ (width of fabric, or “WOF”).  I cut that piece down the fold, so I had two pieces of 36″ x 30″.  These will be the front and back panels of the apron.

Recall that I said that I was having difficulty with fitting this around my hips, so I added more fabric.  If you’re a particularly thin person, you may not require this next step.  To gain that extra fullness, I cut another piece of fabric 36″ x 28″, and cut that in half to make two 36″ x 14″ rectangles.  Each of those had to be cut in half *diagonally* to make four triangles.  These will be the gores on the sides.

Assembly is pretty straight forward:  sew a gore to each side of the two panels with the *bias edge* of the triangle on the straight of grain of the apron body.

This will prevent stretching of that bias edge.  Here’s a great illustration, in case you aren’t familiar with some fabric terms:

Once you have all the gores sewn onto the apron body, you will sew the sides together.  Put front and back panels facing right sides together and sew up from the bottom about 20″.  Your measurement may vary, but it should connect together from the bottom hem to just below your hips.

Make a casing at the top of each panel and thread a lacing through the casings and tie the ends.  Then you just have to finish the seams and hem the bottom and you’re done!

2015 Arts Unframed 2 (2) 2015 Arts Unframed (2)

The Kirtle of DOOOOOOOOOM!

(Originally posted Sep 9, 2015)

OK… It’s not really doom-worthy, but it took a lot more adjustments than I thought it would in the end.

I was over at a Lorenzia’s place for an open house sewing day and was surprised with gifts of “door prizes!”  She had some linen that she bought and it was much darker than she thought, so she passed it on to me because I said I could probably use it for something.  That’s quite a nice gift!  It didn’t take me long to decide that I wanted to turn it into a kirtle.

I dug around for quite some time, poking around all the nooks and crannies and cupboards and boxes and buckets…and finally gave up looking for my pattern that I made earlier this summer for the Perfectly Period Feast.  I grabbed my old kirtle and drew up a new pattern based on that one, hoping that the measurements came out OK.  I laid it out and cut out the linen and sewed it together.  Then I took it in where it was extra loose and baggy, and while it still fits a bit loosely, it’s flattering and is quite comfortable.

Normally those wide scoop neck garments cause the shoulder straps to just slip down but this one didn’t.  The sleeves I made help immensely with that.  I was really surprised!  I had to make the sleeve pattern to fit the opening, which did not follow all the whoopy-sloopy patterns that you see for Elizabethan sleeve-making; they wouldn’t have fit the opening at all.  I just cut fabric like you would a t-shirt (90 degrees out from the dress), but trimmed it to fit the curve of the opening.  I can easily move and raise my arms and hug people, and it’s snug enough that it keeps the shoulder straps up, which would normally slide down *constantly* off of my slopey shoulders.  I do have to shorten the skirt in the front just a little–the fabric has stretched a little from hanging and there’s a little bit in the front that I keep stepping on.

I wore it to Crown this weekend and hoped to get a photo in it, but apparently I am elusive when it comes to photography equipment.  I always seem to be just a couple feet to the left or right of where the group shot is taken.  No idea why that is.  The only one I’ve seen so far is this one…and I’m in the shadows…and I’m not wearing the blue dress.

I did get my hubby to take a photo before I left for camping, so here it is:

He was sitting comfortably on the couch and didn’t want to get up, so you get the awkward angle and all the coats and things in the background.  I did get some feedback from a costume Laurel who said, “the kirtle looked great–especially the fit of the flare around the hips. From a distance when I saw you in the kitchen tent while I was standing at the edge of the eric, it really had the “just stepped out of a manuscript painting” feel.”

I admit it…I swooned at that comment!

Camping in cooler weather has given me cause to revisit my wardrobe and make a short list of things I need to make or remember to bring next time:

  • Hood (liripipe or other)
  • Tall socks (left my wool socks at home…dang it)
  • Sleeping cap
  • Surcoat (my grey and blue coat has gone on walkabout, but I need to make one that covers the v-neck anyway)
  • Another St. Brigitta cap (Aenor borrowed mine, and I think it fits her better!)

I also made a short list of things I want to add to my encampment, but will have to overhaul my bins and boxes to make sure it all fits and is collapsible.  Some of them include:

  • Wardrobe rack & dresser (nightstand?  Plastic drawers?)
  • Washstand and mirror
  • Kitchen stand/prep area (I have one that’s fairly modern–I have never packed it for SCA use, but I will in the future!)
  • Storage system for breakables (goblets, mugs, pitcher, etc.)  Maybe thick padded drawstring bags?
  • More rugs for the floor
  • Cloak hooks on center pole
  • Privacy curtain indoors
  • Propane oven….ooooo!  Fresh bread, pasties, meat pies…
  • Brazier.  I have one that folds up, but it’s kind of a pain in the butt, rusted, and very dirty to put away.

So I guess that’s my to-do list for the winter!