What is Tablet Weaving?
First of all, card weaving and tablet weaving–same thing. The terms are used interchangeably depending on where in the world you’re from. It is a form of narrow band weaving using tablets to form a shed (the space between the top threads and bottom threads), and a method of weaving that can create complex patterns. This not only shifts threads from top to bottom, but twists them around each other creating a very strong woven band.
A Bit of History
The oldest woven piece was found in a salt mine in Austria between 1200 – 1500 BCE. This means it’s quite possibly contemporary with Queen Hatshepsut of Egypt. Several more pieces were found in that same salt mine–the atmosphere of which helped preserve the fibers–which date from 400-800 BCE. Many of them were very complex patterns and the details of these have been analyzed for thread size, twist, color and method of construction, so we know exactly how it was made!
Tablet weaving continued to be a popular way of decorating clothing and household goods until about the 15th century when people started using beads, gems, embroidery and precious metals as decoration.
Looms & Weaving Methods
There are a number of ways that you can do tablet weaving, and you really have to try a few (or all) of them to figure out which is best for you.
Backstrap
This is a favorite among many weavers–the ability to weave almost anywhere, as long as they have a belt and a stationary object to attach to. This could be a pole, railing, banister, door knob, heavy chair, a very patient friend, or even a stick that is held under your feet. If, however, you find that you need to set down your weaving to chase after small children or animals, this may not be a very convenient method for you.

Oseberg
The Oseberg loom was found in the Oseberg burial, dating to about 800 AD. It consists of two upright poles, about 3 feet high (1 m) set about 6 feet apart (2 m). There is a crossbar between them and your weaving is affixed between the two posts. You sit at a bench to weave. This is a beautiful image to see at recreation events–Norse, SCA, or even high Middle Ages. You can even design them to disassemble for transport to and from events.
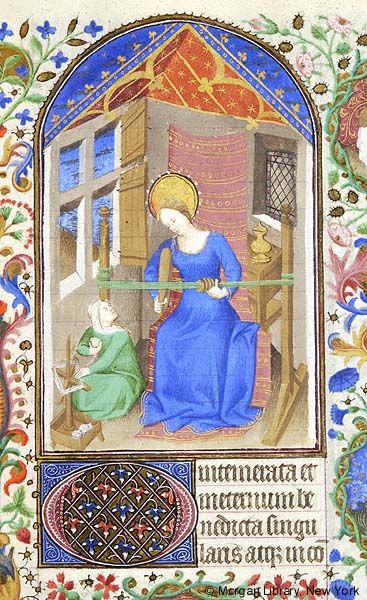
MS M.453 fol. 24r

Modified Oseberg
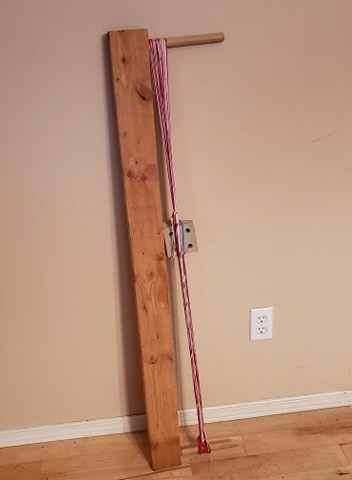
If space is a consideration, you can make a modified version with simply a 2 x 4 and a couple of thick dowels. This sits on a table and can be worked just as easily. You may need to clamp it to the table to avoid it sliding around.
Box Loom
For later periods, the box loom was the way to do narrow bands. These are perfect for having a small loom that can be set on a table top or even on your lap. It has a warp beam (the back rod for the unwoven strings) and the cloth beam (the front rod, for the finished weaving). This warps up like many rigid heddle or floor looms and may require assistance to get the proper tension, or some very creative methods of adding tension to the strings as you warp them onto the warp beam–a stack of heavy books or a moderately heavy chair, maybe.


The Surfboard Loom
A poor cousin to the Oseberg loom and perhaps a first-cousin once removed to the box loom, this simple set up is another great option.

It can be built using a few simple tools and is small and portable.
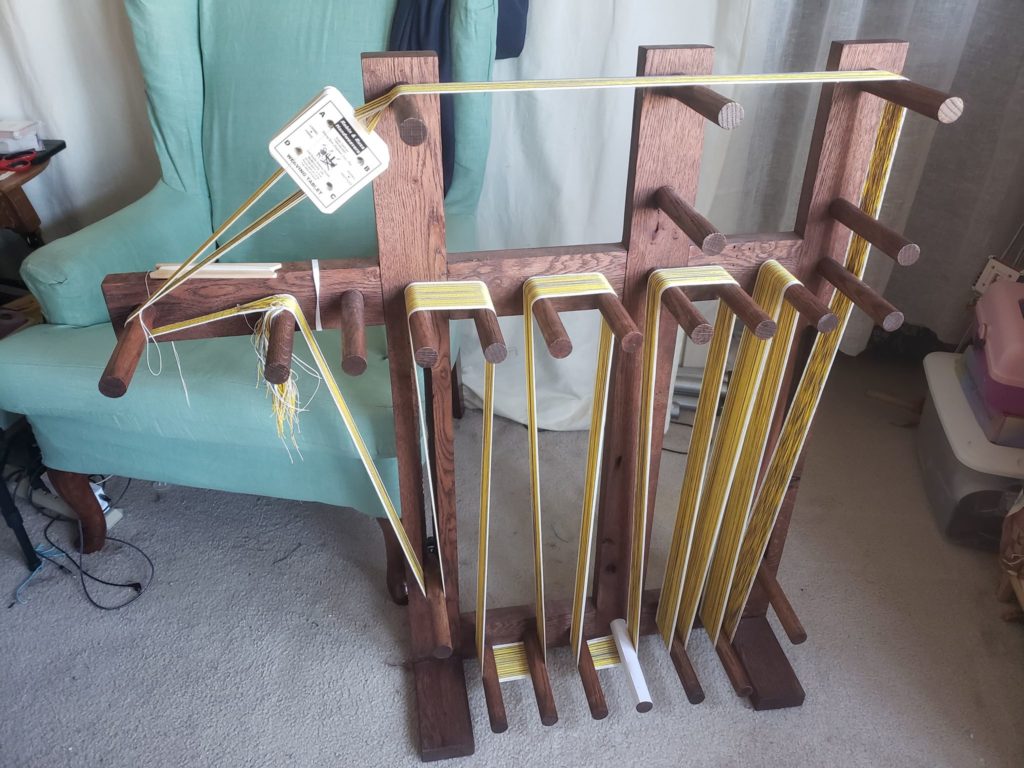
Inkle Loom
This loom is the youngest of the bunch, presumably designed well after the Middle Ages (patented in the 1930s!), but it does act as both warping board and loom, keeps even tension and keeps threads organized. Of all the methods, this is my favorite, causing me the least amount of consternation and irritability. It is, however, limited on how long you can make each of your woven pieces. Most weave between 1 to 3 yards depending on the loom design…but don’t let that stop you…you can always design a bigger loom…
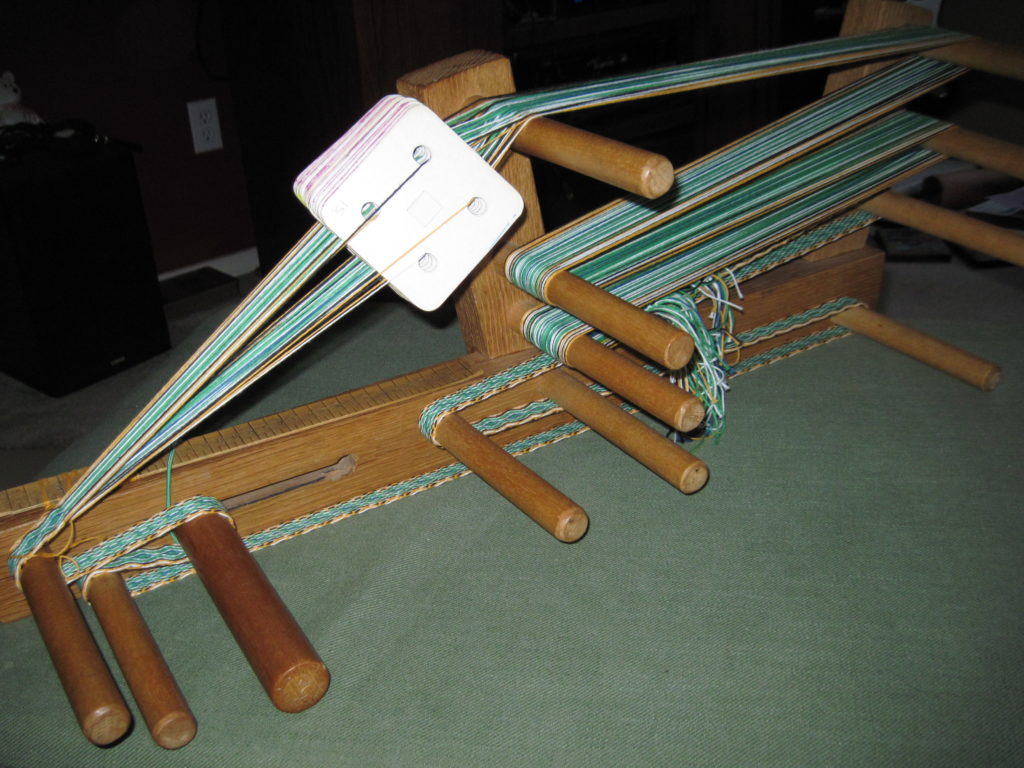
Monster Loom
When three yards isn’t enough…
Weaving Yarn
There are several options for weavers to look for weaving yarns. Here are some ideas for what to look for, and what to avoid:
Wool: Wool hairs are made with little barbs that snag each other to form yarn when spun. Different methods of spinning can give different final products. You can have a very light, fluffy yarn that is soft on the skin, but doesn’t have the strength to be warped; it’s best used as a knitting yarn. You can also have a strong, smooth yarn with a lot of strength, which would be great as a weaving yarn. This is all based on how it’s carded and spun. So wool can be a great option, but you should look for a strong worsted weight wool. If you have some wool lying around, give it a test-tug. If it snaps fairly easily, it will likely snap under tension while weaving and you will cry. You should also check to see if the yarn is really…grabby. I don’t know what the technical term is, but if the wool threads stick to each other like velcro, they will do this while weaving and it will require a lot of extra patience.
Linen: A plant-based fiber that is reputed to be very nice to work with. I haven’t actually used linen yet, so I can’t offer any good advice on that. There are lots of beautiful colors and the fibers are known for being very durable and having a lovely sheen. I will be placing an order for a couple spools, just to try it out, and there are a bunch of colors here on big cones.
Crochet Cotton: This comes in a huge variety of colors in a few different sizes. I’ve done projects in just about every size available, but my favorite–and one that is close to period-accurate–is the size 8 pearl cotton that comes in the little balls (I’m sure someone, somewhere has big cones of the stuff…still looking for a good source). Most craft stores have this in stock–Ben Franklin carries quite a number of colors. Be sure to check color numbers on the spools to make sure they match. I once got several balls of red, only to discover later that I had two different shades of red (I didn’t notice it in the store, but sure noticed it when I got home!).

Cotton Carpet Warp: The Maysville 8/4 yarns are heavier than the crochet cotton–by about double–but it makes a nice, robust weave. If you’re making a woven piece for a cloak, a bag, a guitar strap or a dog leash, this is a great material to work with. It has over 80 colors to choose from and the big spools are under $10 each, so you can do quite a number of woven pieces using just a few basic colors.
SILK: There is nothing bad to say about using silk! There are two sizes available from my favorite Etsy dealer; the 60/2 — a really fine thread — and the 20/2 — about the size of the size 8 pearl cotton. The silk has a luster and sheen that is unmatched by other fibers, it’s a dream to work with, and it’s strong! You can get large cones for $30 each or small 100 yard spools for $5. I got some of the small ones initially to see how well it worked, and within a couple weeks, was ordering cones. I won’t be using it for every project, of course, but for those special pieces, absolutely.
Cards / Tablets
Period cards were made from a variety of products including bone, horn, antler, wood, and leather. There are a variety of sizes that they came in, the Oseberg tablets being about 2 1/2″ (6.5 cm).
Most of the cards I use are of the 3 1/4″ (9 cm) cardboard variety–it’s what I learned on and what I’m used to working with, and several people cleaned out their craft rooms and their cards kept getting rehomed with me–which is great for when I teach classes! I have hundreds of them and don’t have a need to add to the collection. However, my husband just bought himself a 3D printer and has kindly printed some smaller 2 1/2″ (6.5 cm) cards that I’m going to try out. They might be a little thick–I prescribed the dimensions for them–the cardboard cards are about .6 mm each and these plastic ones are 1 mm. There are a few different designs for tablet weaving cards available on Thingiverse, including some Oseberg reproductions, so if you have access to a 3D printer–or know someone that does–maybe they can print some for you!

If you don’t have that kind of technology at hand, you can always make your own cards. You will need some heavy paper stock–like cereal boxes or cracker boxes–or even a deck of playing cards. Here’s a link to some instructions on how to make your own: https://www.instructables.com/id/Make-Your-Own-Tablet-Weaving-Cards/.
Reading the Pattern
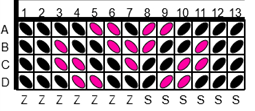
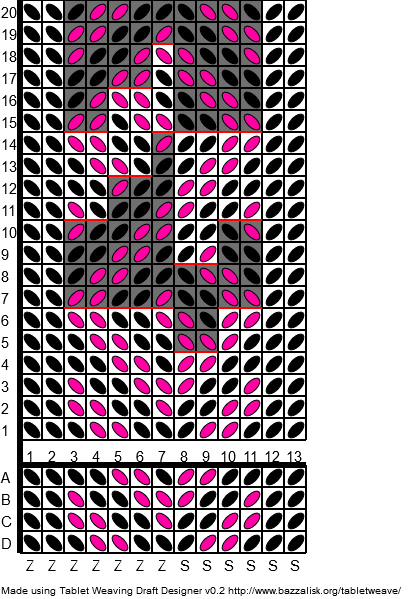
There are a few things you need to be able to understand. Looking at the pattern, you will see the numbers–1 through 13. These are the numbers of cards–one for each column. Best plan to write numbers on the backs of each card, which you will need to reference for many patterns.
Along the side are the letters A, B, C, and D. This indicates what threads go into what hole on which card. For example, card 5, hole A is pink; hole B is black and so on.
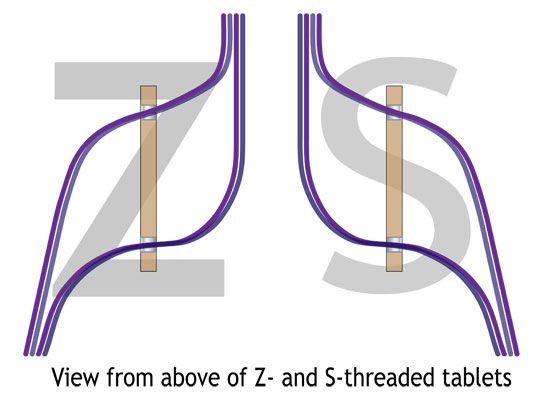
S & Z Threading
This is one of the most disputed items–is S and Z…does it mean the direction of the thread or the direction of the cards? Well, as long as you know how the pattern’s notation is written, you can do it how you choose.
My method is this–if you have clockwise lettering on your cards, face it to the right. If your letters are counter-clockwise (anti-clockwise), face them to the left.
From there, the patterns I use this threading method:
Shuttles
There are a number of shuttle options–I’ve purchased belt shuttles (6″ to 8″ long with a tapered edge) & short stick shuttles, made shuttles from scrap wood in the garage, and even a wooden ruler I found in the school supply box. Use what you have and experiment to find what you like the best.
Warping the loom–at least for circular warps like on the Inkle loom–requires the ends to be tied together. I use a surgeon’s knot so that it’s secure and easier to untie if/when you make a mistake.

Getting Started
While it’s difficult to describe what a weaver needs to do for tablet weaving, I will note that I start with the shuttle on the left and the tail through the shed, hanging out to the right. This is just my personal choice as I try to finish weaving at the end of a repeat and put the shuttle under a piece of elastic so the shuttle doesn’t fall on the floor…which had happened about 12 too many times before it occurred to me to tether that sucker down.
So the shuttle is on the left, the tail is through the shed to the right with a long tail (5″ or more long). Turn the cards forward once, and throw your shuttle through to the right and bring the tail through the shed to the left. The cross-cross of this weft thread helps anchor the weaving. Turn the cards again, throw the shuttle, pausing to lightly beat the weaving. Do then you can start to tighten up your weft threads to draw the band together. Repeat the turns for 2 to 6 more times, depending on how well you like the look of the tension. This takes practice…
Begin the pattern with AD at the top. You may want to view the video for further instruction:
Flipping Your Edge Cards
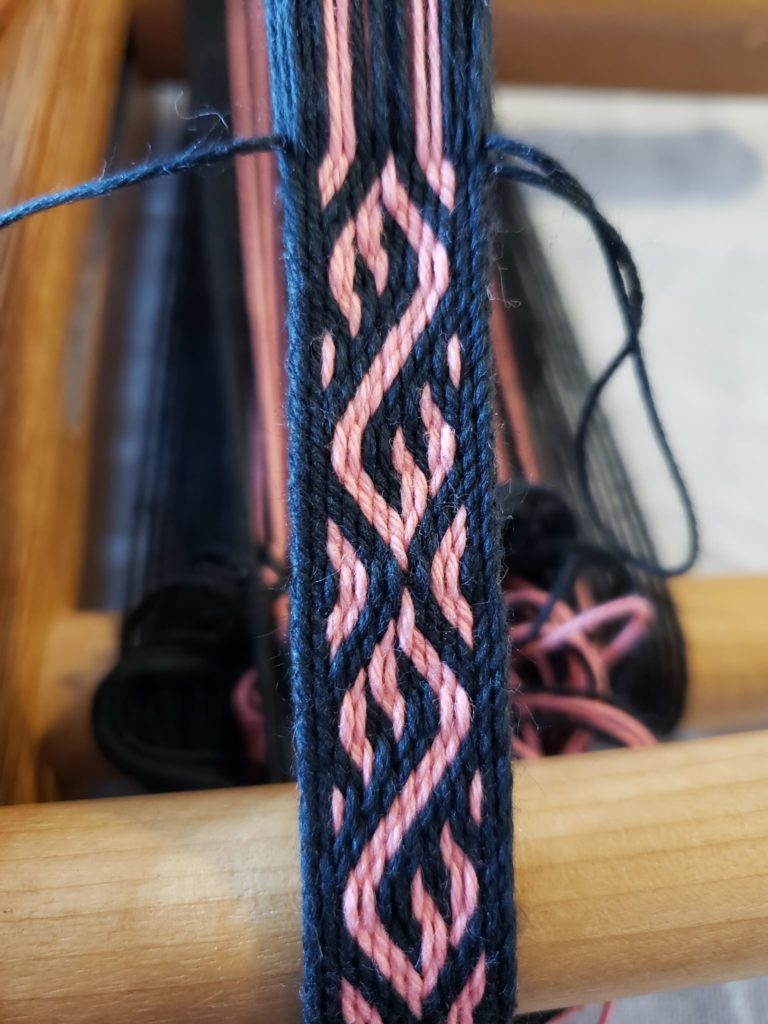
One thing to note is that this pattern is a zero-twist pattern–that is, as you weave, you don’t build up a twist like some patterns do, forcing you to either untie and untwist, use fishing swivels, or weave the pattern in reverse to untwist the warp. In this one, the only cards that build up the twist are the border cards. This can be easily fixed by either reversing the direction of the border cards–backwards instead of forwards–or flipping the cards from Z to S or S to Z, and continuing to follow the pattern as before.
Thanks for joining me! I hope you’re enjoying your weaving journey. Feel free to drop me a note on the YouTube comments if you have any questions.
Elewys
