Athenaeum 2020

Teaching Tablet Weaving During the Plague and Beyond

And A Deep Dive into One Oseberg Pattern
My Year in Review

In the last year, I have done more research on tablet weaving patterns–finding new ones to explore, create, and share, as well as trying to use more period materials of the correct size to recreate tablet woven bands more in line with the extant finds. I have begun using technology during this age of plague to share my weaving skills with others, teaching across the miles and over seas. I have also started re-exploring interests in fiber processing and spinning as well as woodworking, and of course, spending some time enhancing my wardrobe.

Teaching at Home & Abroad

Tablet weaving, like other arts, is not something that is easy to learn from a book, and some people simply learn a technique better by watching rather than reading and experimenting. Over the years, I had been looking for videos about tablet weaving to learn a technique or a pattern, and so many of them are missing one or more elements to the instruction, and fail to walk the viewer through the process, step by step. There was one very long instructional (nearly three hours) where the viewer is sitting in on a class, but the video quality is rather poor, the room is dark, and there are virtually no close ups to doing each step.

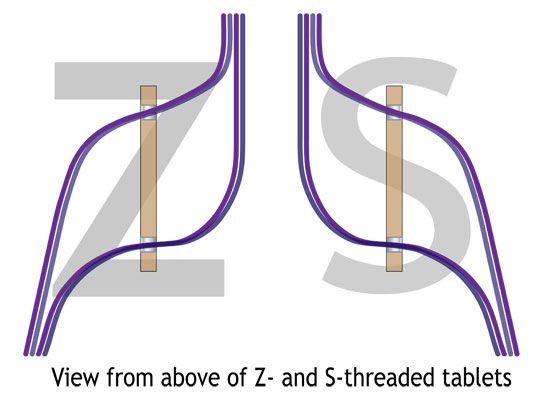
Most of the other videos already had the loom warped, which is a significant gap in the learning of the craft, and leaves weavers wondering about threading the cards, the difference between S and Z threading (which can be different in various parts of the world), the history of the pattern (which may not be the purpose, but for SCA tablet weavers, this is of interest)–and one of the biggest issues–how to read the patterns.

To make things even more complicated, there are several different ways that weavers draw up patterns, and knowing how to determine which ways the cards face, how to thread correctly and how to turn the cards in sequence between one system and the next is a HUGE learning curve and can be profoundly discouraging to new weavers. Even experienced weavers may think, “I got this,” then find that their pattern is appearing on the underside of the band and they’ve got gobbledygook on the top.

Enter “Weave Along With Elewys”

In order to fill that void, I decided to make a YouTube video series on how to do tablet weaving from start to finish. I made a list of things that students need to learn the craft in video form–which would be true for any art:

Start simple. Use a pattern/project that anyone could do.
Use easily accessible tools and materials. Keep investment costs low.
Explain each step clearly and demonstrate the techniques.
Do close ups, and work slowly. Repeat complex processes.
Have good lighting and sound, and use a tripod if you don’t have an assistant.
For history nerds, add some background information to the piece.
Make it entertaining and not too long.
Smile and have fun!

Also important, make sure you’re in a quiet, organized space…I’ve been contending with loud neighbors with pressure washers & lawn mowers …and “roommates”…

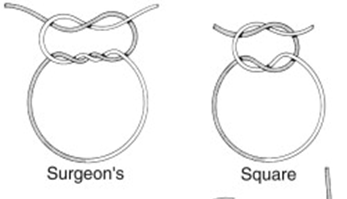
With those points in mind, I set out to make tablet weaving more accessible to the beginning weaver who may not have a teacher nearby (or may not be able to get to classes during this pandemic) and showing others how easy it is to create beautiful, period tablet woven pieces, even as a beginner. I discuss yarns to use, threading the cards, tying a secure knot, reading the pattern, turning cards, advancing the warp, and most importantly, the satisfying snip as you remove your finished project off the loom.

It was my dearest friend, HL Aenor de Pessac, who initially suggested it, although I was thinking about doing something very similar, just not sure how to execute it myself. In discussion with her, we developed the idea further and came up with a plan. She not only encouraged me to make the videos, but has been instrumental with editing and movie magic, which I had no idea how to do (I’m learning!). I owe her a great deal of credit and thanks.

Weave Along with Elewys – Episode 1 Oseberg (variation)

Building Skills

The first video is a very easy pattern and each subsequent video builds on the skills learned, and my emphasis is using period patterns or designs. As a fun side project, each new piece will be done in the colors of the 20 SCA Laurel Kingdoms, in chronological order of creation, starting with the West Kingdom. There are also a couple short videos with quick weaving tips and tutorials on adding new weft thread and weaving a pattern in reverse to untwist the warp. More tutorials will be added in the future as they occur to me or if I get requests from viewers. In the first month, I added 50 subscribers to my YouTube channel after releasing just one full video, and 50 more more since then. Feedback I’ve gotten so far is that this is something people had been looking for, and I’m delighted!

In addition, and as a supplement to the videos, I have made use of my blog to post the patterns and add additional details and instructions for students. Links are provided in the videos for the patterns and the products I use if anyone is interested in finding them.

A Close Look at Oseberg 12L1, 834 AD

Extant Oseberg tablet woven band, 12L1

Two of the videos focused on one piece in particular: Oseberg 12L1, one of at least 10 tablet woven bands found in a large burial mound that was discovered at the Oseberg farm near Tønsberg in Vestfold county, Norway in 1904. The Oseberg dig, as it is known today, had finds which date to around 834 AD. The burial mound contained two female skeletons–the ages of which are estimated to be about 80 years old and 50-55 years. The ship and some of its contents are displayed at the Viking Ship Museum at Bygdøy, Oslo, others are located at the nearby Historical Museum. Among its finds were a loom (commonly called the Oseberg loom), weaving tablets, several narrow bands, a wooden cart, woolen textiles, imported silks, and narrow tapestries. Earlier grave robbers took valuables, but in my opinion, they left the good stuff behind!

Goal

To recreate the tablet woven trim known as Oseberg 12L1. The original was made of silk (or silk & linen) and measured only 5 mm wide, and I have done several experiments to get the correct size of the woven piece using various silk and cotton threads that I can acquire from commercially made goods.
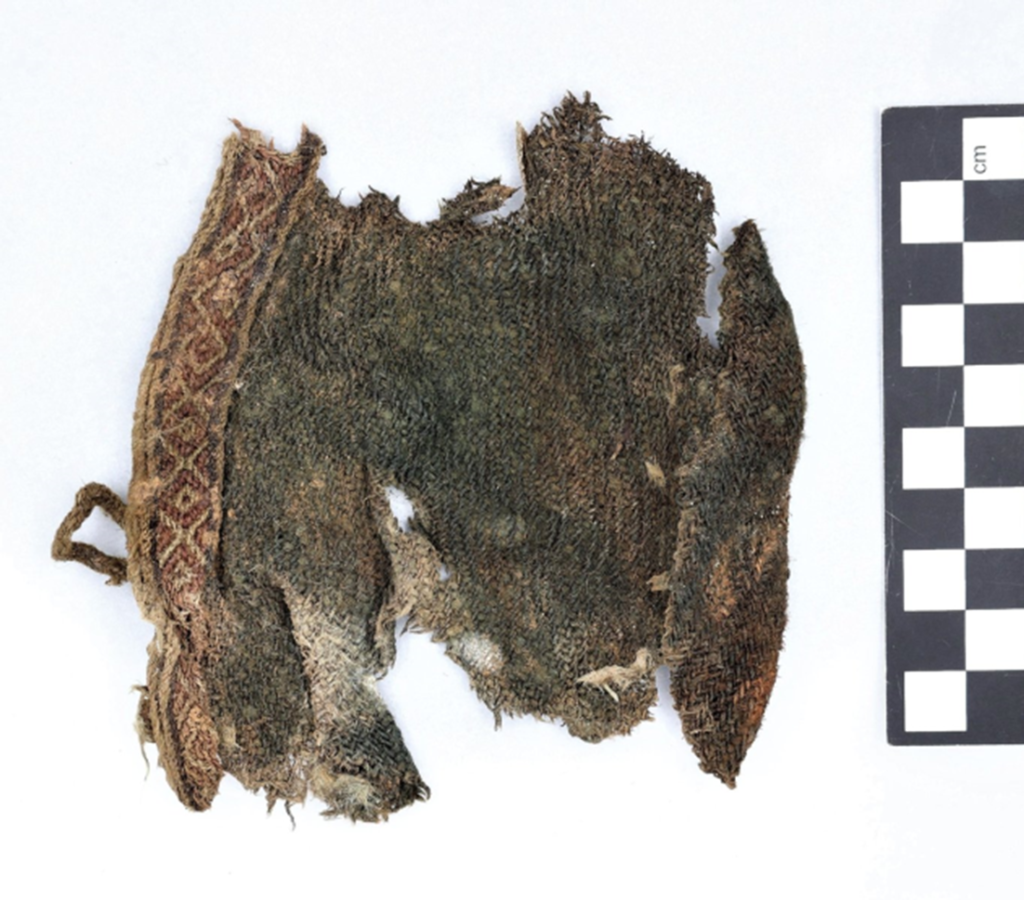
Extant Object

Photo by Eirik Irgens Jørgensen in 1998. Kindly provided by Bente Skogsaas, author of Oseberg Tablet Weave – Book II, which will be released next month.

The piece itself has few images available, and the museum keeps it in a dark room to prevent further decay and no photographs are allowed.

Materials

Original was reportedly in silk (or silk and linen). Some may be surprised that silk was used so much in tablet weaving in Scandinavia, but there was a great deal of Central Asian and Middle Eastern imports into the area, particularly to Birka, a renowned trading center about 540 km away, which was in the midst of its heyday. Birka operated as a trading town from 750 to 960 AD, bringing in goods from the far northern realms of the Saami down to the Byzantine Empire and beyond. The Byzantines had been silk farming for a couple hundred years before Birka opened for business.
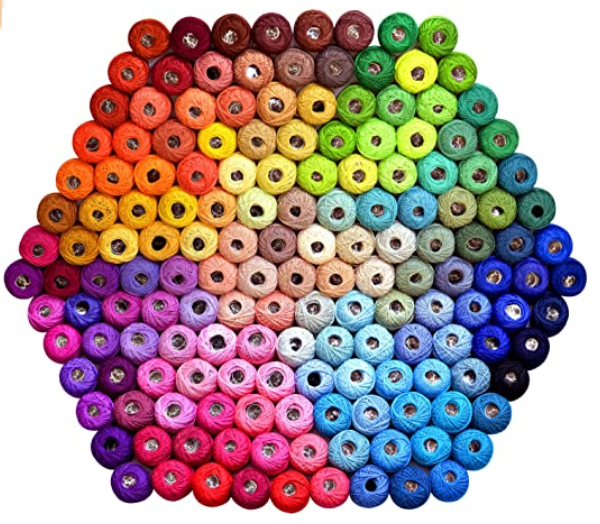
vikings silk route
Silk routes during the Viking age

Colors

Imported silks may have been dyed prior to arriving in Scandinavia, but if they had been adding color after, a huge variety of colors were available. Madder for red, woad for blue, weld and broom for yellow, and more colors achievable from heather, birch leaves, buckthorn, bedstraw, walnut, and lichens. There were clearly other imported dye stuffs as there is evidence of items being dyed with kermes and cochineal, which come from more southern regions.
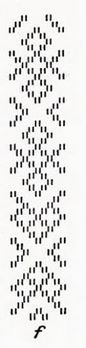
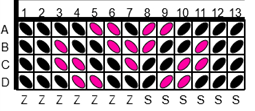
Pattern

Oseberg 12L1 pattern (with 1 added card for symmetry)

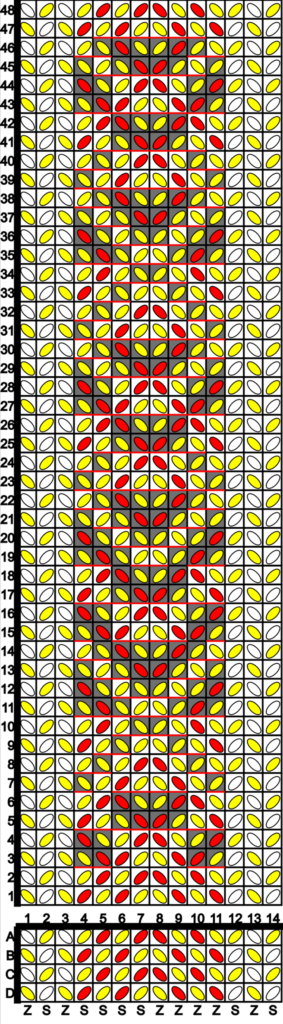
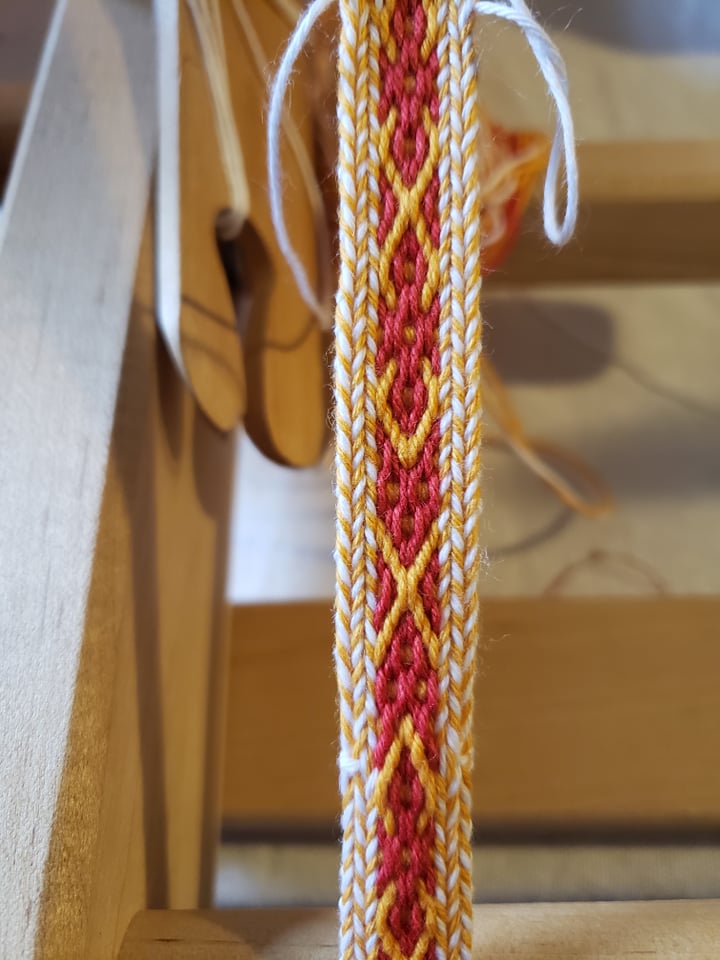
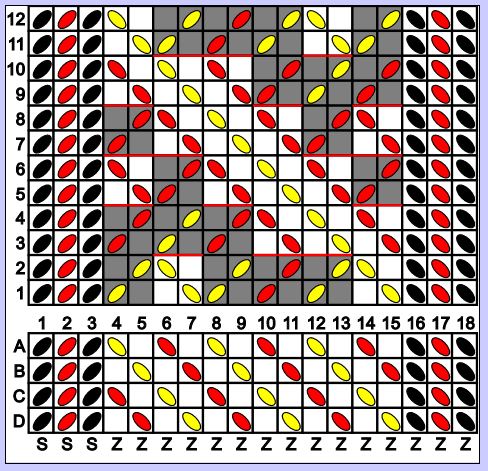
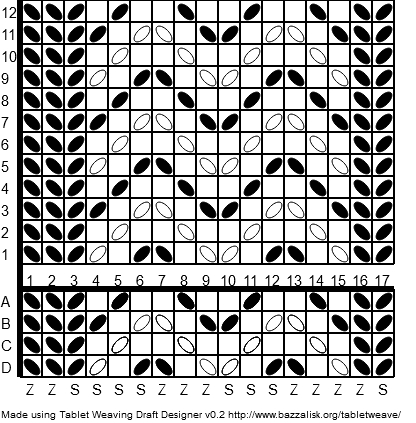
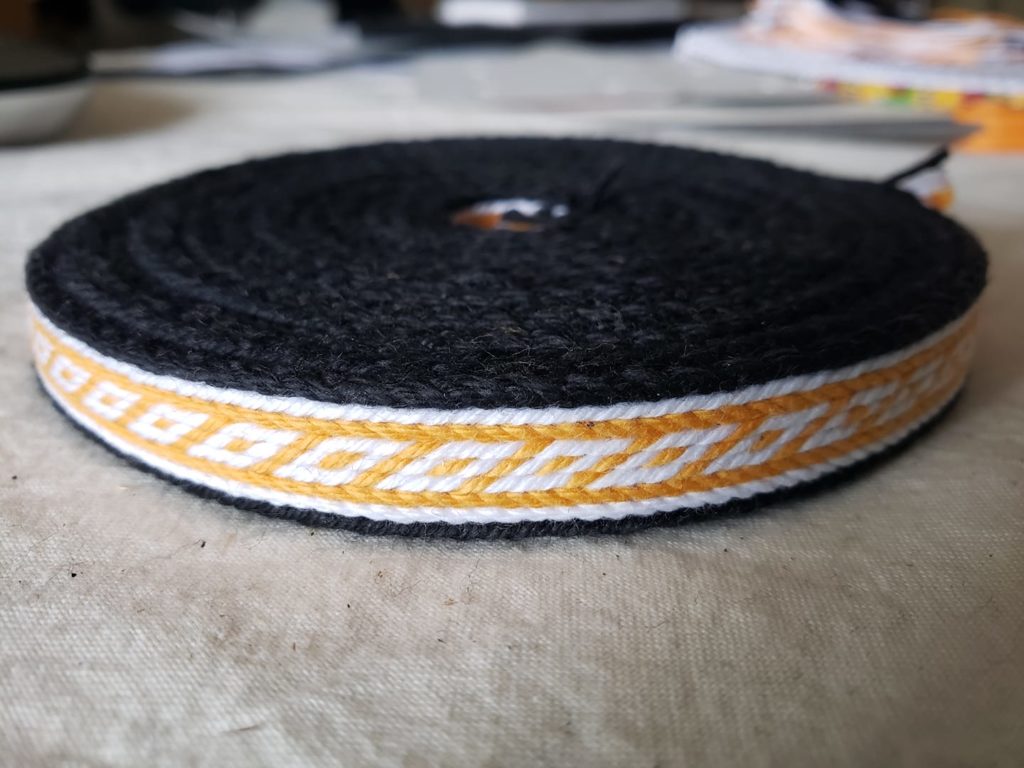
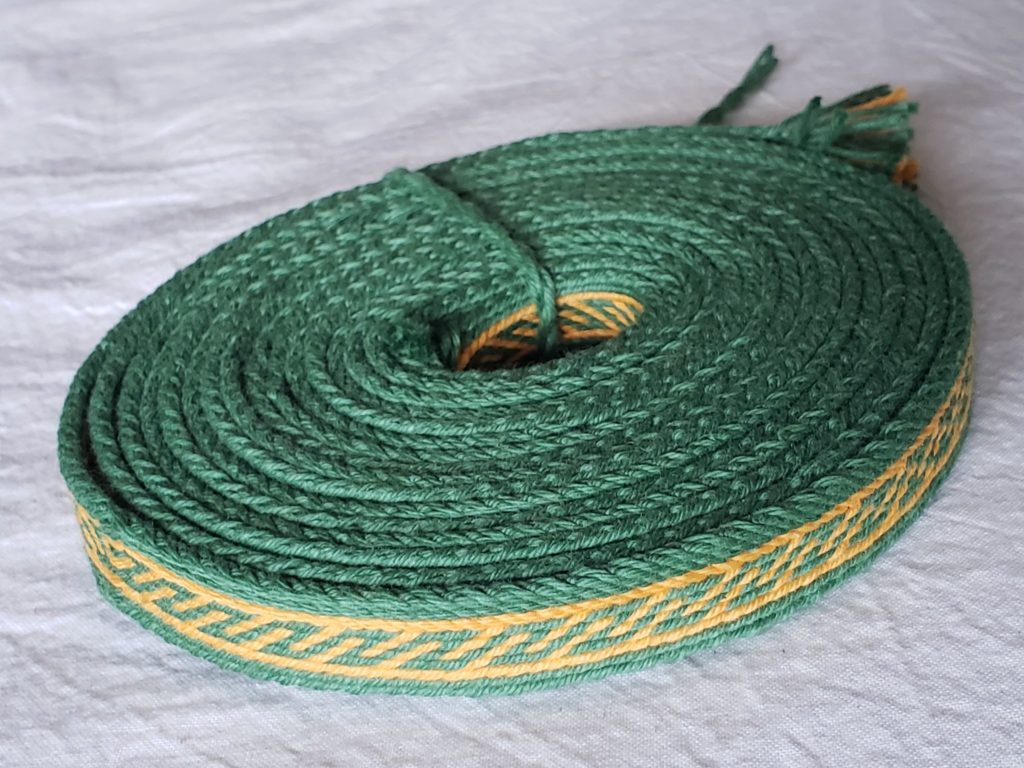
After a couple of experiments, and chatting with other weavers around the world, the pattern that is most likely to be accurate is this one–give or take a couple of additional border cards. More on that later.

This pattern, actually, has an additional border card on one side to create a more balanced design; it appears that the one in period had 8 cards instead of 9, but to create this piece in An Tir colors, I decided to add another black stripe on the other side. I like the symmetry. It appeals to my OCD nature.

Tools

Non-Period Loom Options

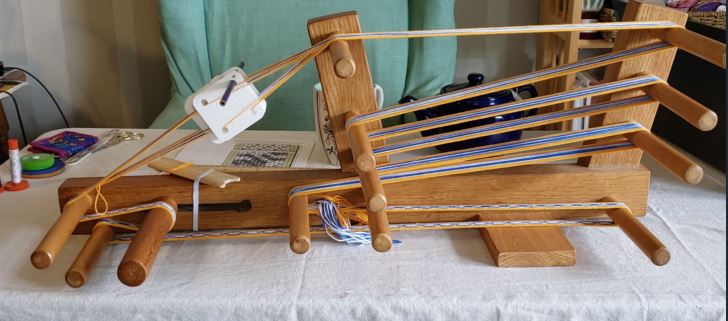
Warped onto my inkle loom; although not period, it is my preferred method of weaving as it is portable, maintains even tension, and sitting at a standard table, it provides ergonomic comfort…it also works in harmony with my life as a busy mom. I began weaving inkle some 25 years ago and invested in this loom (spent a whole $20 at an event for this) and it has been an invaluable tool!

Not period, but perfectly functional.

Period Loom Options

Backstrap

Backstrap looms are a favorite among many weavers around the world. This was something I tried once or twice, but found that it restricted mobility as you’re tethered to a stationary object.

Backstrap weaving by Mistress Joutsenjärven Sahra (Mervi Pasanen). Used with permission.

Box or Tape Loom

Box loom or tape loom. Photo by Reinsfelt, Anne-Lise. Used with permission from the Norsk Folkemuseum.

Box (or tape) looms are portable and very event-friendly, but can have tension issues, as the weaver has to be able to warp the loom with some expertise. It also requires the use of a warping board or a similar technique to measure all the lengths of warp at once before loading it onto the loom. These appear later in the Middle Ages, around the 1400s, so not quite Norse period appropriate.

Oseberg

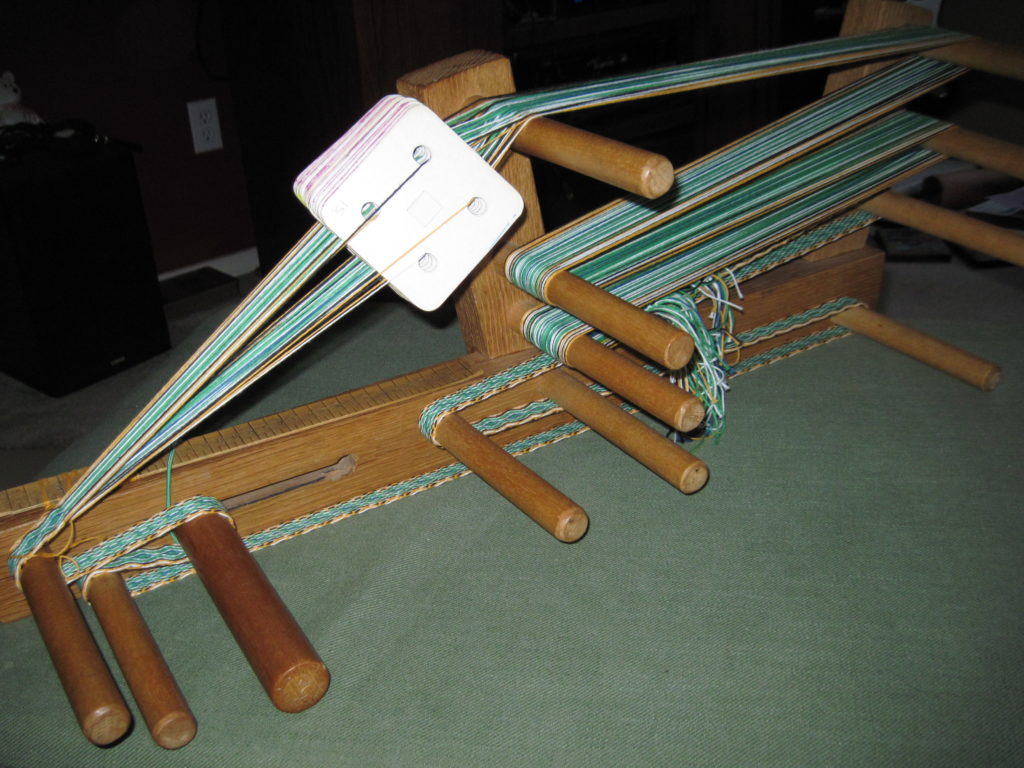
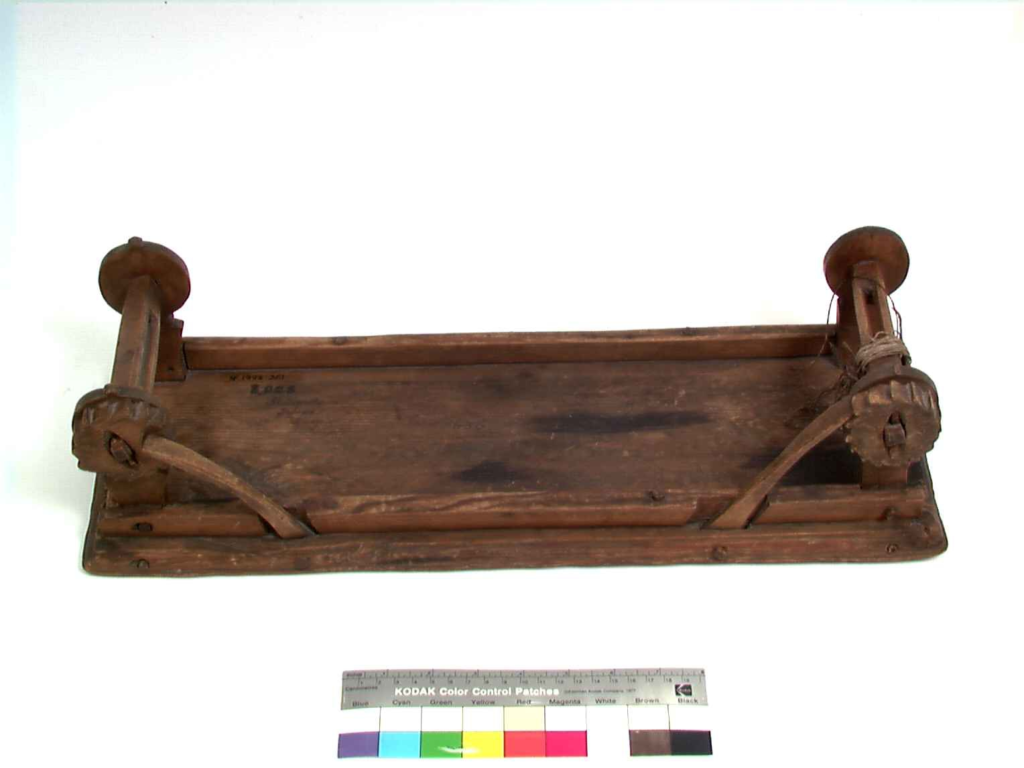
Oseberg looms would be ideal for this project, as it was found at the same dig as the woven piece. They can be designed to come apart for easy transport and look fantastic while working on them at events. It can, however, be uncomfortable to work at for long periods as it requires the weaver to sit next to the work and twist the torso.

https://eugenetextilecenterblog.files.wordpress.com/2014/05/medieval_tablet_weaving.jpg
Oseberg style loom

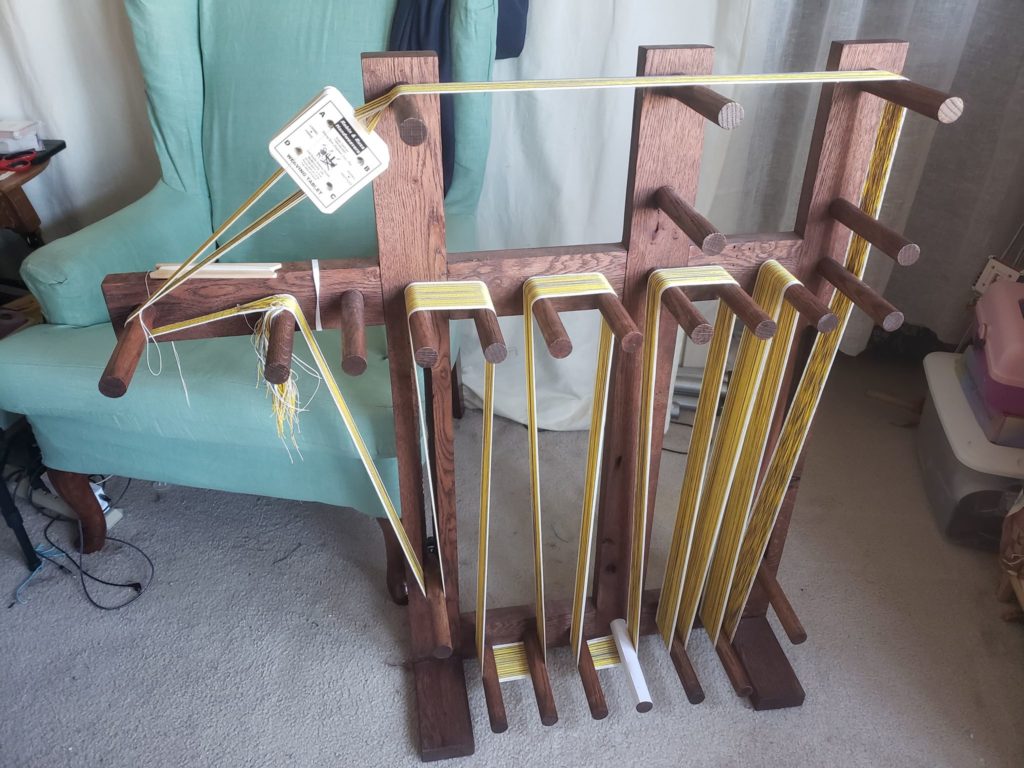
This is a modern portable design of tabletop Oseberg loom which can work if clamped to the table, but that also requires some skill at managing tension. Like the box loom, you must also have a warping board to measure out all your warps before loading and threading the cards. I find this one is a little long for easy use, but I may try to make a shorter version.
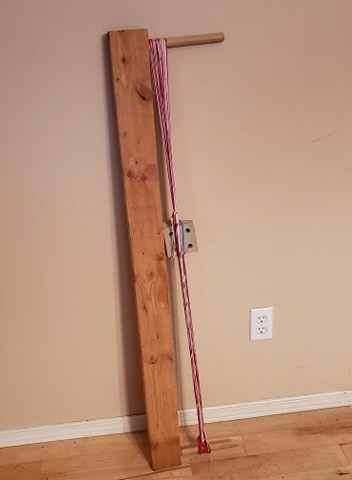
Tabletop Oseberg loom that I made for portable projects.

Warp Weighted

I recall someone suggesting using a warp weighted loom to do tablet weaving, but that doesn’t seem practical. Warp weighted looms require space to set up and a wall for the loom to lean against, and the weaver stands at the loom to work. It seems like a whole lot of loom for such a small project. It’s definitely not portable. I have seen theories on how tablet weaving may have been done as edge finish on a project and worked at the same time as the rest of the fabric was woven (I haven’t done any serious research on this yet). There are ways that one could do warp-weighted weaving with tablets on a small scale, but nothing that I could find in period that demonstrates this technique.

Frigga the Loom! Warp weighted loom built by Elewys of Finchingefeld.

Cards

My preferred cards are 3 1/4″ Schacht tablet weaving cards as they have color coding on the edges. This is ideal for checking the position of the cards at a glance, which is much more helpful in complex patterns, where cards are turning forwards and backwards in the same pick and should return to the ‘home’ position at the end of a sequence; if you make a mistake and they are not turned correctly, you can see this immediately. I find it to be a great visual cue. They are a bit bigger than period cards, however–those found in the Oseberg dig were about 2 1/2″ wide.

Period Card Options

In period, bone, wood, antler, leather, and other materials were used to make cards. I have a few now that are made from wood, and they work well for some projects although I find that they don’t turn as smoothly as other materials. Perhaps over time they will become smoother with use. I have probably 300 cardboard ones that have fallen into my possession over the years, so I do not lack for supply at this point.

Textiles found on the Oseberg Viking ships shown with tablet-weaving cards.  Bygdøy, Oslo, Norway.
Textiles found on the Oseberg Viking ships in 1904 shown with tablet-weaving cards. Bygdøy, Oslo, Norway. Oseberg 34D tablet woven band pictured here (not the piece I’m recreating). Based on this image, I estimate these wooden cards are about 2 1/2″ across.

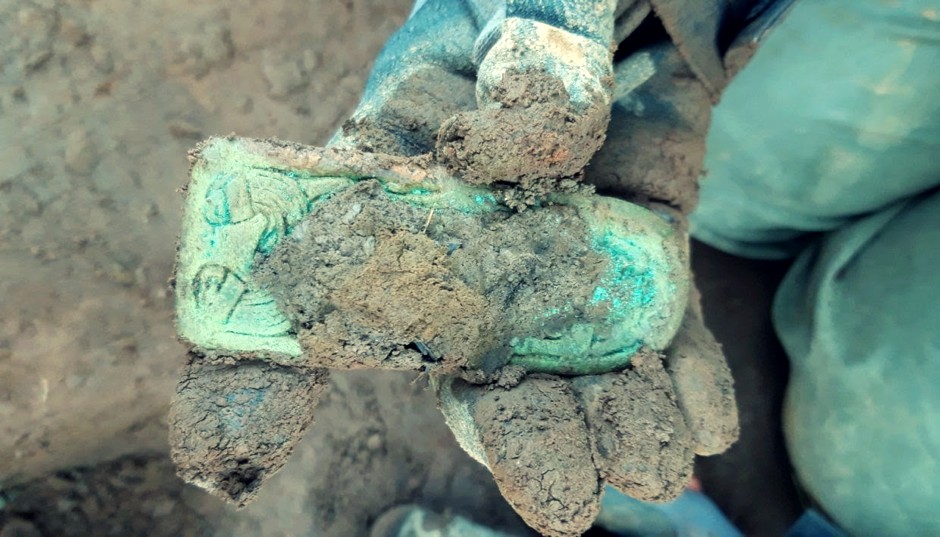
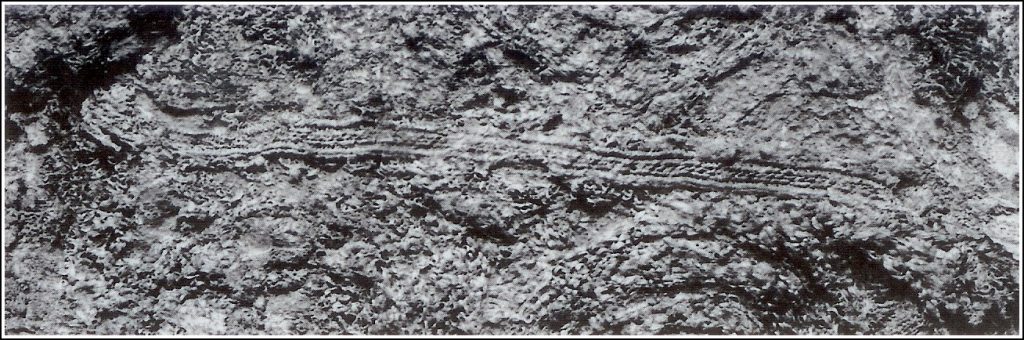
Textiles found on the Oseberg Viking ships shown with tablet-weaving cards. Bygdøy, Oslo, Norway.Textiles found on the Oseberg Viking ships in 1904 shown with tablet-weaving cards. Bygdøy, Oslo, Norway. Oseberg 34D tablet woven band pictured here (not the piece I’m recreating). Based on this image, I estimate these wooden cards are about 2 1/2″ across.

My Experiments in Weaving

8/4 Cotton Warp

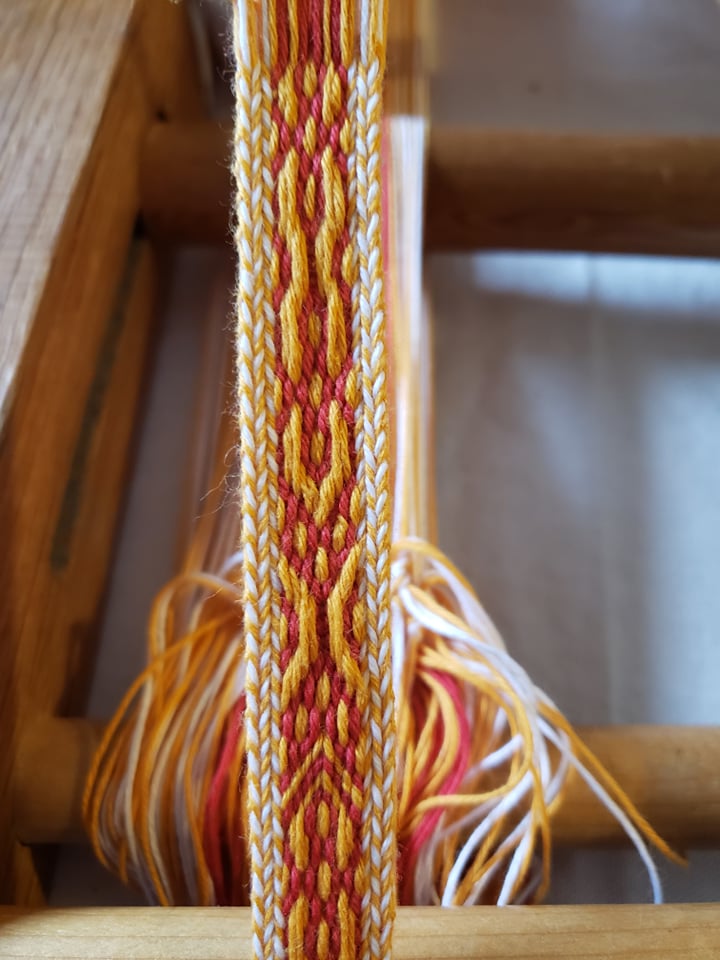
I made multiple pieces for this Oseberg 12L1 re-creation. The first using Maysville 8/4 Carpet Warp, which is 100% cotton. 8 cards were used in this pattern, and using this yarn yielded a width of 10 mm (1 cm) in the finished project. Given that the original measured 5 mm, I knew I needed to use something much finer.
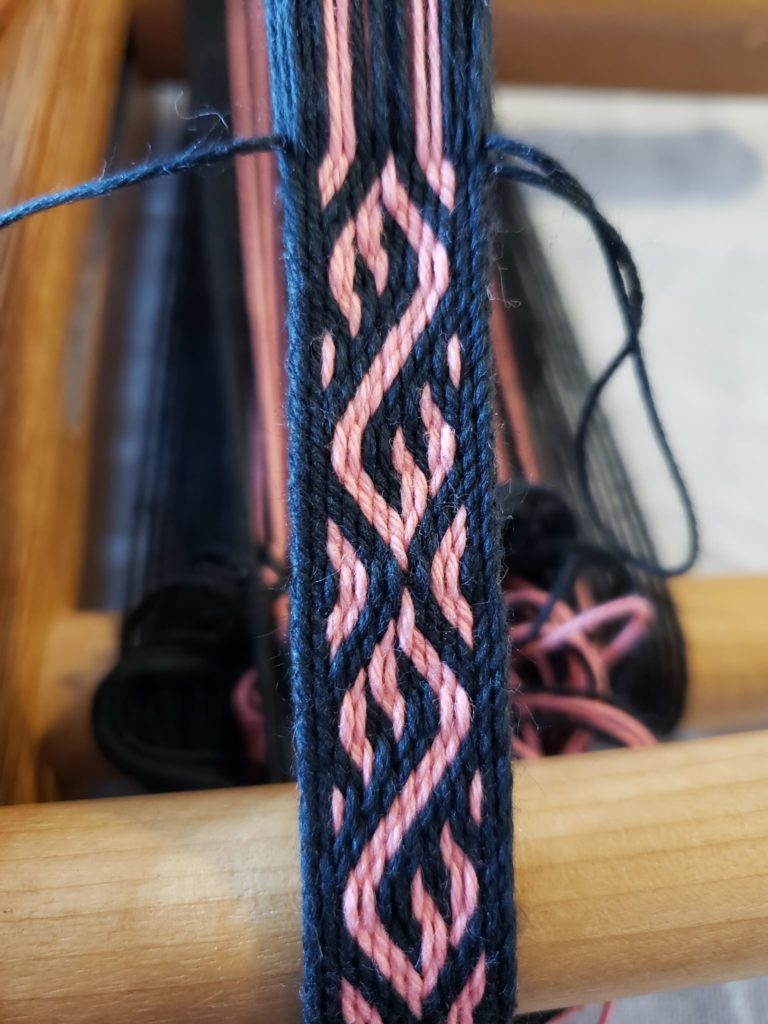
Oseberg 12L1 in Maysville 8/4 Carpet Warp, 100% cotton

60/2 Silk

My second attempt at this pattern was using 60/2 silk that I had on hand (purchased a little more than a year ago from Eowyn the Weaver on Etsy). This is the same silk that I used in the French tablet weaving that I did last year from 7th century Merovingian Queen Bathilde, which resulted in a near-perfect match for finished size; the original was 18 mm and mine finished at 15 mm.

Bertille band, 60/2 silk

Wanting to create a slightly different esthetic to this piece with balanced borders using colors that mimic other Scandinavian narrow bands, I altered the pattern slightly, adding 3 extra cards to the borders, but the finished width was still only 4 mm; significantly smaller than the original.

4 mm finished piece. I needed my readers to see what I was doing.

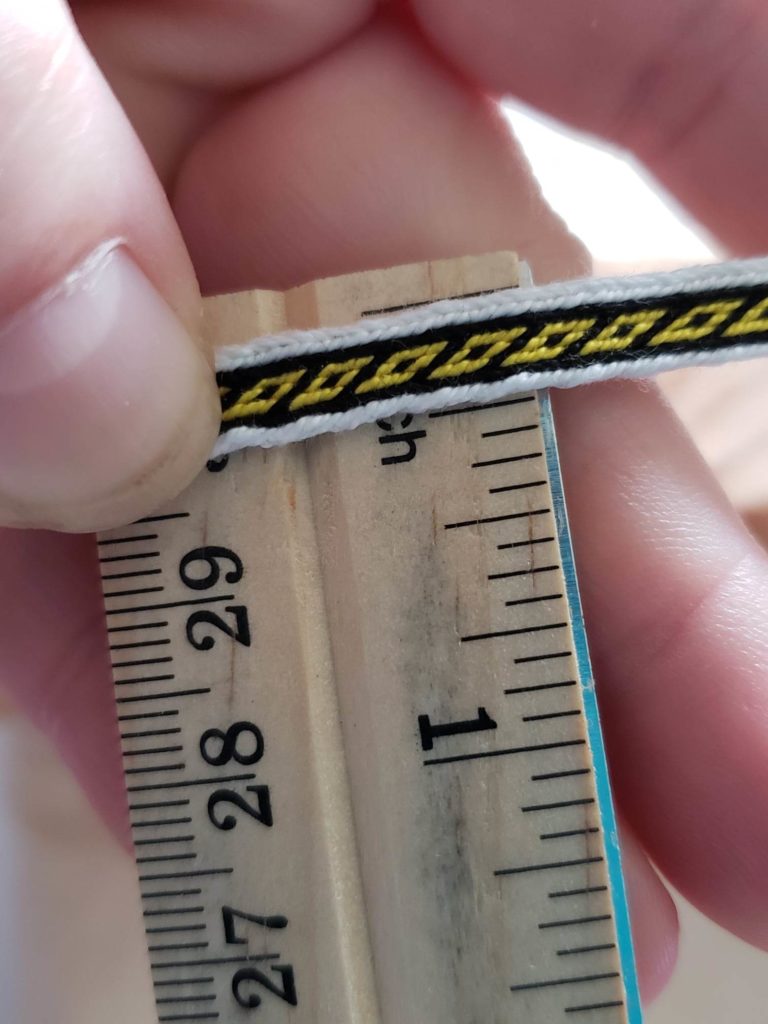
Size 10 Crochet Cotton

5 mm in the Crochet Cotton

I decided to warp up a very small project on the Oseberg table loom with size 10 crochet cotton. It’s what I have on hand and given the pandemic and limited ability to search for other options in the stores…we’ll go with it.

And wouldn’t you know it…it’s a match! 5 mm exactly! So if silk is not available, this is the size you can use for period tablet weaving.
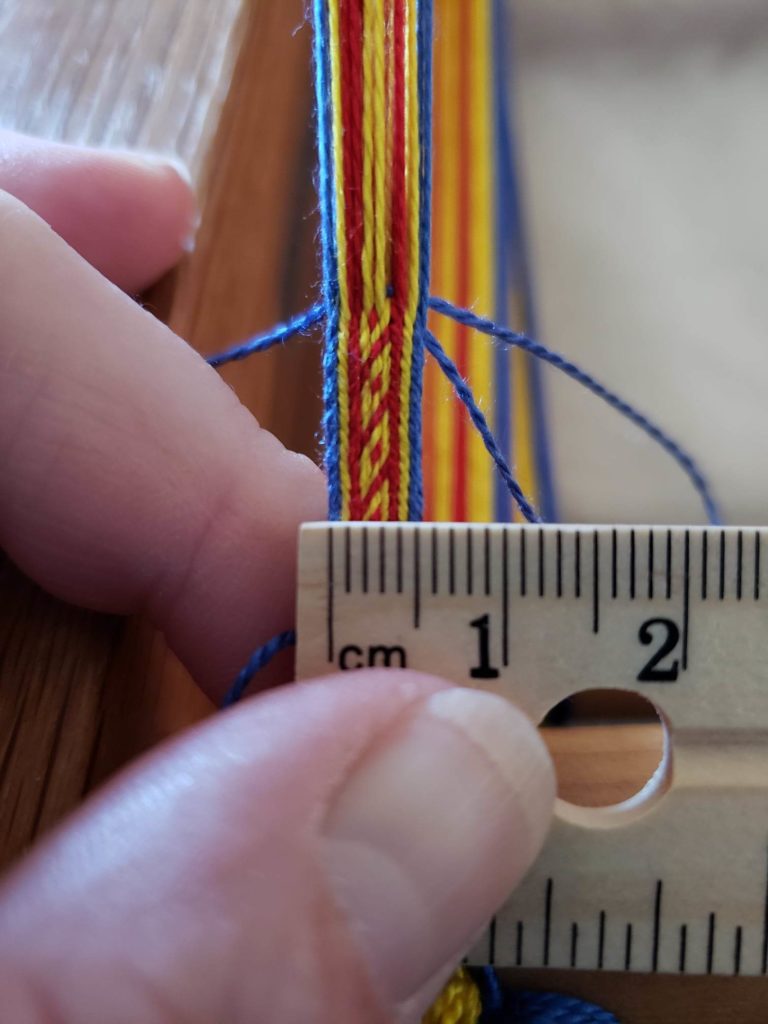
20/2 Silk

I ordered some 20/2 silk, which was listed as ‘lace weight’ yarn, hoping that the slightly larger size would yield better, and more size-appropriate, results. Discussions with one of my Oseberg connections suggests that this would be the proper size thread. I warped up the loom in the 20/2 silk to test the size and it’s exactly the right size!
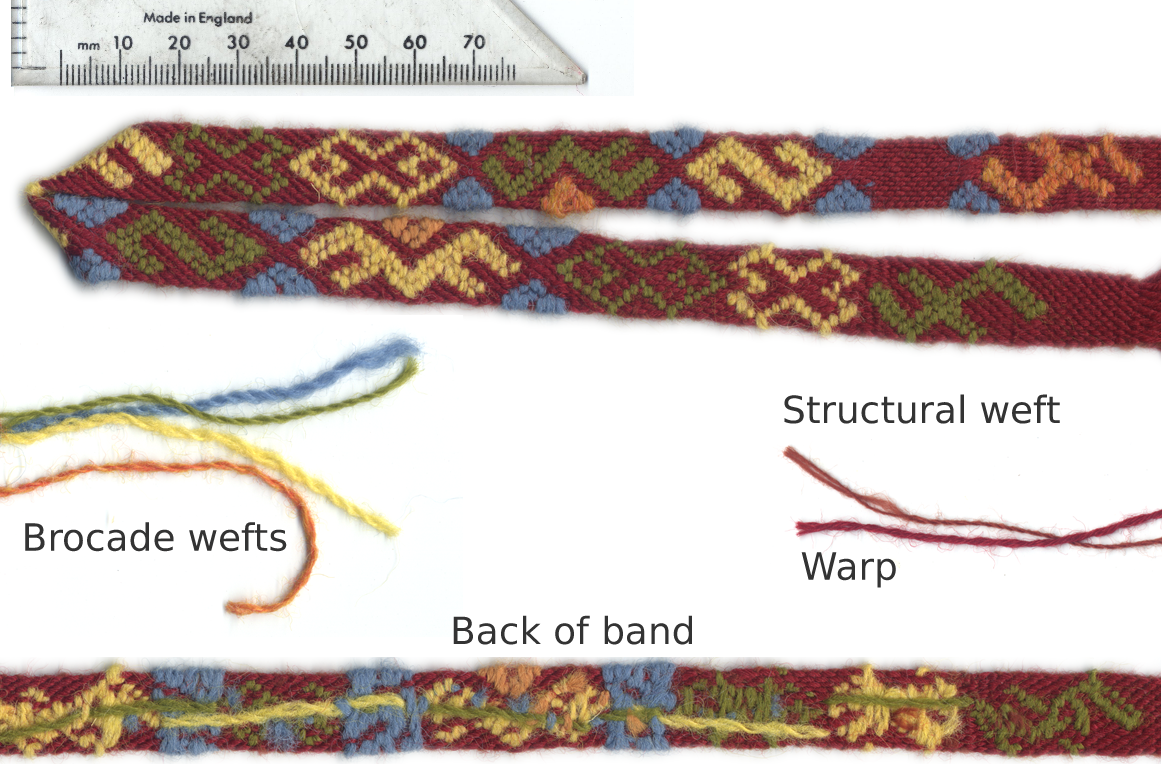
Further Research

Note the loops in the bottom side of the woven piece.

Brand new research–and I mean the book is due out next month–is that the band appears to have had a few additional threads added on the edges, possibly in linen or some other vegetable fiber, that has deteriorated over time. Bente Skogsaas, a weaver from Norway who has authored this book, noted in her study of the piece that the weft has small loops on the edges, as if there were more threads that had been there but had decayed. She suggests that it’s possible that they found it difficult to sew through the silk to attach the weaving onto garments, so the linen threads added to the edge was easier to sew through. I agree with this hypothesis and contend that sewing through the linen is more forgiving to that kind of abuse than the silk. I can imagine that silk might pucker or gape in an unattractive way if you sew through it. Also, if the silk needs to be removed for laundering the garment or attaching to a new garment, it would put the wear and tear on the linen instead of the silk.

Adding this linen border would increase the overall width of the woven piece; however, it would not change the look and dimensions of the main part of the design. Perhaps in the future, I’ll try weaving a piece using linen on the edges to see how this changes the width and if it makes a difference in attaching the woven piece to a garment.

Future Weaving Projects

Hallstatt 3

There are many more period bands to research and recreate, and more videos to be made for new weavers. I still have 18 more woven bands to finish for the Laurel Kingdoms video series project, and the next one (a sneak peek for you all!) is going to be a throw back to ancient times, the Hallstatt 3 band (HallTex 152) for the Kingdom of Atenveldt, which dates to 800-400 BCE. Some fantastic research was done on this piece three years ago and revealed a lot of great information about this fragment. The original was made in wool and I’m tempted to invest in a couple cones of weaving wool, but I need to find a source of affordable lace weight yarn that is strong enough for weaving.
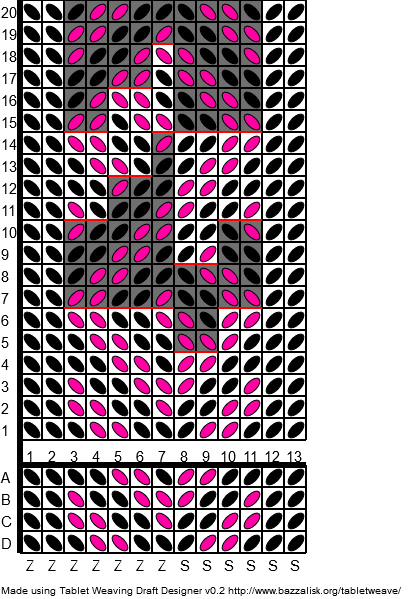
This image has an empty alt attribute; its file name is hallstatt-3-Atenveldt-4-hole.jpg

Icelandic Brocade

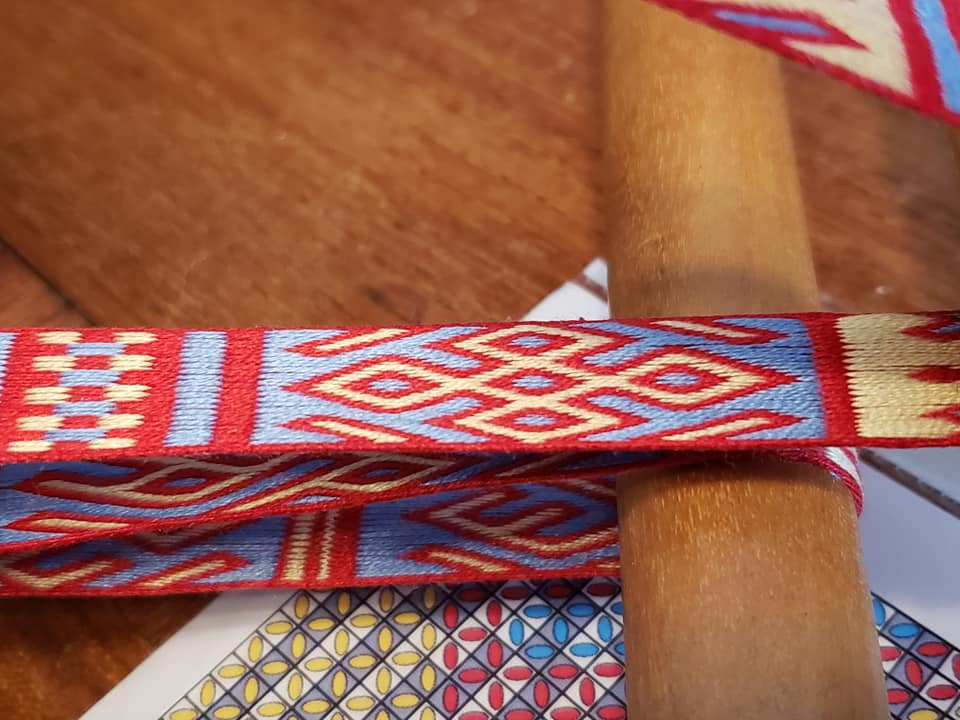
Also, one of the items I will be weaving for a future project will be a brocade pattern, a weaving style that I have only done a very small amount of…about 3″ worth.

There is a project I’ve picked out to do and it has the least amount of brocade possible that would still qualify it as a brocade.

Reconstruction of the tablet woven band from Reykjasel i Jökuldal by Aisling.

The only part of this design that is a brocade is the white zig zag across the top. This will be a great way for me to dip my toe into the waters of brocade without being overwhelmed, like I was in my first project.

Køstrup Brocade

The Køstrup band is another one that I’m thinking about doing which has a series of different brocade designs and looks really stunning. This find was in a 10th century grave from Denmark.

http://urd.priv.no/pics/viking/kostrup/x584.jpg
http://urd.priv.no/pics/viking/kostrup/x584.jpg Extant Kostrup band
http://www.shelaghlewins.com/tablet_weaving/gallery/kostrup_band.png
Weaving by Shelagh Lewins, photo used with permission.
A free pattern is available from TwistedThreads.org

I’m looking forward to learning and teaching more using the online platforms, and–when this plague leaves us behind–teaching in person when possible.

Bibliography

Gundersen, Kristine. Viking Age Dyes: A Brief Overview. 2013 (Also Tournaments Illuminated #191, 2014). https://www.academia.edu/4652690/Viking_Age_Dyes-_A_Brief_Overview
Kjell S-e Bull-Sveen blog: https://vevstua.bull-sveen.net/?p=5556.
Lester-Makin, Alexandra. The Lost Art of the Anglo-Saxon World: The Sacred and Secular Power of Embroidery, 2019.
Lewins, Shelagh. https://www.shelaghlewins.com/tablet_weaving/gallery/kostrup_notes.htm
Norsk Folkemuseum. https://norskfolkemuseum.no/
Pasanen, Mervi. Applesies and Fox Noses. ISBN 978-952-5774-49-8, Salakirjat, 2013. https://www.salakirjat.com/product/159/applesies-and-fox-noses—finnish-tabletwoven-bands
Priest-Dorman, Carolyn. Colors, Dyestuffs, and Mordants of the Viking Age: An Introduction. https://www.cs.vassar.edu/~capriest/vikdyes.html
Skogsaas, Bente. Blog. http://www.findglocal.com/NO/T%C3%B8nsberg/733085720422001/Oseberg-tablet-weave
Skogsaas, Bente. Oseberg Tablet Weave Book I (34D) and Osebert Tablet Weave Book II (not yet published) https://www.facebook.com/bente.skogsaas/
Thunem, Hilde. http://urd.priv.no/viking/kostrup.html
Twisted Threads Kostrup pattern. https://twistedthreads.org/pattern/zn6qDBWB5QJ4mJJHw
University Museum of Norway Photo portal http://www.unimus.no/foto/#/search?q=Oseberg%20brikkevev*&museum=KHM
Viking Ship Museum https://www.khm.uio.no/english/visit-us/viking-ship-museum/exhibitions/oseberg/
Wikipedia. https://en.wikipedia.org/wiki/Oseberg_Ship#Burial_mound

Other Projects – Gallery

A gallery of images of other stuff I’ve been working on.

6th century tablet weaving for Birka Coat
Birka Coat
Six Board Box made in class from AMR
Inspiration photo for Pink Ladies Dress
The Pink Ladies Dress, 12th Night 2020
Oseberg 12L1
Oseberg variation
Ladoga Burial Mound, Karelia, Russia, 10-12th c.
Ladoga Burial Mound, Karelia, Russia, 10-12th c. skip hole variation
Birka 12, Sweden, 9th c.
Oseberg 12L1, silk
German 14th century
Checky fabric created from linen squares for Royal Sleeves, Sept Crown 2019
Checky linen, detail
Karelia, Russia 10-13th c.
Wool scouring, July 2020
Beading Royal sleeve for 12th Night 2020
Group applique on Royal Sleeve for 12th Night 2020

10 Replies to “Teaching Tablet Weaving During the Plague and Beyond”

‘Izza al-Dimashqiyaa ‘Izza al-Dimashqiyaa says:
July 14, 2020 at 3:19 pm Edit

You are my hero!

I took an class at an event and had so much fun I invested in a loom, cards, books, etc and then when I tried to sit down and do it at home…no luck. Every time I try to get started I can’t seem to get past the warping! Thank you so much for not just teaching, but truly starting at the beginning with warping, patterns, etc. I have now subscribed to your channel and will work on dusting off my cards and giving it another try. Thank you!!
Reply
Eowyn de Wever says:
July 14, 2020 at 12:41 pm Edit

The one comment on the warp weighted loom; I’ve seen two variants. One is a long board on a table, and the weights dangle off the end. (See Guntram, for instance.) The other is very similar to a setup for a viking tent, only with a much smaller top pole. On each side, you have two poles that meet at the top; mine has cord between the two poles around mid height so that the legs don’t spread apart too far.

The latter setup for me works nicely in front of the tv.
Reply
Elisabeth de Rossignol Elisabeth de Rossignol says:
July 13, 2020 at 8:53 pm Edit

I am currently checking out the YouTube videos. Congratulations and well done! You’re quite right that many instructional videos on YouTube don’t really address what the beginner needs to know, and recognizing this gap and addressing this is a real public service. I look forward to hearing more about your work and future plans.
Reply
Gwennan nic Ailpien says:
July 13, 2020 at 8:36 pm Edit

Greetings from the Hon Gwennan nic Ailpein in Shire of Lost Moor in Calontir!

I was very happy to see the advanced level of research and card weaving you have been doing. Cuz wow! Its wonderful to hear that you are teaching as well! I am glad to see that you also researched the different types of looms that were used with card weaving. Very nice!

Card weaving is not my specific specialty; I spin and weave, but on different types of looms as well as dyeing. I process the raw sheep wool into useable fiber and then spin and weave it.

I would love to chat with you in some way. I have a few questions for you concerning card weaving. I hope you will email me.

Have you done any dyeing or used handspun yarn for your projects?

I really enjoyed reading about and
seeing your wonderful work. Thank you for doing this!
Reply
Viscountess Kerij-e Viscountess Kerij-e says:
July 13, 2020 at 8:57 pm Edit

Hon Gwennan, you are welcome to sign up as a Participant and request a 1:1 meeting! ~ Kerji-e, Athenaeum Staff
Reply
Katelijne van der Ast Katelijne van der Ast says:
July 13, 2020 at 3:50 pm Edit

Hi Elewys,
Always a pleasure to see your work! I subscribed to your youtube channel as my daughter is interested in starting to tablet weave. Thank you so much for the wonderful examples and clear process steps.
Reply
Elonda Blue Haven says:
July 10, 2020 at 9:45 am Edit

Very interesting. I was just going to watch a portion of your video and ended up watching the whole thing. You have such a great teaching presence. I have a book on Latvian cardweaving that I picked up in Riga last September. I really would like to see your take on some of the items in there. It is written in Latvian but the pictures are in English.
Reply
Margaret Hamilton of Stirlingshire says:
July 9, 2020 at 7:07 pm Edit

Good angle on the video! That Oseberg pattern has quickly become a favourite, interesting to hear about the linen edge threads. Great article. Thank you!
Reply
Guido d’Aquila says:
July 9, 2020 at 6:48 pm Edit

I love the tablet weaving you have done. I’ve just started in the past two months and have jumped in with both feet. 50 bands so far. It would be great to chat some time.
Reply
Elewys of Finchingefeld Elewys of Finchingefeld says:
July 9, 2020 at 6:49 pm Edit

Sure! I would love to!
Reply

Exhibit Table of Contents

My Year in Review
Teaching at Home & Abroad
Enter “Weave Along With Elewys”
Building Skills
A Close Look at Oseberg 12L1, 834 AD
Goal
Extant Object
Materials
Colors
Pattern
Tools
Non-Period Loom Options
Period Loom Options
Backstrap
Box or Tape
Oseberg
Warp Weighted
Cards
Period Card Options
My Experiments in Weaving
8/4 Cotton Warp
60/2 Silk
20/2 Silk
Size 8 Crochet Cotton
Further Research
Future Weaving Projects
Hallstatt 3
Icelandic Brocade
Køstrup Brocade
Bibliography
Other Projects – Gallery

About the Exhibitor

Elewys of Finchingefeld Elewys of Finchingefeld
Branch: Barony of Aquaterra

Enthusiastic student, focusing on tablet weaving, lampworking, spinning & costuming. Serving Mistress Isolde as both apprentice & protégé for the last 5 years.

Athenaeum 2020

Weave Along with Elewys, Ep. 33: Seydisfjordur Smokkr Weave

A landslide in 2020 uncovered a bunch of archaeological finds in a small village on the East coast of Iceland. Beads, a ring, and this fragment from a woman’s smokkr were found, and this piece of tablet weaving on the smokkr is a beautiful example of weaving from the 9th-11th centuries.

Top of the smokkr with woven trim, about 2 cm wide, and a loop for a broach
I think this is a decorative broach! Maybe not one that went with this dress….

Here’s pattern A. It’s not twist-neutral by itself, but weaving the reverse will untwist that pattern! See pattern B…

Pattern A courtesy of Marcelo Oliviera, Brazilian Speed Weaver 😀

Updated pattern B! If you were here on the first day, you will have noted there was an issue with the pattern–a few of the picks were missing at the end. I rebuilt the pattern and here it is!

And this is part B…weave both parts and it will create a twist-neutral repeat.

And just for a little more variety, there were a couple other motif ideas that I saw, so I drafted those up as well.

Another option with a “scissors” motif, version A
Another option with a “scissors” motif, version B

Weave Along 24: Birka 2f

The last installment in the Laurel Kingdom series! Avacal!

I thought I would do one more Birka pattern to finish the set, this time choosing a design that I couldn’t find a pattern for. It gave me the opportunity to challenge myself to create a pattern from just a sketch. This is the sketch of Birka 2f that I found:

Birka 2f, found in Sweden, dated 8th-10th centuries

I used the Tabletweaving Draft Designer to create the patterns, which can be found at https://jamespbarrett.github.io/tabletweave/. A video to help you navigate the program and learn some of the features can be found here: https://www.youtube.com/watch?v=OmPy61SSTP0&t=3s.

4-hole sample and pattern:

It really didn’t turn out how I imagined. It’s not terrible, but I wonder if it would look better using finer threads? That’s something I’ll have to try in the future.
Birka 2f: 4 hole pattern

Skip hole sample and pattern:

This turned out far better! Skip hole pattern. The border is the same but the middle cards create a much narrower piece with more defined designs.
Birka 2f: Skip hole pattern

Avacal is the newest Kingdom in the SCA, formed from Saskatchewan, Alberta and a tiny bit of BC; the eastern slope of the Rocky mountains.  Their colors are yellow, white and red.

So there you have it! The final installment of the Laurel Kingdom series! I hope you enjoyed it and will start weaving up your own pieces and creating patterns of your own to share with others. I’m not sure what my next projects will be–perhaps I will go through Tablets at Work and learn all the different types of techniques that have been found through history.

Yours, the warped and twisted,

Elewys

11th c. Finnish Masku Humikkala

This is a lovely 11th century piece with some half-turns included, which are indicated by the ovals inside the ovals.

· Humikkala is a little town about 20 minutes northwest of Turku, Finland. Built around 1490-1510, the Masku Church and surroundings represents one of the oldest parishes in Western Finland.  dedicated to John the Baptist and St. Ursula. Next to the church is the Masku Museum, founded in 1974, which has a collection of finds from the local area.  Near the church, researchers found an Iron Age burial ground. The Humikkala cemetery, called the “hill of corpses” is on a hillside next to the Masku church.  There were 49 inhumation graves found here, and this fragment came from grave 32. Like others, this find is dated to 1000-1100.

· A note about the identification of finds at these anthropological digs.  While I couldn’t find the specific item number for THIS piece, I did find one for another one in the neighboring grave.  This item was given the code KM 8656: H32:18 ; KM is Kansallismuseo = National Museum of Finland; the number 8656 identifies the dig site for the Humikkala findings, H means hauta = grave, 31 is the number of the grave, and 18 is the object number in that grave.  Having these identifying numbers helps a great deal when you are looking for more information from the museums that store these finds.  This piece was actually found in grave 32 (H32), so we know that the item code would start KM 8656: H32… I’m still looking for the item number on this guy…but having that much information narrows down the search tremendously.

Seija Sarkki researched it in the 1970´s publishing a book in 1979 called “Suomen ristiretkiaikaiset nauhat” or The Finnish Crusades.
Volume 18 of Helsingin Yliopiston arkeologian Laitos. Moniste
Moniste (Helsingin Yliopiston Arkeologian Laitos)
Volume 18 of Moniste / Helsingin yliopiston arkeologian laitos, ISSN 0355-1881 ISBN 9514516281, 9789514516283

Sarkki, S. (1979). Suomen Ristiretkiaikaiset Nauhat. Arkeologian Laitos. Helsinki, Helsingin Yliopisto.

Sarkki was not a weaver and had a unique way to translating the textiles by trying to figure out how they were woven, and Maikki Karisto, co author of Tablet-Woven Treasures and Applesies and Fox Noses, took her drawings and created patterns from them.  This proved to be challenging for Maikki and Mervi Pasanen; the pattern above is the result of that reconstruction.

I hope you enjoy weaving this piece as much as I did! It’s got a lovely texture to it and will be a gorgeous addition to your medieval kit!

Weave Along with Elewys: Ep 16, Dublin Dragons of Drachenwald

I was very excited to show you all a piece from something other than the Norse or Baltic countries, but it turns out that during the 10th century, from when this piece was made, Ireland–especially the coastal cities like Dublin–were occupied by the Vikings.

However, this is such a well-loved design and I had gotten several requests for it, so here it is!

The extant fragment, c 950 AD

The pattern:

This is a double-sided pattern, so if you have golden dragons on a fire-red sky, on the other side will be fire dragons in a golden sky.

Weave Along with Elewys, Ep. 13: Oseberg 21

There are several tablet weaving fragments that were found in the Oseberg burial, and this is one that I designed based on images I have found on the internet. I cannot vouch for its historical accuracy, but it is one interpretation of the design and it looks FABULOUS!

As I mentioned in the previous pattern from the Oseberg dig, these finds date solidly in the Norse era, 834 AD. A large burial mound was discovered at the Oseberg farm near Tønsberg in Vestfold county, Norway. The ship and some of its contents are displayed at the Viking Ship Museum at Bygdøy, Oslo. Among its finds were a loom (commonly called the Oseberg loom), weaving tablets, a sled, a cart, animal carvings, quite a number of textile remnants, including a work in progress (known as 34D). The burial contained the remains of two women–one about 80 years old, and the other somewhere between 25 and 50 years old (opinions vary) and she may have been a slave or a relative to the elder.

This weaving piece is being done in the colors of the Kingdom of Calontir as part of the Laurel Kingdoms project–halfway through the list! The Kingdom is made up of the states of Iowa (but not Davenport or Bettendorf), Kansas, Missouri, Nebraska, and the city of Fayetteville, Arkansas. Their colors are purple and gold.

Heraldic arms for the Kingdom of Calontir, founded in 1984.

Edit: A comment from Amy Bischoff suggested that I make a couple of minor changes to the pattern to make it twist-neutral! Thanks, Amy! The pattern here is the new-and-improved version.

There is a pair of books written by Bente Skogsaas that has patterns for many other pieces found in the dig if you are interested in doing more of them (the newest book is on my wish list…). She is self-published and is doing all the sales and distribution of the book, so you may contact her directly through Facebook: https://www.facebook.com/bente.skogsaas. (PS – I am not getting any kickbacks from the sale…just putting it out there for those interested in adding to their library.)


Weave Along with Elewys, Ep. 12: 10th Century Mammen

In the mid 1800s, in the town of Mammen, just outside of Viborg, Denmark, a farmer discovered a grave from the 10th century. Inside was a treasure trove of rich textiles and weapons, laid there to honor a man who was in the service of King Harold Bluetooth. Among the many finds, which included wax candles, silver axes, and silks, was this lovely piece of tablet weaving.

My middle kid, Cam, asked for a piece of weaving for Christmas, and sent me a photo (from Pinterest) with this pattern on it. I recognized it as a period pattern, and knew that I had to share it all with you. She chose the colors–so it’s not part of the Laurel Kingdoms project. And it’s not exactly like the period piece–apparently the original had 17 cards, was made from both wool and a vegetable fiber (probably linen) that degraded, and the pattern was likely done in a brocade technique. However, this double-sided, skip-hole weave is so lovely, I think you’re going to enjoy it!

Because the black threads in this piece were threaded ABBA, it made me think of music from my very young childhood…and I named this piece Mamman Mia. I know…terrible joke, but I’ve been spending a lot of time indoors….the weather is dreary and the endless months of virus lockdowns have taken their toll.

Despite 2020 being the dumpster fire that it is, I have a lot to be grateful for–my family, my friends, YouTube, and my faithful viewers. Here’s to a much better 2021. Thanks for a terrific year!

Elewys

Weave Along with Elewys, Episode 7: Snartemo II

The last video for the Hallstatt 152 skip hole may have been a bit too advanced for a beginner, so here is a very easy skip hole pattern for beginners!

The original band was found in Hægebostad in the southern part of Norway and dates to about 500 A.D. The tablets in the central area were threaded with only two threads per tablet, the border tablets with four.

The three graves at the Snartemo farm were excavated over an 85 year period, between 1847 and 1933, which uncovered a number of fantastic pieces, including a sword, glass beakers, gold rings and more, dating to about 500 AD. Grave II (excavated in 1878) and Grave V appeared to be those of a warrior nobleman, both containing remarkable textiles, including the bands we know as Snartemo II and Snartemo V, the latter being significantly more complex than the former. The simpler band from grave II was woven with 17 tablets in two colors of fine wool using the skip hole technique. It measures 0.9 cm, but colors have not been determined as no dye analysis has been done. Lisa Raeder Knudsen did a study of the extant piece and said, “In Bjørn Hougen’s book “Snartemofunnene” 1935 a drawing is shown, but the analysis is not correct.” More recent in-depth studies have been done very recently; the link is below.

As part of my Laurel Kingdoms project, this piece is celebrating the Kingdom of Meridies, which was created in 1978 from the Kingdom of Atenveldt in the Southeast United States. Its borders currently encompass the entirety of Alabama; almost all of Georgia; a sizeable chunk of Tennessee; a bit of Florida; and small portion of Kentucky. Their colors are black and white.

This pattern is completed by simply turning all the cards forward, throwing the shuttle after each quarter-turn. When the threads become over-twisted or after a chosen number of repeats–often I switch after 12 or 16 repeats–turn all cards backwards, throwing the shuttle after each quarter-turn. Easy as that!

Now, there is the new technique that was found in a recent discovery of a rolled hem. I could type up all the directions and details, but all of that can be found at their web site here: https://www.vestagdermuseet.no/snartemo-ii-narrow-band.

I hope you’re all enjoying this series and learning a lot in your weaving escapades! Let me know if there are more patterns you want to learn!

Elewys

Tablet Weaving for the Absolute Beginner: Birka 6

What is Tablet Weaving?

First of all, card weaving and tablet weaving–same thing. The terms are used interchangeably depending on where in the world you’re from. It is a form of narrow band weaving using tablets to form a shed (the space between the top threads and bottom threads), and a method of weaving that can create complex patterns. This not only shifts threads from top to bottom, but twists them around each other creating a very strong woven band.

A Bit of History

The oldest woven piece was found in a salt mine in Austria between 1200 – 1500 BCE. This means it’s quite possibly contemporary with Queen Hatshepsut of Egypt. Several more pieces were found in that same salt mine–the atmosphere of which helped preserve the fibers–which date from 400-800 BCE. Many of them were very complex patterns and the details of these have been analyzed for thread size, twist, color and method of construction, so we know exactly how it was made!

Tablet weaving continued to be a popular way of decorating clothing and household goods until about the 15th century when people started using beads, gems, embroidery and precious metals as decoration.

Looms & Weaving Methods

There are a number of ways that you can do tablet weaving, and you really have to try a few (or all) of them to figure out which is best for you.

Backstrap

This is a favorite among many weavers–the ability to weave almost anywhere, as long as they have a belt and a stationary object to attach to. This could be a pole, railing, banister, door knob, heavy chair, a very patient friend, or even a stick that is held under your feet. If, however, you find that you need to set down your weaving to chase after small children or animals, this may not be a very convenient method for you.

Applesies author, Mervi Pasanen.

Oseberg

The Oseberg loom was found in the Oseberg burial, dating to about 800 AD. It consists of two upright poles, about 3 feet high (1 m) set about 6 feet apart (2 m). There is a crossbar between them and your weaving is affixed between the two posts. You sit at a bench to weave. This is a beautiful image to see at recreation events–Norse, SCA, or even high Middle Ages. You can even design them to disassemble for transport to and from events.

The book of hours and hours and hours of weaving! France, Paris, ca. 1425-1430
MS M.453 fol. 24r
Image of card weaving from a festal missal of Savoy, ca. 1460 (The Hague, Koninklijke Bibliotheek, KB 128 D 30).
The Crack-Your-Head edition

Modified Oseberg

If space is a consideration, you can make a modified version with simply a 2 x 4 and a couple of thick dowels. This sits on a table and can be worked just as easily. You may need to clamp it to the table to avoid it sliding around.

Box Loom

For later periods, the box loom was the way to do narrow bands. These are perfect for having a small loom that can be set on a table top or even on your lap. It has a warp beam (the back rod for the unwoven strings) and the cloth beam (the front rod, for the finished weaving). This warps up like many rigid heddle or floor looms and may require assistance to get the proper tension, or some very creative methods of adding tension to the strings as you warp them onto the warp beam–a stack of heavy books or a moderately heavy chair, maybe.

Arachne's Blog: Planning a Portable Loom for Tablet Weaving

The Surfboard Loom

A poor cousin to the Oseberg loom and perhaps a first-cousin once removed to the box loom, this simple set up is another great option.

Beginners Loom RH-4 by OakeandAshe on Etsy

It can be built using a few simple tools and is small and portable.

Inkle Loom

This loom is the youngest of the bunch, presumably designed well after the Middle Ages (patented in the 1930s!), but it does act as both warping board and loom, keeps even tension and keeps threads organized. Of all the methods, this is my favorite, causing me the least amount of consternation and irritability. It is, however, limited on how long you can make each of your woven pieces. Most weave between 1 to 3 yards depending on the loom design…but don’t let that stop you…you can always design a bigger loom…

Monster Loom

When three yards isn’t enough…

This was not warped to its full capacity, but yielded nearly 8 yards of finished silk tablet weaving.

Weaving Yarn

There are several options for weavers to look for weaving yarns. Here are some ideas for what to look for, and what to avoid:

Wool: Wool hairs are made with little barbs that snag each other to form yarn when spun. Different methods of spinning can give different final products. You can have a very light, fluffy yarn that is soft on the skin, but doesn’t have the strength to be warped; it’s best used as a knitting yarn. You can also have a strong, smooth yarn with a lot of strength, which would be great as a weaving yarn. This is all based on how it’s carded and spun. So wool can be a great option, but you should look for a strong worsted weight wool. If you have some wool lying around, give it a test-tug. If it snaps fairly easily, it will likely snap under tension while weaving and you will cry. You should also check to see if the yarn is really…grabby. I don’t know what the technical term is, but if the wool threads stick to each other like velcro, they will do this while weaving and it will require a lot of extra patience.

Linen: A plant-based fiber that is reputed to be very nice to work with. I haven’t actually used linen yet, so I can’t offer any good advice on that. There are lots of beautiful colors and the fibers are known for being very durable and having a lovely sheen. I will be placing an order for a couple spools, just to try it out, and there are a bunch of colors here on big cones.

Crochet Cotton: This comes in a huge variety of colors in a few different sizes. I’ve done projects in just about every size available, but my favorite–and one that is close to period-accurate–is the size 8 pearl cotton that comes in the little balls (I’m sure someone, somewhere has big cones of the stuff…still looking for a good source). Most craft stores have this in stock–Ben Franklin carries quite a number of colors. Be sure to check color numbers on the spools to make sure they match. I once got several balls of red, only to discover later that I had two different shades of red (I didn’t notice it in the store, but sure noticed it when I got home!).

A gross of colors! $43 on Amazon.

Cotton Carpet Warp: The Maysville 8/4 yarns are heavier than the crochet cotton–by about double–but it makes a nice, robust weave. If you’re making a woven piece for a cloak, a bag, a guitar strap or a dog leash, this is a great material to work with. It has over 80 colors to choose from and the big spools are under $10 each, so you can do quite a number of woven pieces using just a few basic colors.

SILK: There is nothing bad to say about using silk! There are two sizes available from my favorite Etsy dealer; the 60/2 — a really fine thread — and the 20/2 — about the size of the size 8 pearl cotton. The silk has a luster and sheen that is unmatched by other fibers, it’s a dream to work with, and it’s strong! You can get large cones for $30 each or small 100 yard spools for $5. I got some of the small ones initially to see how well it worked, and within a couple weeks, was ordering cones. I won’t be using it for every project, of course, but for those special pieces, absolutely.

Cards / Tablets

Period cards were made from a variety of products including bone, horn, antler, wood, and leather. There are a variety of sizes that they came in, the Oseberg tablets being about 2 1/2″ (6.5 cm).

Most of the cards I use are of the 3 1/4″ (9 cm) cardboard variety–it’s what I learned on and what I’m used to working with, and several people cleaned out their craft rooms and their cards kept getting rehomed with me–which is great for when I teach classes! I have hundreds of them and don’t have a need to add to the collection. However, my husband just bought himself a 3D printer and has kindly printed some smaller 2 1/2″ (6.5 cm) cards that I’m going to try out. They might be a little thick–I prescribed the dimensions for them–the cardboard cards are about .6 mm each and these plastic ones are 1 mm. There are a few different designs for tablet weaving cards available on Thingiverse, including some Oseberg reproductions, so if you have access to a 3D printer–or know someone that does–maybe they can print some for you!

If you don’t have that kind of technology at hand, you can always make your own cards. You will need some heavy paper stock–like cereal boxes or cracker boxes–or even a deck of playing cards. Here’s a link to some instructions on how to make your own: https://www.instructables.com/id/Make-Your-Own-Tablet-Weaving-Cards/.

Reading the Pattern

As easy as A-B-C and 1-2-3! And S and Z…

There are a few things you need to be able to understand. Looking at the pattern, you will see the numbers–1 through 13. These are the numbers of cards–one for each column. Best plan to write numbers on the backs of each card, which you will need to reference for many patterns.

Along the side are the letters A, B, C, and D. This indicates what threads go into what hole on which card. For example, card 5, hole A is pink; hole B is black and so on.

S & Z Threading

This is one of the most disputed items–is S and Z…does it mean the direction of the thread or the direction of the cards? Well, as long as you know how the pattern’s notation is written, you can do it how you choose.

My method is this–if you have clockwise lettering on your cards, face it to the right. If your letters are counter-clockwise (anti-clockwise), face them to the left.

From there, the patterns I use this threading method:

Z threads go in the right side; S threads go through the left side.

Shuttles

There are a number of shuttle options–I’ve purchased belt shuttles (6″ to 8″ long with a tapered edge) & short stick shuttles, made shuttles from scrap wood in the garage, and even a wooden ruler I found in the school supply box. Use what you have and experiment to find what you like the best.

Warping the loom–at least for circular warps like on the Inkle loom–requires the ends to be tied together. I use a surgeon’s knot so that it’s secure and easier to untie if/when you make a mistake.

Getting Started

While it’s difficult to describe what a weaver needs to do for tablet weaving, I will note that I start with the shuttle on the left and the tail through the shed, hanging out to the right. This is just my personal choice as I try to finish weaving at the end of a repeat and put the shuttle under a piece of elastic so the shuttle doesn’t fall on the floor…which had happened about 12 too many times before it occurred to me to tether that sucker down.

So the shuttle is on the left, the tail is through the shed to the right with a long tail (5″ or more long). Turn the cards forward once, and throw your shuttle through to the right and bring the tail through the shed to the left. The cross-cross of this weft thread helps anchor the weaving. Turn the cards again, throw the shuttle, pausing to lightly beat the weaving. Do then you can start to tighten up your weft threads to draw the band together. Repeat the turns for 2 to 6 more times, depending on how well you like the look of the tension. This takes practice…

Begin the pattern with AD at the top. You may want to view the video for further instruction:

Zip ahead to about the 27 minute mark for weaving instruction.

Flipping Your Edge Cards

One thing to note is that this pattern is a zero-twist pattern–that is, as you weave, you don’t build up a twist like some patterns do, forcing you to either untie and untwist, use fishing swivels, or weave the pattern in reverse to untwist the warp. In this one, the only cards that build up the twist are the border cards. This can be easily fixed by either reversing the direction of the border cards–backwards instead of forwards–or flipping the cards from Z to S or S to Z, and continuing to follow the pattern as before.

Thanks for joining me! I hope you’re enjoying your weaving journey. Feel free to drop me a note on the YouTube comments if you have any questions.

Elewys

Birka 22…Weaving in Reverse!

One thing that tablet weavers experience frequently is twist in the warp that builds up until *something* has to be done about it. There are a few options that a weaver can consider.

  1. You can untie and comb out the twist and re-tie…but that can create some exceptionally bad tension problems.
  2. You can use a warp-weighted system that will untwist your warp as you go, but that is somewhat less portable.
  3. Or you could try using fishing swivels, which is fine for a shorter warp, but when you’re doing upwards of 7 yards, like I am for this project, chasing the twist through a dozen or more pegs means you need another plan.

I’m sure that there’s a term for it…mirror image weaving…flip card weaving…or…untwist weaving…but I’m calling it Weaving in Reverse! This method weaves out the twist while still maintaining the pattern. Sure, it has a small variation in it, but it’s virtually invisible at first glance.

Here was my first attempt at changing direction. It has…elbows. Sure, it works, but it’s not hard to spot. I wasn’t really happy with it, so I experimented a bit…

And this is what I came up with!

A virtually invisible…or at least excellently camouflaged…design!

And this is how it’s done. First, you’ll be weaving the pattern from bottom to top:

When you finish this sequence, weaving 1 through 8, loosen the tension on your warp a bit and flip all your cards–S will become Z and Z becomes S. Then retighten your tension on your warp.

Then you need to weave four picks of a transition, which are rows 4, 3, 2, and 1, in that order. You will only need to do this once.

Then weave the pattern from top to bottom–8 down to 1–and repeat. The white squares are still forwards; the grey squares are still backwards.

When your warp has twisted too tightly in the opposite direction, you can transition back. After you finish your 8-1 sequence, you will need to flip your cards again, and your transition sequence is picks 5, 6, 7 and 8…then start at pick 1 and proceed through to 8.

Give it a try! Let me know how it works for you! If you have any questions, of course, feel free to reach out and ask questions.

Happy weaving!

Elewys