Apprentice Report

I have been asked by my Mistress to submit occasional reports as to what I’m doing, progress, future plans, etc. I thought perhaps I’d post them here, for future reference.

Stuff I’ve done:

* Turned in the beads for the Lampworkers Guild. Was given a hug from Master Phalen and told I was “one of the good ones” for turning in the beads on time. Yey for meeting deadlines!

* Updated my AnTirWiki page (Elewys_Cuylter_of_Finchingefeld)

* Started a Pinterest board for goals for 2017: https://www.pinterest.com/elewys/2017-costume-goals/ (essentially making a jacket, sleeves and building a basic mix-and-match wardrobe, as well as making repairs and embellishing existing clothing pieces)

* Organized and ran (with relative success) the 12th Night Court Garb contest. Hopefully the word will get out and we will have more entrants and judges next time. I still need a go-to list of reliable and capable judges that I can reach out to ahead of time–broadcast requests for judges is never as effective as individual requests.  I can also ping them at a moment’s notice should we have issues with judge shortages at an event, etc.  Also, with the help of Mistress Raffaella, all prizes for the contest were distributed, so no chasing down people afterwards. I really like the idea of making charter scrolls to give with the prize (or in lieu of a prize) so entrants know exactly what they won. I think we could have a number of blanks for each level that we can fill in with names & dates, and have a “Judges’ Choice” award for the fill-in-the-blank reason (Best Use of An Tir Colors, in this case, but it could be any reason we choose). I will post this on the Costumer’s Guild FB page for discussion.

Birkenstock London* Because my brown Keens are not terribly period, I just ordered some London Birkenstocks to go with my outfit…they look very similar to the shoes that were available during the Tudor and Elizabethan eras. I hope I guessed right on the size…silly Euro sizes!  39 sounds enormous.

Shoe found on the Mary Rose, which sank in 1513.

Stuff I’m gonna do:

  • Gearing up for the Ursulmas event where I will be the point person for Ursulwyck Village. Only adding a few things to the village this year, unlike last year’s epic upgrade. We will have more standards and are looking for more white, navy blue, and dark green sheets.
  • Have reached out to a 14th-15th century costumer about building kirtles and hope that I can attend one of her workshops–she’s planning on having it in April, possibly. Even though I’ve settled on doing the Flemish thing, which is 16th century, they still wore kirtles.  I missed the last one due to illness. 🙁
  • Repairs and upgrades on a number of garments in my wardrobe:  re-hemming, sewing lacing holes (or adding rings), replace lacing
  • Make a few more garments to add to my wardrobe (a Pinterest image shows 5 kirtles and 5 overgowns can make a huge number of mix-and-match options), plus make a jacket for cold weather, lightweight partlet, aprons, and head coverings for daily wear.

Veils!

One of the things I’ve always thought is that for the SCA participant, no matter how good your costume kit looks, it always looks MUCH better with some kind of head covering.  Whether it’s a complex cap and veil or a simple coif or flat cap, there’s nothing that can add to the Dream like a medieval headdress.

In that vein, I’m working on my veil kit.  I now have all the pieces complete except one; I just have to finish rolling the hem on one piece.  I’ve been looking at a few different web sites for 14th century (or thereabouts) head coverings.  As you saw, I already had a fillet “pie” hat, a pleated fillet hat, and the barbette and coif (in the form of a St. Birgitta cap).  These were pieces I made about a year ago, and they have stood up pretty well (although storage and transport has made them a bit wrinkley).

end-of-nov-2015-5647  hat-2

These are really quick and easy to put on when in a hurry to get out to court or a meeting.  However, I decided I really needed to improve the set a bit and augment to the hat collection.  Additionally, I wanted to add some variety and some extra sunscreen protection for my extra-fair skin.

I was looking at Katafalk’s site and decided to follow her instructions to make a more formal veil kit.  First, I made some improvements to the St. Birgitta cap.  I deconstructed it, re-shaped it, and sewed it back together.  https://katafalk.wordpress.com/2014/01/16/st-birgittas-cap/

birgitta-old

The old cap was cut square, gathered, and the slit up the back had pulled out some, so it was too long.

birgitta-new

The fabric was cut at an angle and the entire bottom length was gathered, the slit shortened in the back, and the straps were re-attached.  They’re still a bit long, but I will make more adjustments as I wear it.

birgitta-on

This is what it looks like on.  It’s still a bit poofy in the back, but it may improve with better straps or additional fitting.

Then I went to her Wearing-My-Veil tutorial and made the pieces she outlined in her blog post.  https://katafalk.wordpress.com/2013/11/06/wearing-my-veil/

It includes an 8 cm x 44 cm forehead cloth, a piece that measures *approximately* 100 cm by 50 cm (hers was a little bigger, but I ran out of fabric), and a giant circle that’s about 90 cm in diameter.  Note to those thinking about doing this project–get 1.5 yards of 55″ wide lightweight linen.

When finished it will look something like this.

veils

I can also make a frilled veil to attach to it later, if I decide I want to try to make one.  At this time, there are dozens of frilled veils around the Kingdom and I don’t want to look like a Bandwagoneer.  In the meantime, I’m going to have more layers to protect my skin during the summer when I inevitably forget my sunscreen at home.

Rigid Heddle Weaving

me-weaving-at-arts-unlimited-2016

I saw a lady in the SCA selling her mother’s rigid heddle loom, which is something I’ve been wanting to do for a while. I started building one but got held up on the tensioning system, so I was happy to find this for such an amazing price! It’s a bit wider than the one I built, lightweight and portable.  After having worked on it, I can see myself weaving up a few yards of fabric on this to make a sheep-to-shawl project on it.

It took me a couple weeks, but I finally found some time to warp up a small project. I had four skeins wool yarn from a lady who was allergic. The yarn I pulled out was called “Olive medley” with a bit of peach and green and grey.  It was comprised of about 50% wool, 50% acrylic and a bit fuzzy.  I warped up two skeins of the yarn, thinking that I would need half for warp, half for weft (logically).  It proved to be a bit tricky to weave with at first, but it got easier as I went along.

table-runner-2016-f

table-runner-2016-e

table-runner-2016-d

table-runner-2016-c

table-runner-2016-b

It took about five or six days of weaving, including at Arts Unlimited last weekend, and finished it off yesterday, tying off the ends. It’s a lovely little table runner that I will give to Mom for Christmas.

table-runner-2016

January Beads, Weaving & Other Stuff

(Originally posted 28 Jan 2014)

The end of January is nigh upon us and I have several things to show…at least in beads and a bit of weaving.

First, there’s me…I set up a table at Ursulmas where I made beads for the weekend.  While there was a demo display booth contest, there were significant limitations as to what I could do given that I was going to be actively demonstrating beadmaking.  Where the booth was located (unknown prior to set-up)?  What I can display that isn’t flammable?  Is there a banner and how do I hang it?  I can’t bring a tent or pop-up with a roof, so what can I bring for ambiance?  So many questions.  I brought the color copies of Callmer’s beads and brought all the old beads I could find that I store in a small treasure box.  Unfortunately, there’s a lot of old & ugly beads from my first months of bead making; I had strung them on dental floss and hung them over the treasure chest on the table.  I need to pull those aside and keep them somewhere else…like decorating the garden or something.  Some of my later beads were loose in the box, and the newest ones were strung on mandrels on the table.

end-of-nov-2015-523-copy

File:An Tir Lampworkers Guild.jpg

I was told there was a banner for the Kingdom Lampworkers Guild, and it would be delivered Saturday morning.  I found the current banner design posted on the Lampworker’s web site; the banner was made for a previous event, but the design was not fully vetted by the Heralds, so it is currently an unofficial banner (not passable, apparently).  Since the Lampworker’s Guild does not have a device registered with the College of Heralds, I had some discussions with a couple of them at the event to come up with a new passable design.

In any case, the banner might not be understood by the public, so just to make it clear to passers-by, I made a lettered banner that simply reads:  “Lampworkers Guild” in a font called King Harold, matching the lettering from the Bayeux Tapestry.  I hung it using the packaging tape I had with me on the exposed pipes in the frigid hall.  It ended up being the only banner, as the Lampworker’s banner ended up not arriving after all.

Although I didn’t mean to be the exclusive lampworker working the booth, I was the only one there for more than half of the weekend; Aenor joined me for a while on Sunday, making a few beads in the frigid hall.  It was so cold on Sunday that the bead release was not drying and we walked around with our plastic buckets of vermiculite looking for a heat source.  The portable heaters outside were turned off to save fuel; they said they were only heating the building at night (which didn’t make any sense–no one was in the building at night).  I dipped the mandrils and more than 90 minutes later, the bead release was still wet.  If you heat them using the flame, the stuff dries too quickly and either cracks or explodes off the mandril.

Because I had more than 16 hours of uninterrupted time to make beads, I was able to finish almost 40 beads over the weekend, using just under two tanks of propane–I was able to make several more after returning home.  I finished all the beads I needed for the Kingdom gifts to Caid and Glen Abhann–they’re not due until July Coronation, so I got the Gold Star from the Guild head. 🙂  There are more than I need here, so I will send on the best 20 of each colorway.

Here are a few that I made over the weekend, in addition to the Caid and Glen Abhann beads…I also made a few as part of a commission for Jadwiga.  She chose six others that I failed to photograph before she came to pick them up.

I am also doing a little card weaving. I finished the weaving for Tyrssen of Middle Kingdom and warped up a new one on the loom.

I brought the loom with me to the event, but didn’t do any during the weekend.  The booth next to mine was occupied by Demo Winners, Emma and Nigel, who covered their table with weaving and leatherworking items.  I placed my loom on the edge of the table, next to hers, to add to her display.  This one is strung up with Perle cotton, using just over four balls of strings–one yellow, one black, and two red–in #8 floss.  I had quite a time finding extra red floss, and ended up having to replace it with a readily-available color.  Red 666 was available during the holidays, apparently, but not later, but everyone was carrying Red 321.  I had to un-warp six cards, and I’ll use those threads in a later project, I suppose.  While this is more expensive than using the cotton warp, the cost of materials is still under $20, it comes out lovely and shiny, and the cards turn smoothly.  I have a couple other projects in mind that I might try, using these threads as a substitute for silk.

The Kirtle of DOOOOOOOOOM!

(Originally posted Sep 9, 2015)

OK… It’s not really doom-worthy, but it took a lot more adjustments than I thought it would in the end.

I was over at a Lorenzia’s place for an open house sewing day and was surprised with gifts of “door prizes!”  She had some linen that she bought and it was much darker than she thought, so she passed it on to me because I said I could probably use it for something.  That’s quite a nice gift!  It didn’t take me long to decide that I wanted to turn it into a kirtle.

I dug around for quite some time, poking around all the nooks and crannies and cupboards and boxes and buckets…and finally gave up looking for my pattern that I made earlier this summer for the Perfectly Period Feast.  I grabbed my old kirtle and drew up a new pattern based on that one, hoping that the measurements came out OK.  I laid it out and cut out the linen and sewed it together.  Then I took it in where it was extra loose and baggy, and while it still fits a bit loosely, it’s flattering and is quite comfortable.

Normally those wide scoop neck garments cause the shoulder straps to just slip down but this one didn’t.  The sleeves I made help immensely with that.  I was really surprised!  I had to make the sleeve pattern to fit the opening, which did not follow all the whoopy-sloopy patterns that you see for Elizabethan sleeve-making; they wouldn’t have fit the opening at all.  I just cut fabric like you would a t-shirt (90 degrees out from the dress), but trimmed it to fit the curve of the opening.  I can easily move and raise my arms and hug people, and it’s snug enough that it keeps the shoulder straps up, which would normally slide down *constantly* off of my slopey shoulders.  I do have to shorten the skirt in the front just a little–the fabric has stretched a little from hanging and there’s a little bit in the front that I keep stepping on.

I wore it to Crown this weekend and hoped to get a photo in it, but apparently I am elusive when it comes to photography equipment.  I always seem to be just a couple feet to the left or right of where the group shot is taken.  No idea why that is.  The only one I’ve seen so far is this one…and I’m in the shadows…and I’m not wearing the blue dress.

I did get my hubby to take a photo before I left for camping, so here it is:

He was sitting comfortably on the couch and didn’t want to get up, so you get the awkward angle and all the coats and things in the background.  I did get some feedback from a costume Laurel who said, “the kirtle looked great–especially the fit of the flare around the hips. From a distance when I saw you in the kitchen tent while I was standing at the edge of the eric, it really had the “just stepped out of a manuscript painting” feel.”

I admit it…I swooned at that comment!

Camping in cooler weather has given me cause to revisit my wardrobe and make a short list of things I need to make or remember to bring next time:

  • Hood (liripipe or other)
  • Tall socks (left my wool socks at home…dang it)
  • Sleeping cap
  • Surcoat (my grey and blue coat has gone on walkabout, but I need to make one that covers the v-neck anyway)
  • Another St. Brigitta cap (Aenor borrowed mine, and I think it fits her better!)

I also made a short list of things I want to add to my encampment, but will have to overhaul my bins and boxes to make sure it all fits and is collapsible.  Some of them include:

  • Wardrobe rack & dresser (nightstand?  Plastic drawers?)
  • Washstand and mirror
  • Kitchen stand/prep area (I have one that’s fairly modern–I have never packed it for SCA use, but I will in the future!)
  • Storage system for breakables (goblets, mugs, pitcher, etc.)  Maybe thick padded drawstring bags?
  • More rugs for the floor
  • Cloak hooks on center pole
  • Privacy curtain indoors
  • Propane oven….ooooo!  Fresh bread, pasties, meat pies…
  • Brazier.  I have one that folds up, but it’s kind of a pain in the butt, rusted, and very dirty to put away.

So I guess that’s my to-do list for the winter!

Frigga the Loom

Originally posted Sep 26, 2015

Warp Weighted Loom:

I decided to build a warp-weighted loom a couple years ago.  I consulted a BUNCH of web sites (and Pinterest) and looked for sources (books) that I could look to, but most of the books I could find on warp-weighted looms is dated from before 1980.

Barber, Elizabeth Wayland.  Women’s Work:  The First 20,000 Years. W. W. Norton & Company; 1995.
Broudy, Eric. The Book of Looms.  Brown University Press, 1979.
Broholm, H.C. and Hald, Margarethe. Costume in the Bronze Age in Denmark. Arnold Busck, 1940.
Hoffman, Marta. The Warp Weighted Loom. Robin and Russ Handweavers, 1974.
Trychkare, Tre. The Viking. Carver and Co., 1966.

Yeah.  I looked for the Hoffman book, just out of curiosity, but the cheapest I can find is a used copy for $133 ($195 for a hard copy).  Not happening on my budget.  I’ll have to see if I can get a copy on inter-library loan.  There appear to be a couple of newer magazine articles, so I’ll seek those out as well.

There are a lot of web sites with some research (most based on the sources above) plus looking at extant pieces and experimenting with building their own.  There are differences with all of them, so other than the basic structure, there is a lot of room for experimentation and setting things up so it’ll work for the weaver.  I still need to do a little more research on weaving in general–I’ve only done inkle and card weaving, but this seems to be just like a giant inkle loom.  There are possibilities for doing multiple sheds, although the first couple of projects will be 2-shed only.

The other thing to keep in mind with this is that it is meant to be taken apart for transport to events.  None of the joints are glued or permanently attached.

Identifying the parts of the loom are the first step to being able to build it.

Warp weighted loom 1777 Loom with warp and kljåstein character of Sæmundur Magnusson Holm, minister in Copenhagen 1777. Iceland.:

  1.  Upright
  2. Crotches
  3. Top stabilizing rod
  4. Warp beam
  5. Tensioner
  6. Warp threads
  7. Heddle rod
  8. More heddle rods
  9. Heddle Rod Support
  10. There are two things that are numbered 10…one is what looks like another heddle rod, the other is the finished weaving wrapped around the warp beam.
  11. Can’t find a number 11.
  12. Can’t find a number 12 either
  13. Warp weights
  14. Bundles of warps
  15. Chain stitched string to separate warp threads

(skipping 16-21)

22. Sword for beating

This was my process to building the prototype:

frigga 11

Take two 2 x 4s–I would recommend using two hard wood boards for a “finished” look, although Hemlock or Douglas Fir is certainly more economical and lighter for transport…I grabbed two boards from the rafters, only to realize later that the darker board was, in fact, cedar.  Low light in the garage…Whoops!

I was looking at several sets of directions in the process.  The first set said that I should cut two 2 x 4s to 7 feet long (84″).  Other directions said keep the 2 x 4s at 8 feet long and use a stool to reach when weaving (which I would likely need for the 7′ tall uprights as well).  To that I said, “What?!  Oh, heck no!”  I’m clumsy enough that I would likely fall off a stool, and being only 5 feet tall, I’d need a rather TALL stool for something 8 feet tall.  Or maybe some stilts.  I don’t need to risk injury on a super-size loom designed for a tall man.  At the time, I left it at the 7′ measurement, but later on, as I will explain in a minute, I decided that I really didn’t need to make it much taller than me.

Next, you take those 24″ pieces that you cut off and make the “crotches”, seen in the above image.  These are the pieces that the top beam rests in while you weave.  It needs to be deep and wide enough for the rod to rest in, and taper down on the end so it can be screwed into the wood.  Some directions suggest that you make it vaguely “S” shaped.  Vague, indeed.  Seems mostly stylistic, although the thinner end at the bottom makes it easier to attach to the boards with long screws.  These were shaped using the band saw…I love that toy!  The bottom of the crotch is 16″ down from the top of the upright leaving room for the top stabilizing rod.

.Frigga 3

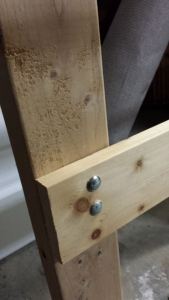
The next step was creating the shed rod, which is the cross bar that sits about knee height made from a 1″ x 3″ board.  This rod separates the front and back warp yarns; the back yarns go over the front, and the front yarns go over the back.  It’ll all make sense later….  The top beam I bought is 5′ long, which determined the minimum width of the frame, but it also needed some overhang.  4″ on each side seemed adequate, so I cut the shed rod 52″.  I drilled one hole through and secured it with a bolt and wing nut.  I attached it right in the middle, then realized that it created a pivot point.  I added a second bolt at the top, but they’re still a little close.  I should put another one near the bottom and leave the center hole empty…next time, don’t drill the middle hole.

As I mentioned earlier, I attached a top stabilizing rod above the crotches.  Some of the looms I’ve seen don’t have them, but it also appeared that the warp beams were very robust, but narrower where it fitted into the crotches, creating its own stability.  For this project, however, I thought it was necessary to anchor it.  This was also cut to 52″ and bolted in…just one bolt at each end, attached with wing nuts for easy assembly.  Initially, I had the wing nuts to the back, like in this image, but the bolts were very long and scratching the walls, so I turned them around to the front.

Frigga 2

The heddle rod supports were shaped from scraps in the bin, I think cut from leftover 1″ x 3″ pieces.  They are about 8-10″ long and roughly Y shaped.  I used the band saw again to shape this piece.  I drilled a hole into the end and into the frame and used a piece of dowel to mount it onto the frame.  These, likewise, can be easily removed for transport.

The heddle rod was the next piece.  The plans I was following called for 7/8″ dowels, which I looked for at the hardware store, but they only had 4-foot lengths…I needed 5 feet.  I realized that these don’t need to be particularly heavy or strong, and I just happened to have 3/4″ sticks that are more than long enough (leftover from the yurt project).  More scavenging means more money savings for the prototype project!

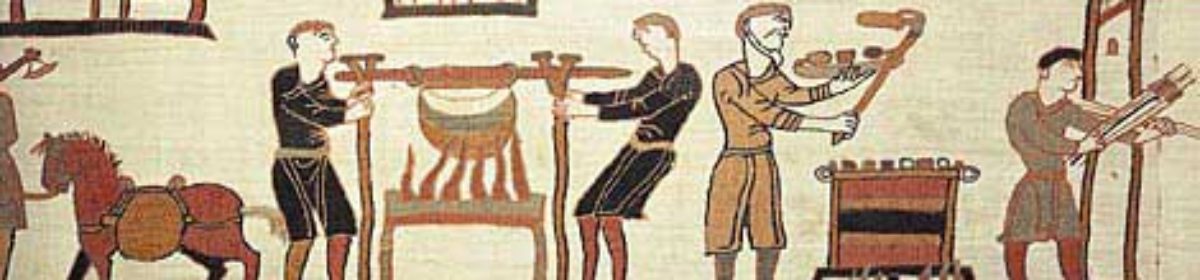
For the warp beam, where you attach the selvage band, I bought a piece of 2″ doweling.  In some of the old-school looms I saw, like the one pictured above, the selvage band is sewn right onto a very large beam.  In other images, it’s sewn into a bar that is somehow attached to the beam.  I decided to attach a thin piece of wood into the dowel to sew the weaving onto.

Referring back to the Saami/Norwegian video of Mary Mikalsen Trollvik who was demonstrating how to set up the loom, she is weaving on a loom where the warp beam is at her head level.  The more I thought about it, the more it made sense.  Anything out of reach is just silly, so it was at this point that I decided that the top beam needed to be sitting at about 62″ instead of a ridiculous 78″.  I disassembled it and cut it to size.  Now she feels right.

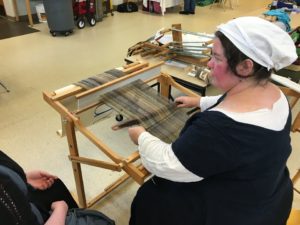
Here she is, standing up!  Maybe it seems weird, but at this point, she was starting to feel alive!  She even told me her name.  Frigga, named after the Norse Goddess of weaving and wisdom.  There were a few more steps to complete my girl, but it was wintertime and it was just a few degrees above freezing in the garage, so this project was put on hold until warmer days.

Fast forward several months…

The Saami weaver, Mary Mikalsen Trollvik, started with a woven band with weft threads that become the warp threads of a woven piece.  I had a bunch of Fisherman’s wool that was given to me and this seemed like a great project to use that yarn.  I wove the selvage band, just the same way as Ms. Trollvik, and tied it onto a thin piece of wood–about 1/4″ thick and almost as long as the width between the uprights.  At first, I had just tied it onto the dowel, but eventually, I put a couple screws into it to keep it from sliding around.

Then I set it up in January 2015 at Ursulmas and worked on the set up for several hours over the weekend, in between making beads for passers-by.  By the end of the weekend, it was still no where near ready to weave on.

Frigga 8

One of the things I hadn’t figured out was weights for the warp-weighted part.  Ms. Trollvik and other Saami weavers use oblong rocks to weigh down the warp.  Coming up with easy to transport weights was a bit more time consuming (I was still working on them up until the day before the Arts Unframed event). I needed it to be the right weight, easy to take off of the loom during transport, and not too heavy overall.  Extant weights ranged from 1/2 lb. to 5 lbs.  In my research, other weavers said that they have used 1/2 lb to 1-pound bags of sand or gravel for weights instead of clay circles or rocks.  Some even used water bottles.  I decided to go with bags of gravel–easy to make, easy to add or subtract weight as needed, and cheap.

I started making muslin bags with 5″ x 12″ pieces of fabric, folded long ways to make 2 1/2″ x 12″ tubes with an opening in the middle.  I filled them with 1/2 lb. of pea gravel, evenly distributed into both ends, and hung it over the knotted lengths of yarn.  I was planning on leaving it open, but decided rather than end up having gravel spilling everywhere during transport, I sewed them closed.  I can always open it up and adjust as necessary.

Frigga 9

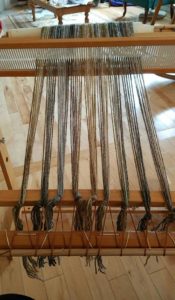
Heddles were made from Maysville cotton warp.  I thought this would be ideal since it would be less likely to get caught up in the wool fibers.  The warp yarns are from “natural” color wool yarn that a friend was giving away.  She got it from somewhere else and is allergic to wool and thought I’d get some use out of it.  Why, yes I can!!

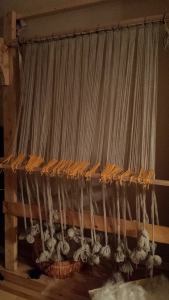
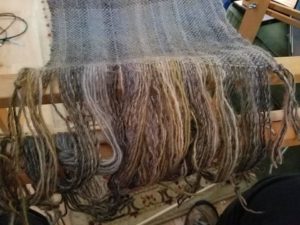
So finally, at the end of September, nearly a year after starting this project, I took the loom to the Arts Unframed event in the Barony of Wyewood.  It took 3/4 of the day, but I got it up and running!  I had to chain stitch the strings (two chains, front and back), bundle the warp to make half as many bundles, and then put the heddles back on.

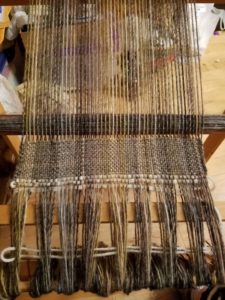
Here it is all set up and ready to weave!  You’ll now see that the back warps come forward through the heddles, then back behind the shed rod.  The front warps lay down on the front of the shed rod.  As you pull the heddle rod forward, the back warps come forward; you throw the weft, beat it into place, then put the heddle rod back.  The back warps will hang behind and you can throw the weft again and beat.

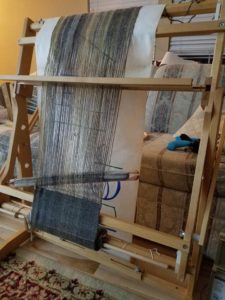
While I didn’t get a lot done on the weaving (only about 2″), it broke down easily into three long pieces and a box of rocks (weights).  It took about 10 minutes to take it apart and wrap it up in a sheet.  It looks like a mummy, which makes sense since it was secured in this fashion by an Egyptologist.

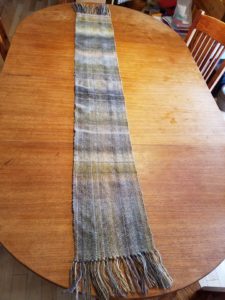
When I got it home, it set up again in less than 10 minutes.  I LOVE IT!  This makes it easily transportable and I look forward to taking it to events like Ursulmas or even an outdoor event in the summer (weather permitting).

You note that the warp is darker than the weft…I ran out of the natural yarn and had to switch to the white yarn.  I don’t know how many skeins I’ll need, and since Fred Meyer doesn’t appear to carry the yarn anymore, I may have to source more online, if need be.  The blue yarn, just so you know, is the same Fisherman’s yarn that I dunked into a Kool Aid dye.  Yep.  Kool Aid!

My plan is to (very soon) obtain some wood in a more natural and rustic state to make a loom that looks a little more like this:

an ICELANDIC LOOM for the Norse Encampment -Daily Life in the Viking Age circa 1000 AD at Vinland. The Viking Encampment living history prog...:

I hope you enjoyed reading about my venture into building a warp weighted loom!  If you are inspired to build your own, please send me a picture of your finished product!

Hats, Hats, Hats for Career Girls!

Originally published May 25th on my first blog, then Oct 1, 2015 on the more recent blog, and now here.

I discovered in my attempt to research fillets and barbettes, that  if you Google “Barbette” you come up with images of a drag queen from the 1920s.  Not exactly what I was looking for, but interesting nonetheless.

The next hat I made was a pleated fillet.

Directions I used from http://www.caitlinsclothing.com/

Step 1

Measure your head with a tape measure and add 1″.

Step 2

Set the tape measure on its edge on a sheet of buckram, so that it arcs from the selvage of the buckram to the cut side, straddling a corner. Using a pencil, trace this line.

Step 3

finding the radial
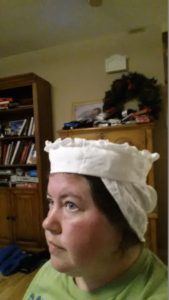
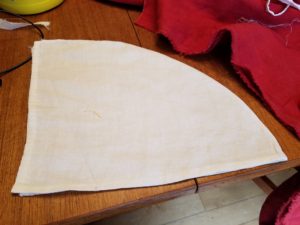
Measure from the corner of the buckram to a few points on the line to get an average measurement. Use this radial measurement to get an even circle-segment drawn on the buckram.

Step 4

Decide how tall the fillet should be. A good height is 2.5″. Add this number to the radial measurement, and again trace the curve onto the buckram.

Step 5

join the seam
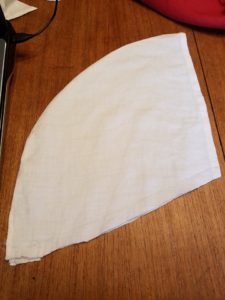
Cut the buckram and join together at the short edge to make the fillet.

Step 6

To cover the coif with pleated fabric, cut out a strip of fabric twice your head measurement, and twice as wide as the fillet is tall, plus seam allowances. Iron this fabric into pleats before applying to the fillet.

Step 7

pleat the fabricPin the pleats onto the middle of the fillet’s band, all the way around. Carefully fold the pleated fabric over the top and bottom. The pleats may expand or contract because of the angle of the fillet. Pin securely, then baste the covering together on the inside of the fillet.

What goes underneath is the same smaller coif and a barbette.

After a bit of experimentation, I also made a St. Brigitta cap.  I’m not entirely happy with the fit–I think it’s too big.  I’ll have to keep experimenting.  I know I should have tucked all my hair into it, which would change the shape of the hat, too.


Out of the Dye Pot: Tansy & Alum

Originally published Oct 9, 2015

A couple of years ago, I was all anxious to try natural dyes.  I got a bunch of onion skins and made some lovely yarn!  I got some tumeric and made some more lovely yarn!  (Which is fugitive, by the way, so it fades over time).  I also tried a tansy dye project to see what would happen.  I picked tansy ragwort as well as common tansy to see if there was any difference, I tried the leaves separate from the buttons.  I even tried splashing a bit of ammonia into the dye bath…but I can’t find any of the images or results from that project.  I’m starting over and I hope to try other locally found things, like algae, apple leaves, and more, as well as ordering some other dye stuffs, like brazilwood, indigo and woad.  I also want to try to use some different mordants–all I’ve ever used so far is alum.  I found that it’s pretty easy to do iron, but it takes a couple of weeks to prep, so I’m going to work on that in the next week or so.

Today’s dye project was common tansy!

As the weather grows colder, I knew that if I wanted to do any tansy dyeing this year, I had to jump on it quickly.  I dropped the middle kid off at Scouts and found a bunch of tansy along the roadside across the way.  This is actually my photo…not a stock photo stolen off the internet.  Sometimes that scuzzy phone camera actually takes a good shot now and again!  Now, you should note that this is *common tansy* (Tanacetum vulgare), not Tansy Ragwort, (Senecio jacobaea), which is also amusingly called “Stinking Willie”.  Both are considered a noxious weed in Washington state, so there is no problem with me picking it along the roadsides.  (Then again, Himalayan blackberries are considered a noxious weed and no one is doing anything about those except happily picking the berries in August and September and cursing loudly when they snag their ankles on one of the runners.)

Here is the yarn I started with:  100 grams of KnitPicks Bare wool/nylon.  I usually prefer to use 100% wool yarn for these projects, just because it takes the dye so much better, but this is what I had on hand.  My plan is to use it to make some socks for SCA wear.  I prepped it by soaking it in a couple gallons of water with a half jar of alum and a quarter jar or so of cream of tartar (about 2 oz of alum and 1/2 oz of cream of tartar).

I ended up picking a grocery sack full of flowers in just 10-15 minutes.  I tried to avoid putting any leaves in the stew, thinking that it might turn the yarn a little more green, which even the stems may very well have.  Here are the buds simmering in the water.  I let it sit on the warm stove for about five hours.

Yarn test color–before and after
After posting it on Facebook, several people asked me why I was drying spaghetti on my faucet.

I took the very wet wool and placed it gently in the dye bath.  I removed most of the flowers before putting it in there, but I think next time, I might find a nylon or net bag to put all the vegetable matter in so I can easily remove it before putting in the fiber.  There are a few sticks and leaves still in the yarn.

In the end, it turned into a rather nice butter yellow–a little bit of the brown tones in it, but still quite lovely.

I soaked the yarn in the resulting bath for about an hour, keeping it warm, but not boiling.  Boiling can do horrible things to the color, like leave splotches on your yarn.  That’s not a good look.

The fun part of this is that it’s fairly easy to do, none of the ingredients are extremely toxic (although I wouldn’t recommend eating the tansy), and be sure to wash your hands after handling it.  It had been used as a medicinal herb in Medieval times, and is occasionally used on salads in some cultures, but the plant’s medicinal property, thujone, can cause miscarriage.  It is also a very effective insect repellent, and the herb can cause hallucinations, spasms, convulsions, and even death in large doses.  I have to admit that after making the dye in my kitchen with the windows open, I had a stomach ache and felt a bit queasy for a couple days.  So I would recommend using rubber gloves when handling it and use in a well-ventilated area.

Out of the Dye Pot: The Beginning of My Dyeing Journey

Originally posted Oct 13, 2015

Finding out how to do natural dyeing is part math and lots of chemistry.  After much scratching of my head, figuring out how much I have in dye stuffs vs. fiber and how much of the chemicals (alum, iron, etc.) to mix in to make a mordant….well, I kinda threw it out the window and said, “That looks about right!”  Unfortunately, that means I won’t be able to absolutely replicate what I did, but that’s not the goal just yet.  As a beginning alchemist, I’m happy getting any results at all!

I started my dye projects several years ago with onion skins.  I was at the grocery store early one morning and looked around the produce section for some dinner stuff.  I walked past the onion bin and said to myself, “What a mess!  Look at all those onion skins!”  Then the light bulb went off and I said, much more excitedly, “WOW!  LOOK AT ALL THOSE ONION SKINS!”  I grabbed a clear produce bag and started picking out all the skins and stuffing them in.  The produce jockey came over and said, “Thanks for doing my job!  What are you going to do with those?  Make soup?”  And I said, “No!  I’m going to dye yarn!”  We chatted for a few minutes and the produce guy said I could have the skins for free.  Later, I discovered that they normally don’t do that, so later when I’d gather skins, I’d also grab an onion and throw it in so I’d pay the “poundage” for the skins (which weigh virtually nothing).

I used alum and cream of tartar to dye all my first pieces, starting with a very bulky wool yarn that was 3-ply.  I un-plied it to make 3 regular size skeins of single-ply (yes, they were too beefy to be sock yarn; almost the weight of Cascade 220).

That onion skin yarn is on the left.  Going to the right, it is followed by tumeric (very fugitive–see how it’s fading in several spots?), Common tansy heads, Ragwort tansy (just to see if there was any difference), common tansy leaves (a bit more green), and some mysterious thing that I can’t remember.  Granted, the colors are not very pure and may have had not had the right vegetable matter to yarn ratio.  That will likely come with time.

All of these used alum and cream of tartar as the mordant and were done in 2010, so even though they’ve been in a box for several years, you can see that they’re mostly colorfast (with the exception of tumeric).

Out of the Dye Pot: Dogwood Fruit & Lessons in Chemistry

Originally posted Oct 14, 2015

It came to my attention the other day that my neighbor’s dogwood tree is producing fruit.  I’m sure I noticed before but never thought to ask anyone about it.  So, doing a little research, I found out this is a Korean Dogwood variety, and it turns out that that fruit–besides being edible–*supposedly* makes a nice dye stuff.

The sources that I saw online (which I think may have just been quoting each other) said that the berries themselves would make a lovely blue-green yarn.  Unfortunately, they didn’t say what kind of mordant they used*, so it was time to do a little experimentation.  I first mordanted my yarn with alum and cream of tartar.

*They also didn’t mention that there are several different varieties of Dogwood that produces fruit, including one that grows a blue fruit, that, like the Oregon Grape, may create the blue hues.

I picked up a bunch of berries off the ground and off the tree as high as I could reach (there are still plenty I couldn’t reach), and put them into the dye pot.  I let them simmer for a while, which made a rather orangey-tomato-red colored sauce.  I took a sample of yarn and dropped it in there just to see what color it would be.  It came out not blue or green, but a slightly orangy yellow.

Top yarn: the orangy-yellow Dogwood fruit yarn. I dunked into vinegar after pulling it out of the dye pot, which brightened the color just slightly; the white yarn is the undyed yarn, just for color reference; the other yellow is the common tansy yarn, again for a color reference.

A few days ago, I found a reference to making your own iron mordant by taking 2 parts water, 1 part vinegar and placing them into a glass jar and adding rusty nails.  “Well,” says I, “Let’s do that and see what happens!”  I found some rusty nails (thanks to a kind neighbor) and dropped them in the jar with the vinegar and water.  The recipe says you need to wait a week or two, but I didn’t have that kind of time for this project.

So continuing on with the experimental part, says I, “what would happen if I added iron to the bath?”  So after a couple hours, I shook the jar and poured most of the contents into the dye bath with the yarn.  I probably should have started small and added more later, but I figured it was a weak compound having only been sitting for a couple hours.

I checked the yarn a few minutes ago and looking in, it looks like grape jelly.

The yarn, on the other hand, looks like rather blah grey.  Not blue.  Not purple.  Not green.  Blah.  Maybe heather grey…just a hint of blue hue.

I will let it dry a bit and see if the color improves, but so far, you can color me unimpressed.