My creative SCA journey on stuff I make and research I do…mostly in fibers (wool prep, spinning, weaving, tablet weaving) and glass beads, but could also include costumes, camping, cooking, and any other creative things that strike my fancy.
The first thing you’ll need to do tablet weaving is, of course, tablets or cards.
These can be made yourself with a deck of playing cards, a hole punch, sharp scissors, ruler, cutting mat, rotary cutter, template, compass, protractor, slide rule, abacus, battering ram, caffeine, and chocolate…that is, if you’re really OCD about getting the holes lined up perfectly…
OR…you just go online and buy them. They’re inexpensive and durable!
(OK, if you DO want to make your own, here’s an instructable to do it yourself: https://www.instructables.com/id/Make-Your-Own-Tablet-Weaving-Cards/. However, if you don’t have a corner trimmer, hole punch, cutting mat and all the things they ask for, it would be cheaper and easier to order some online.)
Make your own!
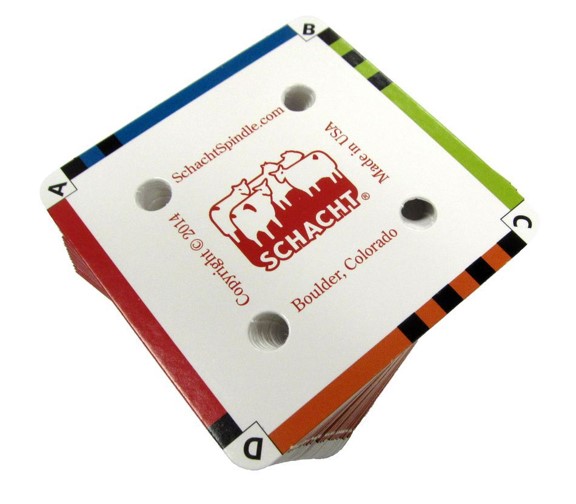
There are a number of different manufacturers of tablet weaving cards. I have at least five different varieties. I like the Schacht cards that are sold at stores like HalcyonYarn.com or the Woolery (Yarn.com). $8 for a set of 25 cards that are labeled and color coded. I’d recommend getting two sets (50 cards total) to start. The cards will last a long, long, long, long time, so no need to get hundreds, at least to start. Most patterns that we will be doing will require fewer than 25 cards, but it’s always good to have a second set on hand for larger patterns later.
Color coded sides and labeled corners make these a great choice for weaving!
Next, you’ll need to pick your fiber. For a beginner, you’ll want to work with something that is strong, but forgiving, and easy to work with…so put away the silk, linen, and wool for now. The best place to start is with cotton. It’s cheap, strong and doesn’t bind up like other fibers can.
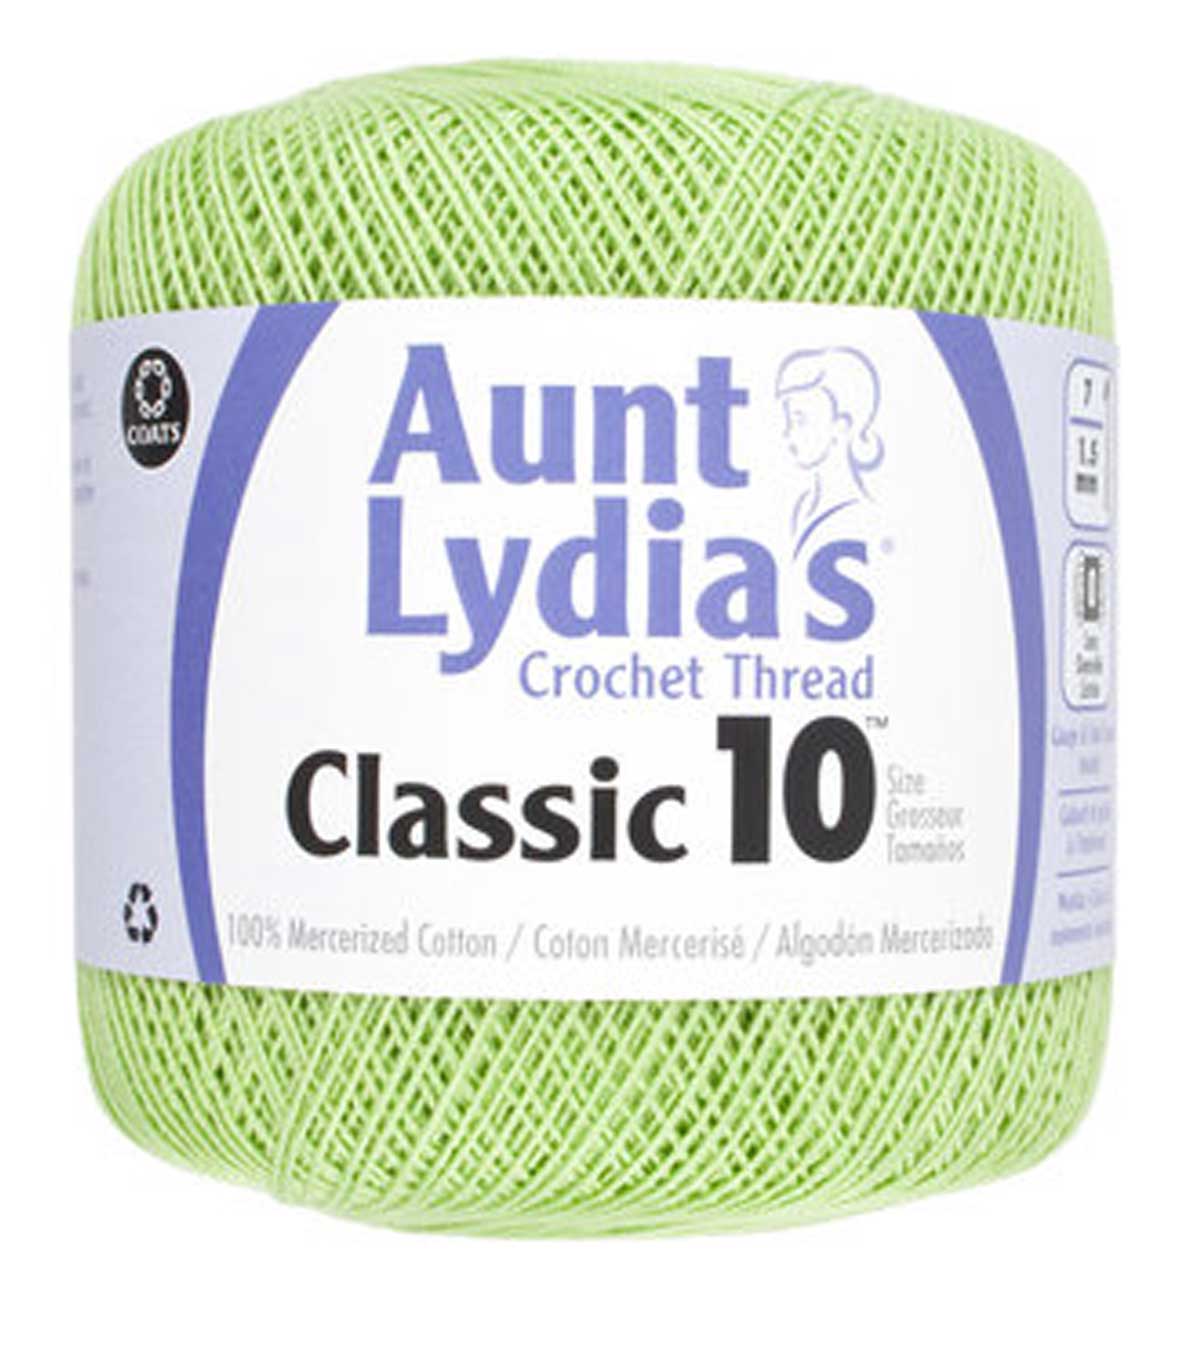
Crochet Cotton is my first pick for a beginner, for those who are looking for readily available and inexpensive materials, which you can find at your nearby hobby store. The limitation with this stuff is that they usually only have 4 or 5 colors at the store—white, baby blue, floofy pink, minty green and pale yellow. If you can find more saturated colors—red, black, dark blue…go for it! Just be sure to get contrasting colors—light and dark. Think of what colors go well together–yellow, white and black; blue, green and white; yellow and red…anything that will make one color pop against another! If you use two colors of the same intensity, the pattern may get lost.
Whatever the brand, size 10 crochet cotton is a great size to work with.
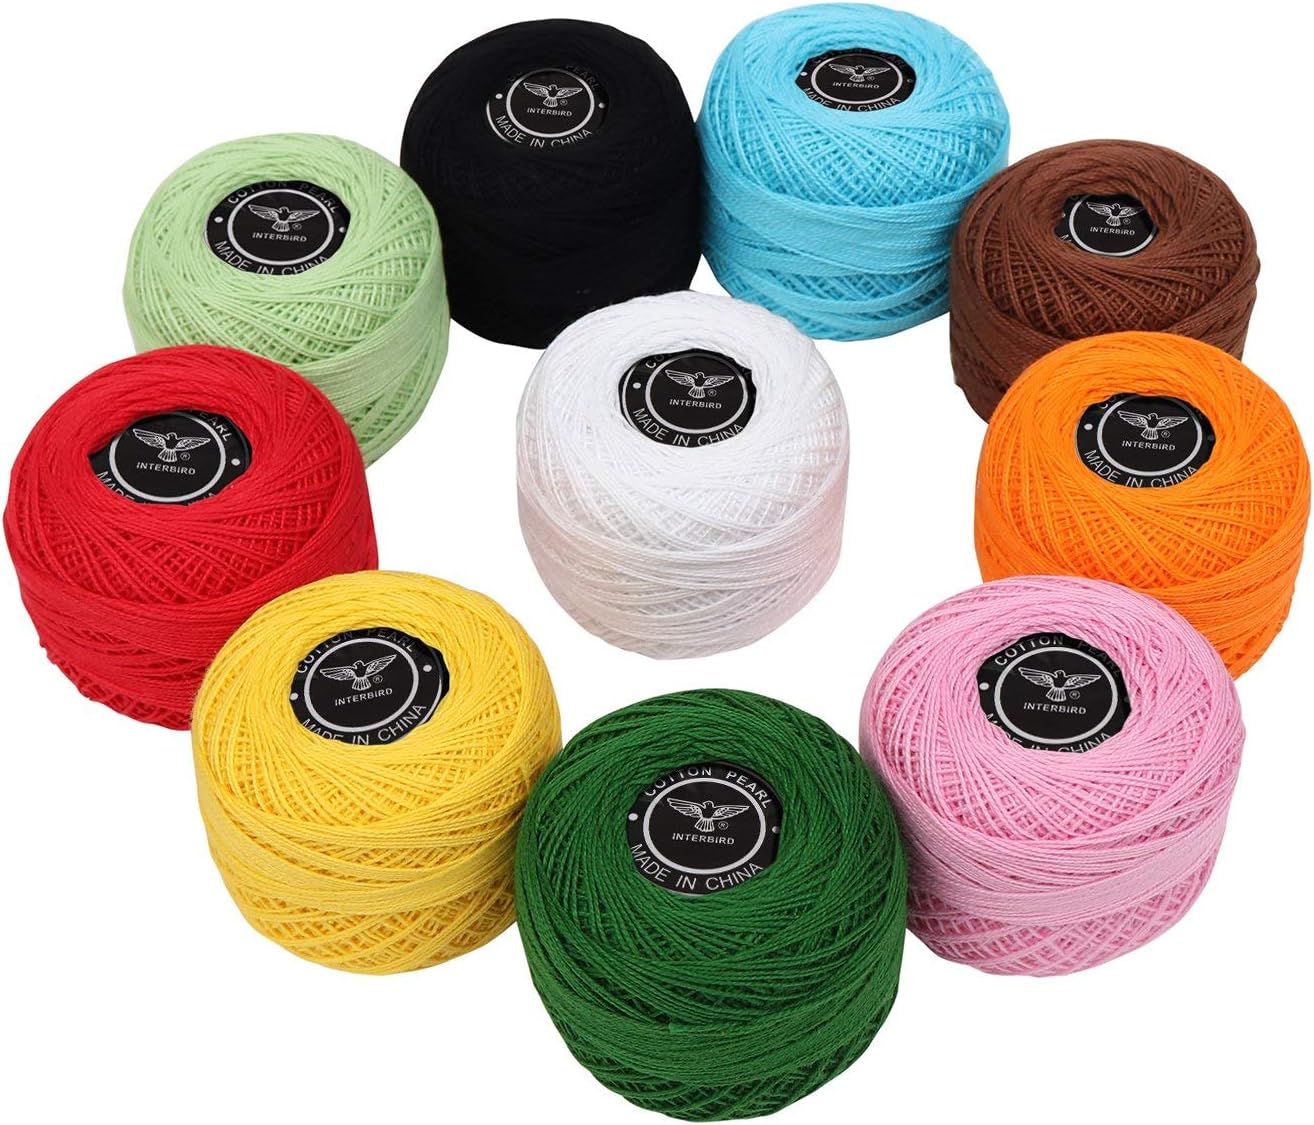
Pearl Cotton is another good choice. They come in lots of colors and work very nicely. Note: the higher the number, the finer the threads; the size 5 or 8 are best. Size 10 is fine, but might be challenging. Size 12 is too fine for a beginner. Unfortunately, they come in such small spools of about 87 yards each, so you can warp up about 5 cards per spool (depending on the length of your project). At about $3 a ball; it can run you $15-30 per project…or more. Look for large spools online at the Woolery or the Yarn Barn of Kansas, or ask if your local hobby shop can order them for you.
Little balls of pearly fun!
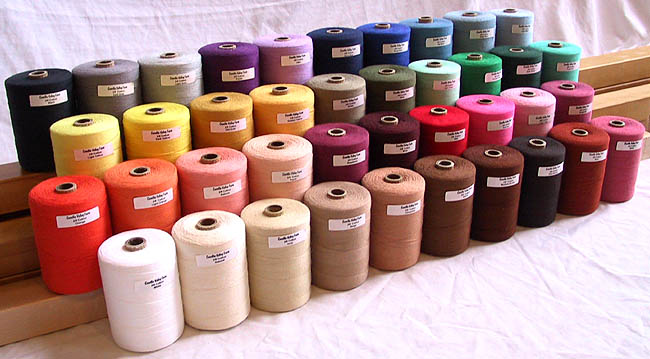
Maysville Carpet Warp has been my go-to thread. If you have a weaving store nearby, you can see if they carry it, or you want to order online. It has about 800 yards on a $9 spool, so it’s a great option. It’s a bit thicker than crochet cotton (like the size 5) and comes in about 70 different colors. Eugenetextilecenter.com, Yarn.com and the Woolery all carry it.
A rainbow of thready fun! This is only about half of the available colors.
For the upcoming videos, this is the type of yarn I’ll be using for the demonstrations.
I have created these blog posts as an addendum to the YouTube videos: Weave Along With Elewys. While some people learn very well from videos, others learn well from written directions and still images. This blog post will serve that need. I also need to have copies of the patterns that I use in the series available for weavers, and a central location to put them, so this blog will serve that need as well.
We haven’t been able to fully launch the project yet due to mundane demands (we expect it to be ready very soon). Despite the coronavirus Stay at Home orders, mundane work still gets in the way of filming and editing, especially the Intro to Tablet Weaving episode, which is going to be longer than the others as it covers all the materials and tools as well as techniques. I am struggling to do video taping while there are kids, a working husband, and birds in the house, so if you hear thumping, yelping, laughing, chirping, squawking, or another ambient noises, please forgive me. I’m doing the best I can with the resources at hand.
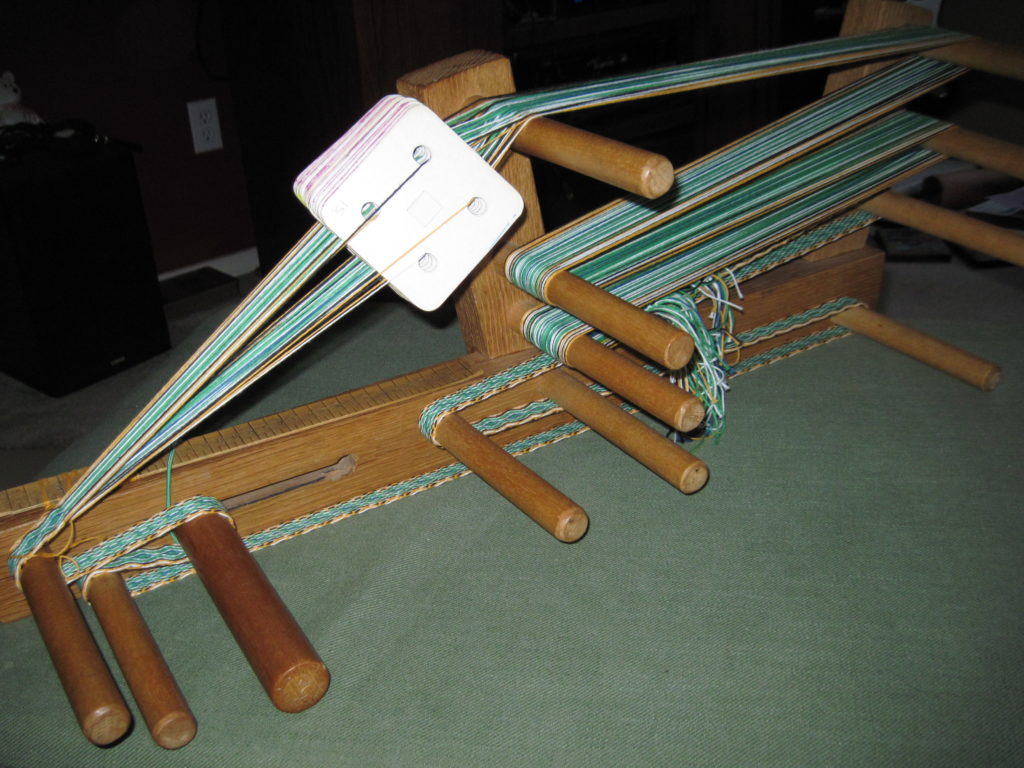
Note: one of the things that I will have to assume in this series is that the weavers are using an inkle loom. If you are using a backstrap, warp-weighted, or box loom, you may need to consult with other resources for directions on how to warp and anchor those.
Old oak inkle loom purchased second hand sometime around 1992 and has helped me produce hundreds of yards of inkle and tablet woven bands. Working on finding a name for it…
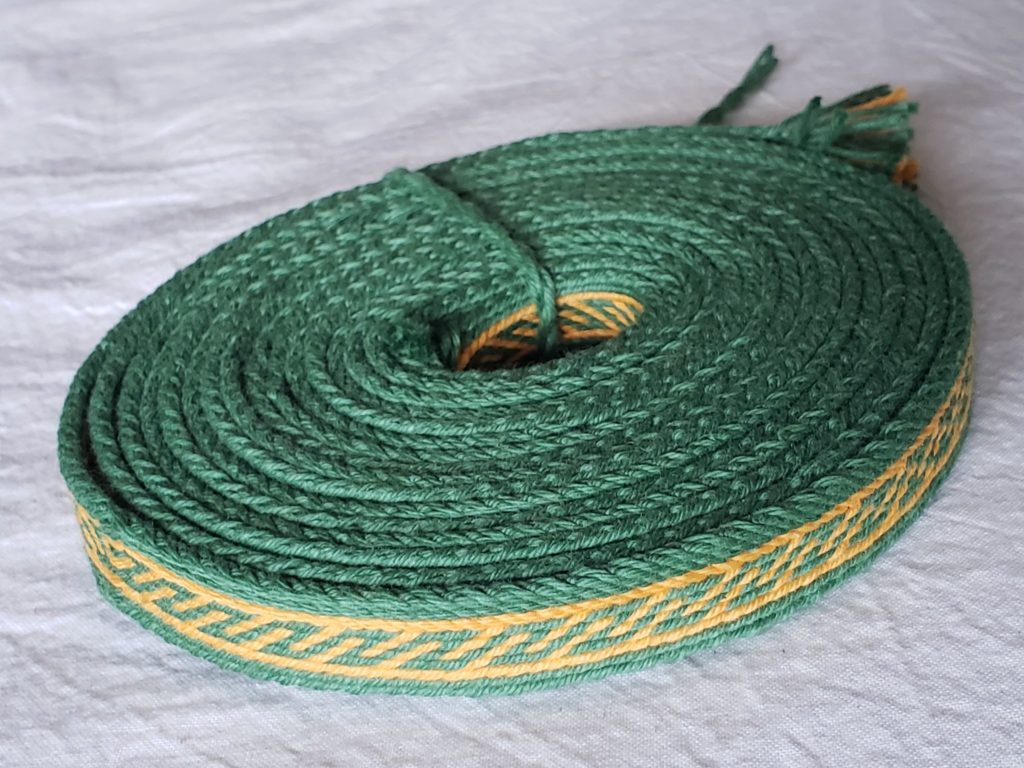
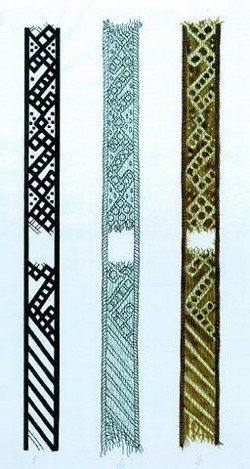
The first episode is a pattern from the Oseberg dig, dating solidly in the Norse era, 834 AD. A large burial mound was discovered at the Oseberg farm near Tønsberg in Vestfold county, Norway. The ship and some of its contents are displayed at the Viking Ship Museum at Bygdøy, Oslo. Among its finds were a loom (commonly called the Oseberg loom), weaving tablets, and a work in progress (known as 34D), as well as this silk piece. The original measured only 5 mm wide–a diminutive little weave–but we’ll do ours in a larger cotton rug warp for this demonstration.
As we have just celebrated the SCA’s 55th birthday, I decided to couple this project with a celebration of the Kingdoms of the Known World in the SCA. I’ve decided to weave 20 pieces in this series in the colors of each of the Kingdoms. The first Kingdom formed was the Kingdom of the West, in 1966. It comprises Northern California, Nevada, Alaska, Japan, Korea and the Pacific Rim. This is where it all started–with a backyard party that turned into an international medieval history organization with tens of thousands of members in 20 kingdoms. All of the Kingdoms, origin dates and colors are, in order:
The West Kingdom was created when the Society originated in 1966. Colors: green and yellow.
The Kingdom of the East was created in 1968. Colors: yellow and purple.
The Middle Kingdom was created in 1969. Colors: red, white and green.
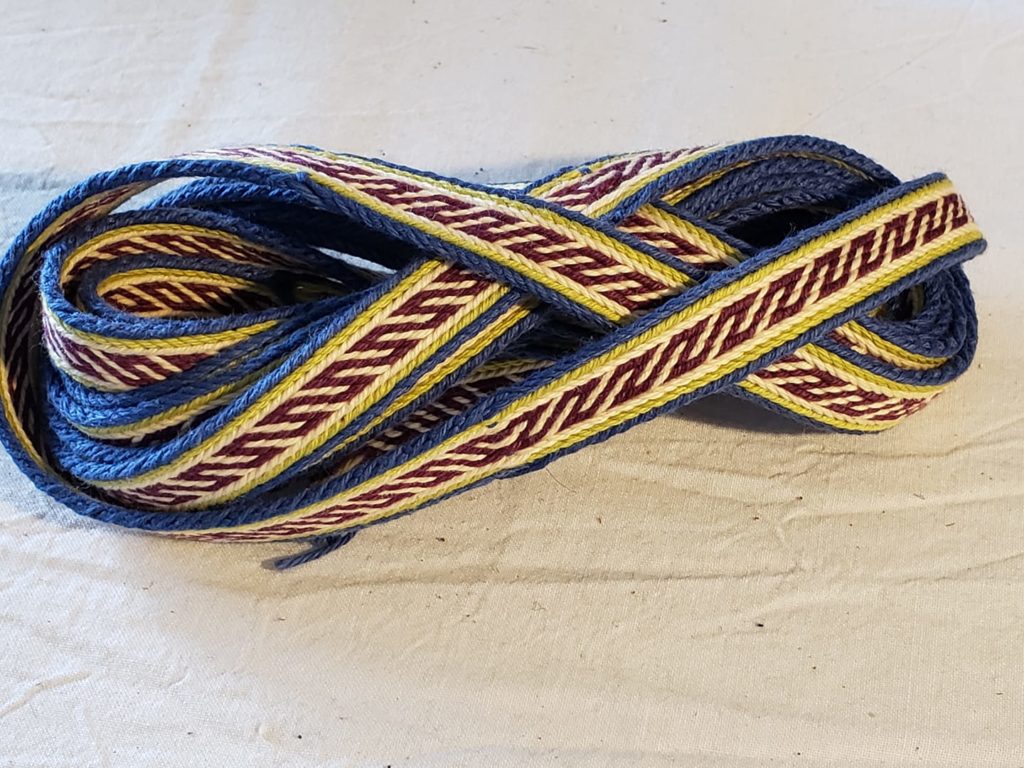
The Kingdom of Atenveldt was created in 1971. Colors: white, yellow and blue.
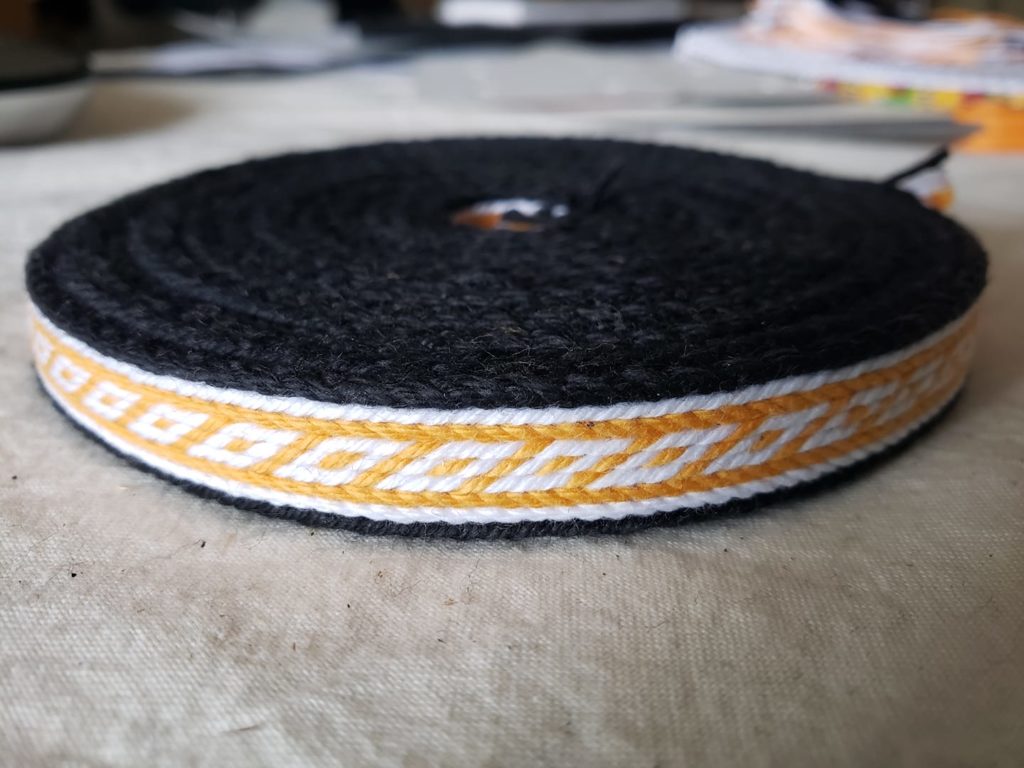
The Kingdom of Meridies was created in 1978. Colors: black and white.
The Kingdom of Caid was created in 1978. Colors: blue and white.
The Kingdom of Ansteorra was created in 1979. Colors: yellow, black and red.
The Kingdom of Atlantia was created in 1981. Colors: green, white and blue.
The Kingdom of An Tir was created in 1982. Colors: yellow, white and black.
The Kingdom of Calontir was created in 1984. Colors: purple and yellow.
The Kingdom of Trimaris was created in 1985. Colors: blue and white.
The Kingdom of the Outlands was created in 1986. Colors: green and yellow.
The Kingdom of Drachenwald was created in 1993. Colors: red, yellow and black.
The Kingdom of Artemisia was created in 1997. Colors: black and yellow.
The Kingdom of Æthelmearc was created in 1997. Colors: white, red and black.
The Kingdom of Ealdormere was created in 1998. Colors: white, red and green.
The Kingdom of Lochac was created in 2002. Colors: red, white and blue.
The Kingdom of Northshield was created in 2004. Colors: White, yellow and black.
The Kingdom of Gleann Abhann was created in 2005. Colors: red, white and black.
The Kingdom of Avacal was created in 2015. Colors: red, white and yellow.
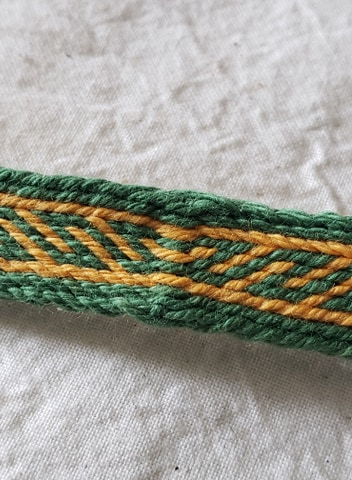
So let’s get started by celebrating the Kingdom of the West!
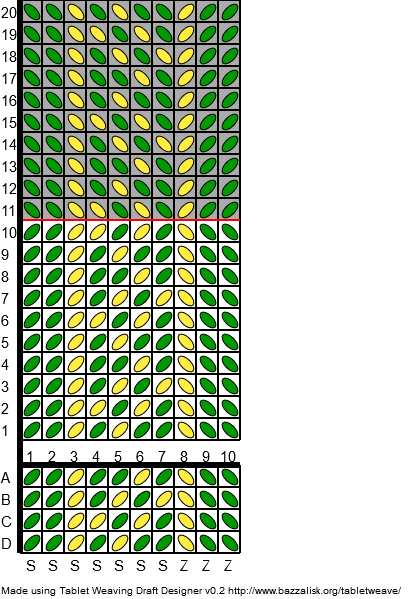
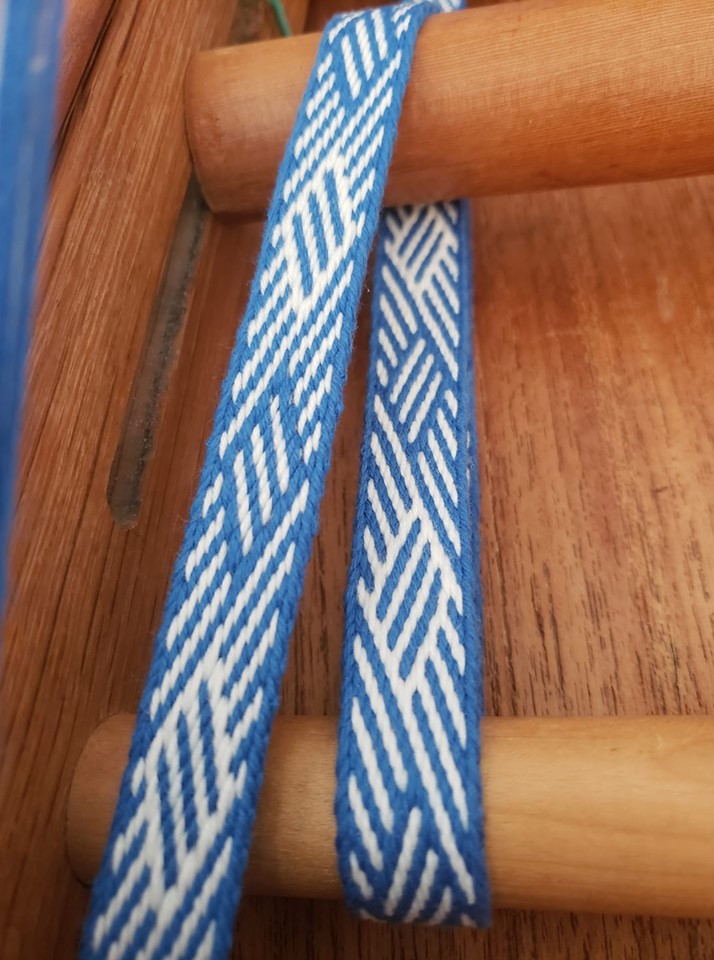
First Kingdom of the SCA! The Oseberg weave will make Os on one side and zig-zags on the other. Makes a great belt or trim on an apron dress or tunic. Alternatively, this pattern, which is more historically accurate, has boxes on both sides. It is just as easy to weave!
Reading the pattern: squares with a white background are turned forward–away from the weaver. Squares with a grey background are turned backward–towards the weaver. I marked this pattern with the reverse after 10 and 12 turns so you can see what the reverses look like, but you don’t have to reverse so soon. In this particular pattern, the cards all turn the same direction until the warp is over-twisted, then all reversed until they not only become untwisted, but over-twisted in the opposite direction….then it’s back to forward turning again. Repeat this until you reach the end of your warp.
Technique refresher:
Warp your cards with the top of the card facing to the right–this is important if your cards are labeled clockwise. If they are labeled counterclockwise (anti-clockwise), face the tops of the cards to the left.
This is my preferred brand of cards–clearly labeled and colored sides are great visual cues to me while I’m weaving.
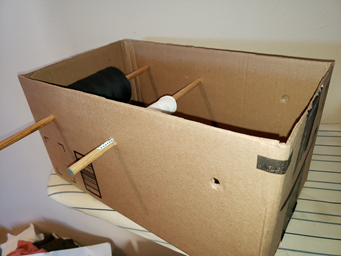
Get out your Lazy Kate (or whatever facsimile you create…mine is simply a Amazon Prime box with a couple of dowels stabbed through it) and load up your threads.
It’s not fancy, but it works.
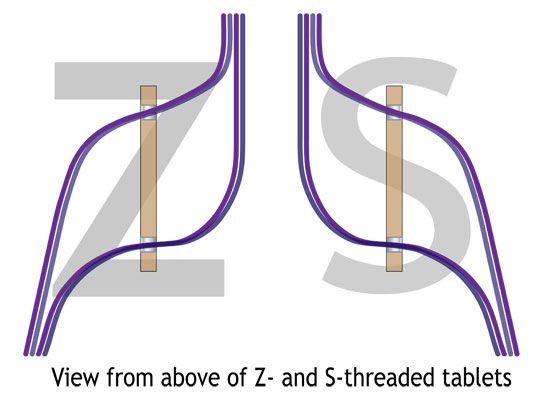
Thread your cards, making sure to keep your S and Z diagram handy to make sure you are going through the cards correctly.
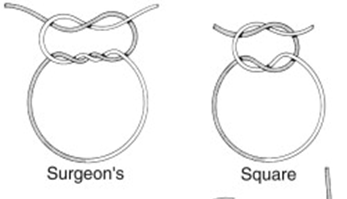
It’s easiest to tie the four threads together for each card, using a surgeon’s knot. It’s similar to a square knot, but has a double throw for the first pass, rather than a single. This makes it easier to untie to adjust tension or to correct mistakes–and trust me, you will make mistakes…we all do.
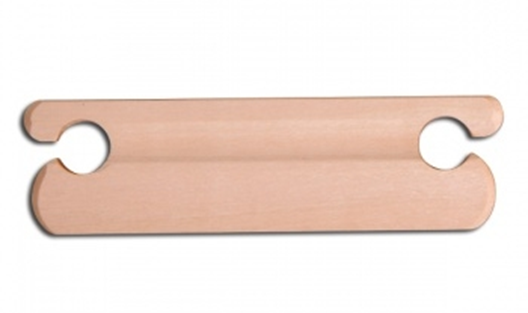
Once all your cards are threaded, double check your work to make sure they are correctly S and Z threaded and that the colors are in the correct hole. Once you have given it the final inspection, ready your shuttle! I wrap a bunch of warp around the top of the shuttle, in a figure 8 pattern, to keep the thickness of the shuttle to a minimum.
Your belt shuttle only needs to be 5″ or 6″ long, and works best if it has a tapered edge for beating.
I begin by setting all the cards with AD at the top and slip the tail through the shed so the shuttle is on the left and a 4″ tail is on the right. Turn the cards forward (away from you) and throw the shuttle and the tail in opposite directions, criss-crossing through the shed. This will help anchor the tail and prevent unraveling later. Turn the cards again, beating the weave, and throwing the shuttle, leaving a loop behind. On the next pass, turn the cards, snug up the weft, beat and pull the shuttle through. Don’t be over-zealous on the weft; gently pull the weft thread to pull the warp threads together. Do four turns total so that AD is back at the top again. The first few passes are going to look a hot mess…don’t panic. It’ll get better as you go, and your tension gets more consistent with practice.
Keep weaving along until the twist gets too tight, or every so often (maybe every 10 or 20 repeats, or whenever it moves you), then reverse direction to untwist. You will develop a funny little bump on the edge of the weave–don’t panic…it’s completely normal. The finer the threads you use, the less noticeable it is.
When the pattern changes directions, the threads on the border cards leave an odd lump. This is less noticeable using finer threads.
Every so often, you will need to release the tension on the loom, and shift it to continue your work. As you work, you will notice that the length of the weave is getting shorter and shorter…you will lose up to 20% of the warp length from start to finish.
When you get to the end of the warp, you will have 6″ or 8″ left between the end of the weave and the knots tied…remember you will also have the width of the cards and the shuttle between the beginning and end…so if you want to get a minimum length of weaving for a project, you will need to factor that into your warp length.
Some weavers carefully untie all their knots and tie up the ends in a variety of ways. I used to twist and knot the threads, but lately, I’ve decided that it’s far more effort than it’s worth, so I just leave a half inch of fringe and chop off the excess. If you plan on sewing it down as part of trim on a garment, it will likely have the ends tucked inside the seams. It hasn’t unraveled yet, at least using the carpet warp or wool, but finer threads like silk might be more trouble.
I hope this has been a helpful tutorial, and I hope you find the videos helpful as well. I look forward to hearing about my fellow weavers’ projects and anything that I have presented that you, and I’d love to see your completed projects!
Oseberg Weave finished!The alternate pattern
I also wanted to give a shout out and direct you all to a tablet weaving generator that I use a lot, created by a British woman named Catherine. It is both super useful and periodically updated (other generators like GTT haven’t been updated in more than a decade). It can be found at: https://jamesba.github.io/tabletweave/.
After I finished the last couple of feet of sewing on the coat, I decided the next item to make is an apron dress. I normally wouldn’t build a wardrobe from the outside in, but nothing is as it should be this year.
Sorry about the crud and boxes around–I am still in the midst of re-arranging the sewing room. Being in quarantine means that I can’t get out to donate the stuff I have to get rid of.
I “interviewed” three fabric candidates. Two were too small and one was *just* about big enough (if I reduced the length of the dress by 3″), but it’s got a very subtle stripe to it and has a right and wrong side…but only noticeable if you’re looking very closely.
You’ll note the fine white chalk marks for the pattern as well as the fine grey pinstripes in the wool. I debated about using it, but thought that since they can definitely date plaids to this era, stripes aren’t a big stretch for plausibility.
I laid out and marked the fabric using the “no waste” apron dress pattern. Mistress Disa i Birkalundi has a YouTube class on how to measure and mark your fabric for this pattern.
I ended up assembling mine a little differently because I was being difficult and dumb, but also because the fabric has a right side and a wrong side; if you sew the two half side panels together, one will be reversed.
Anyway, it looks fine from the front, and that’s what’s important.
I plan on adding the Oseberg tablet weaving to it (the purpley-red in the weave matches the purpley-red in the fabric almost perfectly).
Because I had to make it a bit shorter, I will be adding some dark grey wool at the bottom and trimming the top with it as well. I also need to make shoulder straps, so those will be in grey as well–here’s hoping I have enough! (PS – I do!)
Before the grey trimmings
Meanwhile, the garden is expanding, we moved the compost bins, and hubby has invested in a rain barrel. I’m looking into the possibility of growing potatoes in buckets, but it looks like 5 gallon buckets have rather small yields–maybe 2 lbs. per bucket. A 20 gallon bucket yields about 8 lbs…so about the same yield per gallon.
Many of us around the world are on a shelter-in-place order from their local bureaucrats. Those of us in the Seattle area have been on some kind of social distancing program since about mid-February, and we have been working from home and online learning for the last 3 weeks. This is going to get old really fast…
We got what? The virus? Isn’t that what we’re trying to AVOID?
But it’s giving me an opportunity to catch up on some projects and branch out into some new territory…for me.
I’m getting the finishing touches put on a Norse coat, and plan to make a few tunics and apron dresses to wear this summer…if we ever get out of this…
The last few feet of sewing the weaving down–pattern is a reproduction from the Karelia Burial ground, dated about 600 AD.
I’ve also been working on a costume project for Their Majesties of An Tir with a group of talented costumers. I’m so honored to be part of the team! I only hope that May Crown will not be cancelled and we can see our Royals in Their new clothes!
Coming soon: I’ll be doing an online tutorial for tablet weaving. Introducing the tools & materials, warping my loom and showing viewers how to read and follow a pattern. We’ve done most of the filming and it is now in the hands of my very capable producer/director.
Last weekend, I taught at Collegium for the second time, with my co-teacher HL Aenor de Pessac. It was a great time! Sadly, I didn’t get any photos from the weekend–and we were only there on Sunday.
I had originally planned on going to the event for the full weekend, taking classes on Friday and/or Saturday, but after reviewing the schedule of classes, there were a few that were really intriguing. One was the woodworking bentwood boxes class, from the guy who made my Monster Loom (which I named Mike Wazowski). I’m not a big woodworker, though I’ve done a little (middle school shop class) and I’ve been interested in learning more.
Then there were a couple that were being taught by people who are literally five miles or less from my house. I thought, ‘Ya know, I bet I could just *walk* to Lori’s house and ask her how to make the partlet.’
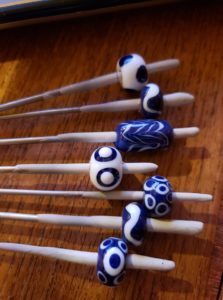
Then I considered taking the lampworking class, but I thought they might be more geared towards beginners–which I am not anymore. Solid intermediate here. I belong to the Lampworkers Guild (as you know) and I needed to make beads that are due before Thanksgiving, and they said Collegium would be a perfect place to hand them over so they wouldn’t have to be mailed. I had completely forgotten about that deadline until just a day or two before, so I thought maybe I could work on making them AT Collegium…but that seemed like a lot of hassle dragging all my stuff down there, and if the class space is really limited, they’d likely want to save it for students, not just someone wanting to play. And then they’d need to be cleaned and I might not have time enough to finish them all…maybe this isn’t a good idea after all. Then I found out the classes were all full anyway. Ah, well.
In the end, I felt time might be better spent making the beads I need to finish for the guild at home on Saturday and bringing them with me on Sunday. I volunteered to make two strings at a dozen or so beads each, so I needed to make 25-30 beads done. I was able to get 18 or so finished before I started making some mistakes and clearly showing signs of flame fatigue. It was getting late and I also needed to finish packing the truck for the event, so I turned off the gas and let the beads cool down. I didn’t have time to clean them after all, so I’ll have to finish them up and mail them anyway.
This year was Collegium IV. I taught Survey of Tablet Woven Bands at Collegium II, which was a slide show of period pieces and patterns. It was a packed room–AMAZING! Apparently, my Laurel sent in a secret expert to sit in and review my information and she said that I did a good job! YEY!! I did my research! Then I skipped teaching for a year; I went to the event and took several classes, which was a lot of fun. This year, I was asked to teach something again and after discussing it with others, including my dear friend (and co-teacher), Aenor, we came up with an idea: Beginning Tablet Weaving: The Astonishingly Easy-to-Recreate 9th Century Oseberg Band!
The class included a very quick Power Point presentation that covered some basics of history, overview of materials and terms, some tips and tricks to keep in mind, and then some hands-on. To save a lot of time and stress, I pre-warped the looms with the yarn and cards, so all they had to do was start turning cards and throwing shuttles. A few of the looms even had a bit of weaving started.
I somehow screwed up one of the looms and warped up something wrong…the threads were making squares instead of zig-zags. Not sure what happened there. Now I think about it, the weaver may have had the cards in the wrong starting point…but it was a pattern and it looked cool, so….win!
Aenor was wonderful at helping get half the students started, and then I went around and checked on their work. In the last half-hour or so, she continued the slide presentation with a lot of great pictures of the archaeological dig and information about what they found. She’s a trained archaeologist and was completely in her wheelhouse there.
The students seemed to have a great time and they all walked away with a tablet woven bookmark they made….and hopefully an interest to learn more later.
It turned out to be (in my opinion) barely enough time. I wish I had been able to have a 4 hour block instead of just 2 so the students would have a lot of time to play, and have materials enough to take home with them, including a set of cards. Or include an hour of warping the loom (which is almost a class in itself because of all the time it takes to learn how to do just that), an hour of history and two hours of weaving. But all the materials needed would drive the price up to about $20 a student (minimum) and require some kind of loom.
New projects, now that Athenaeum is over: lampworking and Royal clothing.
As part of the Lampworker’s Guild, I volunteered to make two strands of beads for gifts from the Kingdom, not realizing how close the deadlines for Athenaeum and July Coronation would be. Honestly, I should have started it sooner, but I kept thinking I had plenty of time. HA HA HA! Whoops.
So, I pulled out the lampworking stuff and noticed that my bead release was, of course, bone dry. I added a bit of water to it and let it sit for a couple days, shaking it once or twice a day. On the second day, it was clear that the stuff was still solid sludge, so I stirred it with a mandril and added a bit more water. I shook it again and realized (too late) that I added too much water. It was too thin. I left the cap off it for a couple days to dry out and it’s STILL too thin. UGH. I was able to make a few beads using the mandrils that I had dipped last time, but I’m down to the last 5 or 6 and then I’ll have to dip some more. I have made arrangements to borrow some from HL Aenor to tide me over, and I may go ahead and order another bottle from Frantz.
The challenge is to make the beads using the Historical Bead Challenge samples that many of us made several months ago. I got most of the way through the challenge before I lost momentum (ran out of gas, needed to focus on other things, etc.). Of the 21 lessons, I think I only missed the last 2 of them, which I plan on finishing once I get the supplies I need.
The other thing I’m doing is helping make costumes for their Royal Highnesses of An Tir, the project headed up by Baroness Lorenzia & HL Margo, who live just a couple miles from me. Duke Morgan and Duchess Livia were King and Queen a couple of times before in another Kingdom (Adenveldt? Arizona area) but this is their first time for An Tir. They are terrific people and fun to hang out with. They have two lovely children (I’ve only met one so far, but I hear the other is equally delightful) and we are clothing not only TRHs, but the kiddos and His father, who is also a Duke. This is a lot of work, but we are up to the task (and volunteered, of course, and are more than delighted to do so). Yesterday and today I spent many hours at Lorenzia & Margo’s finishing seams, cutting out garments, and brainstorming with the team, coming up with genius ideas (not all of them are mine, mind you…but I feel that I have contributed).
One of our genius ideas was to make checky tippets for TRHs. I said, “Gosh, that’s just like making a quilt,” so we’re cutting strips and I’m sewing my quarter-inch seams, cross-cutting flipping and sewing… Continue reading “Side-Stepping the Weaving”
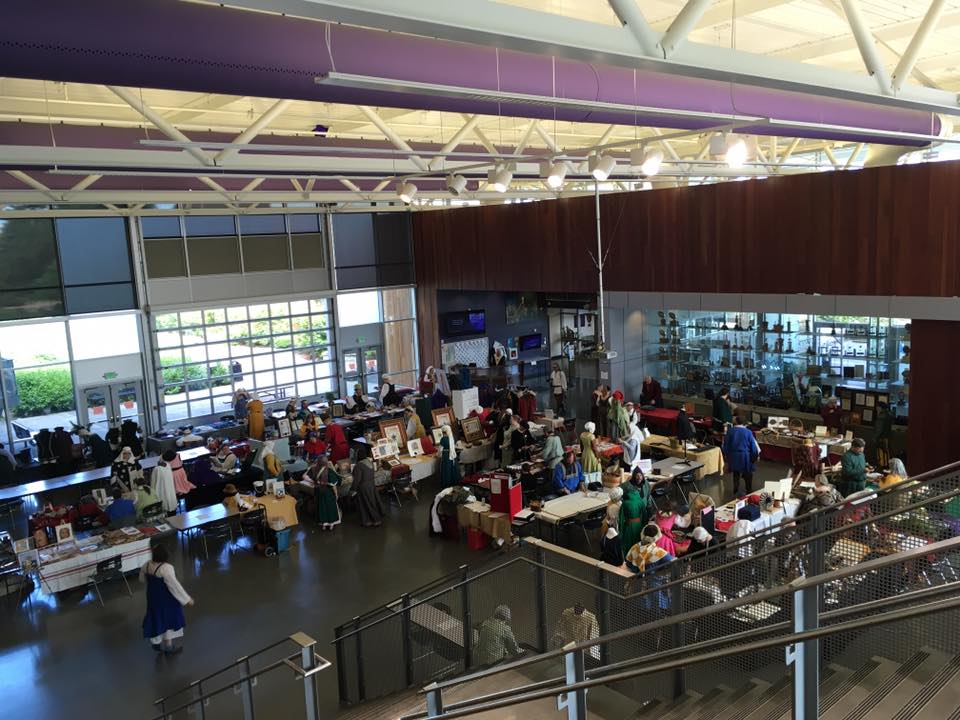
Another brilliant event put on by Master Charles and Mistress Kerij-e! There were over 50 artisans displaying their works, talking with Laurels and other artisans, sharing their passions, their research, their creations, and their positive energy. The place was just alive with joy! It was really palpable.
This event was new last year, but it had a lot of similarities to an event that had gone on for 3 or 4 years prior that was hosted by a Laurel in the Kent/Renton area called Arts Unframed. It had a similar structure to have artisans display their works and have Laurels attend and give them the opportunity to view the stuff. It was a little less structured in that the Laurels were not required to sign up to visit with artisans and have conversations with them about their chosen passions, and the artisans were not guaranteed to have anyone stop by to talk. I did Arts Unframed twice and had only spoken with a couple of Laurels who were curious about what I was doing. I had a lot of stuff on my assigned table, so there were lots of different kinds of art to interest a wide variety of Laurels. I had weaving, spinning, costume bits, sock knitting, the warp-weighted loom, dye stuff, blackwork, lampwork, and part of a Roman doll that I was making.
This is only about 2/3 of the exhibitors. I’m to the far right, next to the staircase.
Last year at Athenaeum, like at Arts Unframed, I had my breadth of knowledge with All The Things on display…
2018…ALL THE THINGS!
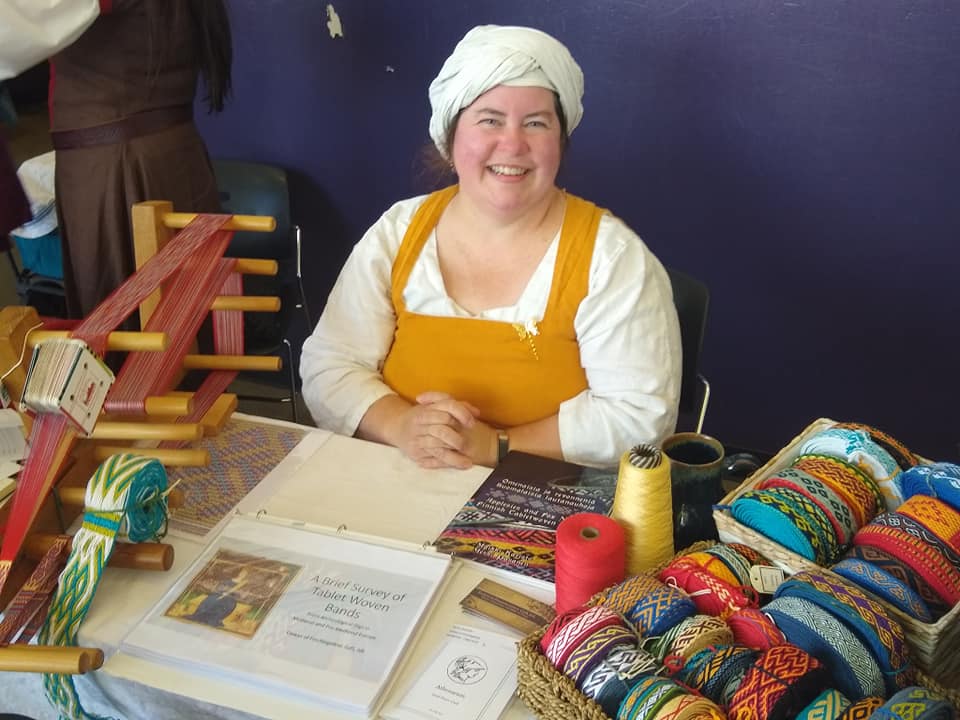
…this year was depth of knowledge display on historic tablet weaving. Because I was only showing one thing, I requested a teeny tiny table. It was just barely enough room, but it worked.
2019…HISTORIC TABLET WEAVING!
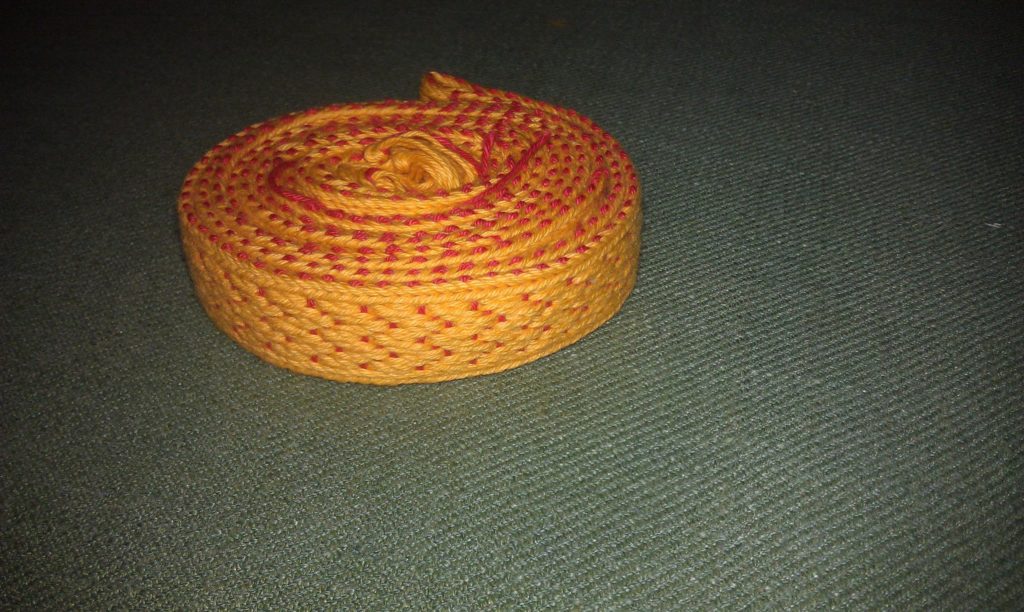
I had so many visitors and each one of them was a joy to talk to. I was able to share where I started with this rather rough-looking skip hole weave, which was made in the THIRD class I took on tablet weaving…I was determined to learn this craft. This was my “ah ha!” moment.
A very simple woven band.
Then I began learning from others through published patterns. I created quite a number of pieces from books and GTT patterns on Pinterest–there are a lot of patterns available there!
Applesies & Fox Noses has been a great tool for improving my weaving skills.
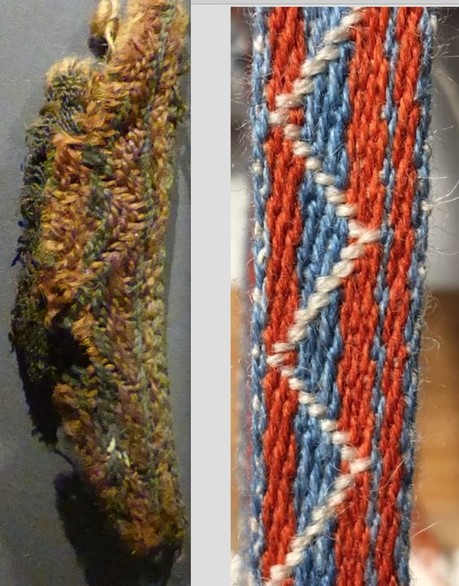
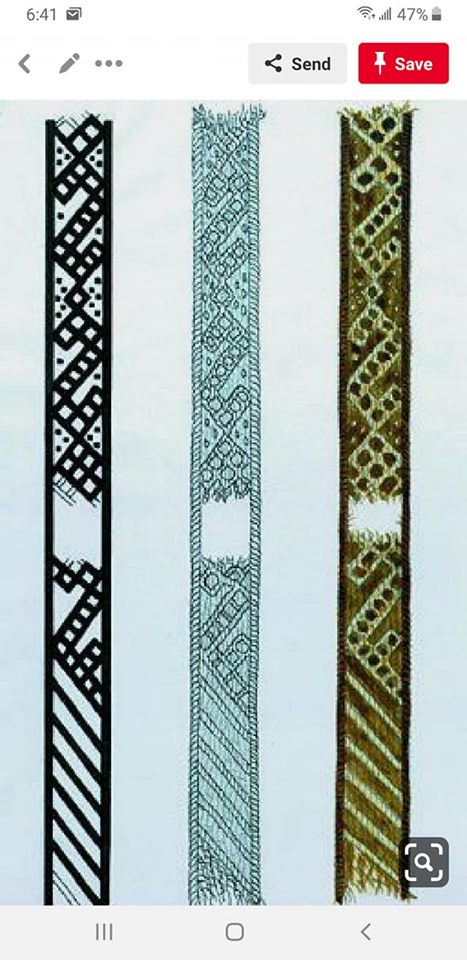
Then I felt I really advanced with this piece where I was able to look at the extant piece (photo) and the archaeological drawing and figure out how it was made…
No pattern was available, but this detailed archaeological sketch was at hand.
…and then re-create it.
Noting the little dimples in the sketch, I guessed that this was a skip-hole weave method…and I was right!
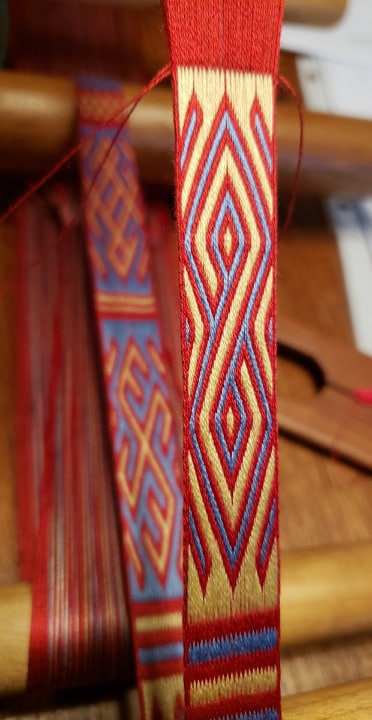
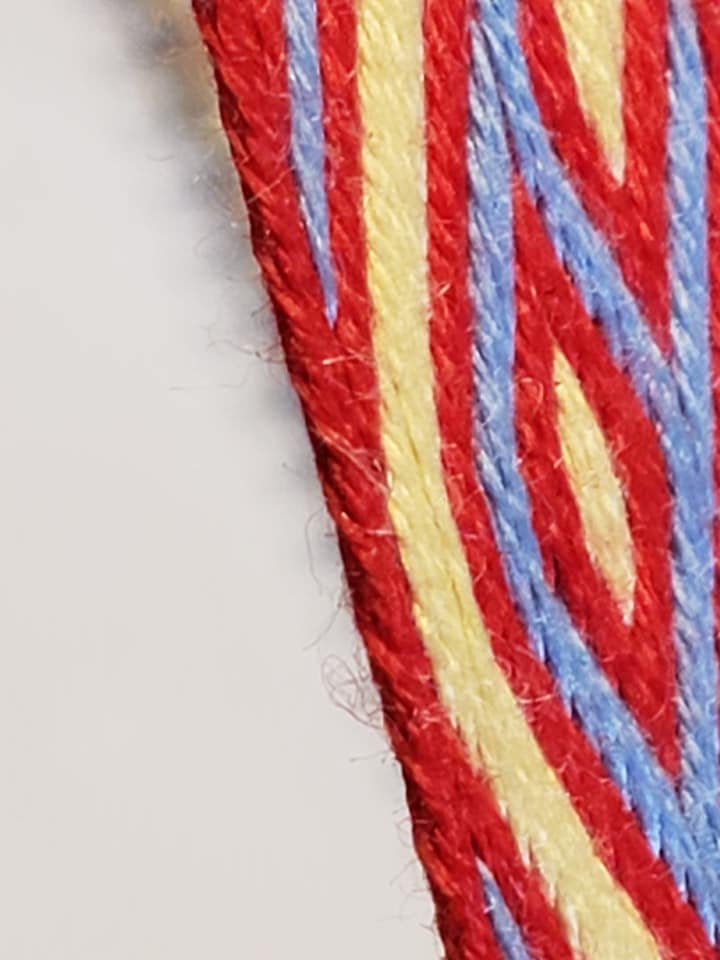
And finally, taking a very detailed pattern and use very fine silk threads to create a breathtaking woven piece…if I may say so myself.
A question I was asked by a Laurel who stopped by was how big was the original and how close is mine to that measurement? I didn’t know the answer to at the time–the extant image didn’t have a ruler next to it, sadly–but have since (in the last 24 hours) discovered the answers and found out even more about this piece and the companion piece found in the tomb. The original measured 18 mm wide and was made of silk (not wool, as was originally published in another source that I found). Mine, also made of silk, is 15 mm wide. The original motifs are much more square than mine and other reproductions I’ve seen, which makes me curious to find out why…
“So what’s up next?” was a question I heard several times. There are three things I want to do. First, work in wool. I have only worked in cotton and a little in silk, but I have a project in the queue for a gent in Denmark who got in touch with me a few days ago. The item that he’s requesting is a 6 yard piece in wool using an Icelandic pattern. I just ordered some materials and am looking forward to receiving them soon…maybe this week. The specific pattern he wants is a brocade tablet weaving piece, although brocaded weaving is something I have done very little of. The last time I tried, several years ago, the process frustrated me, likely due to the materials I was using, and the difficulty of the piece that I chose. However, now that I have much more experience and confidence, I am ready to try it again–so that’s #2.
Brocade weaving from Iceland; reproduction by Aisling
The third thing I am looking forward to trying is weaving with metal. Many of the brocade pieces used gold and silver in its creation, and the Danish gent that I’ve been communicating with has some to trade for the woven piece he is asking for.
Many of the brocaded pieces found at archaeological digs have nothing but the metal remaining–the wool and/or linen rotted away over time.
At 12:30, we had a break for lunch. I lunched in the courtyard with my bestie, Aenor, who was also displaying, as well as their Excellencies of Wyewood and a couple other gentlemen. Although the Madrone Culinary Guild provided a lovely spread of food, allergens prevented me from imbibing, so we packed a lunch of chicken salad, croissants, cheese, fruit, and Millionaire’s Shortbread.
It was a long day, exhausting, but in a good way. I had to leave right after the displaying was over at 4 pm to meet up with hubby and friends at the Pride Day Sounders game. Sadly, this meant missing court and the elevation of Mistress Helewisa, and the awarding of the Lion’s Strength to my Mistress, Isolde.
The gargoyle behind me is Rick…he’s a very funny guy.
At the end of the day, I had over 14,000 steps logged on my Fitbit. I forgot to change into my comfy tennies, but kept wearing my new, not-yet-broken-in SCA loafers…by the time I got home, my feet were very sore! I need to find a way to stretch the leather over the instep.
I’m looking forward to doing this again next year. But maybe with more comfortable shoes.
I’m starting to get a little panicky about Saturday…at least about getting everything packed and not forgetting anything. Once I get there and get set up, I’m fine–I can talk all day to people about tablet weaving, so that’s no problem. It’s making sure I have everything I need that is stressing me out.
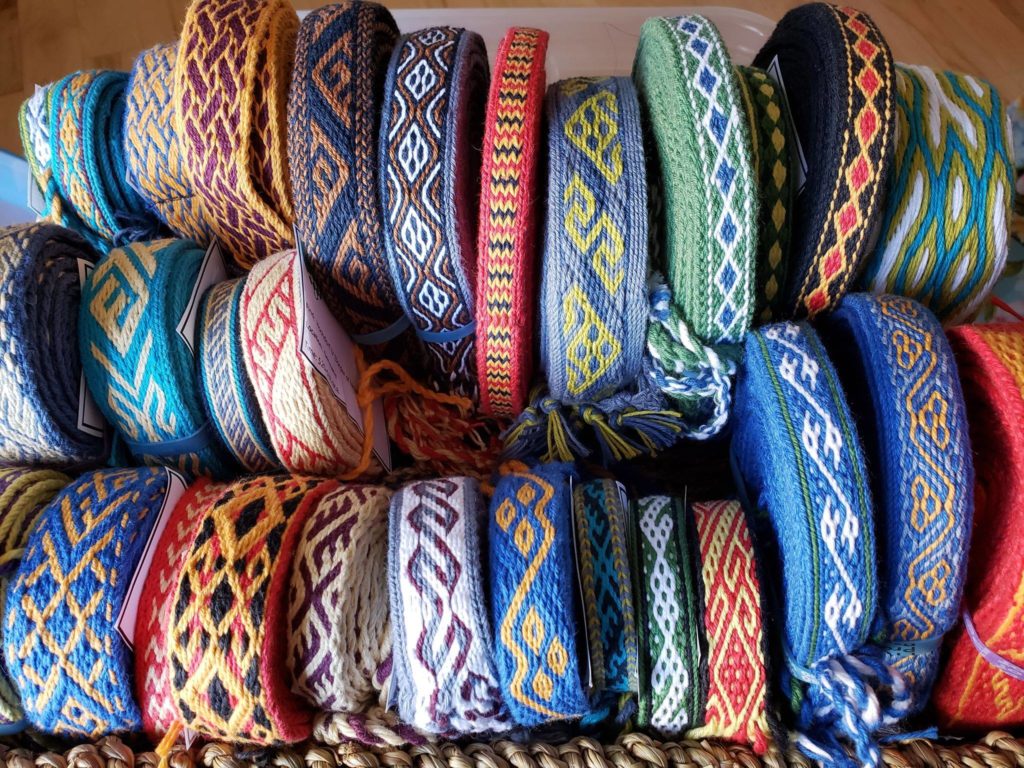
I’ve got my weaving all ready in the display…
This was the first jumble of bands…I realized I had too much weaving and not enough basket…so I got a second basket.
I’ve got my loom warped with lovely fine silk threads…just need to ensure that I can transport it to the event without snagging any of it…I think I have an old Amazon gift bag lying around somewhere.
7th century French double-sided weaving in *silk*…it doesn’t get much sexier than that.
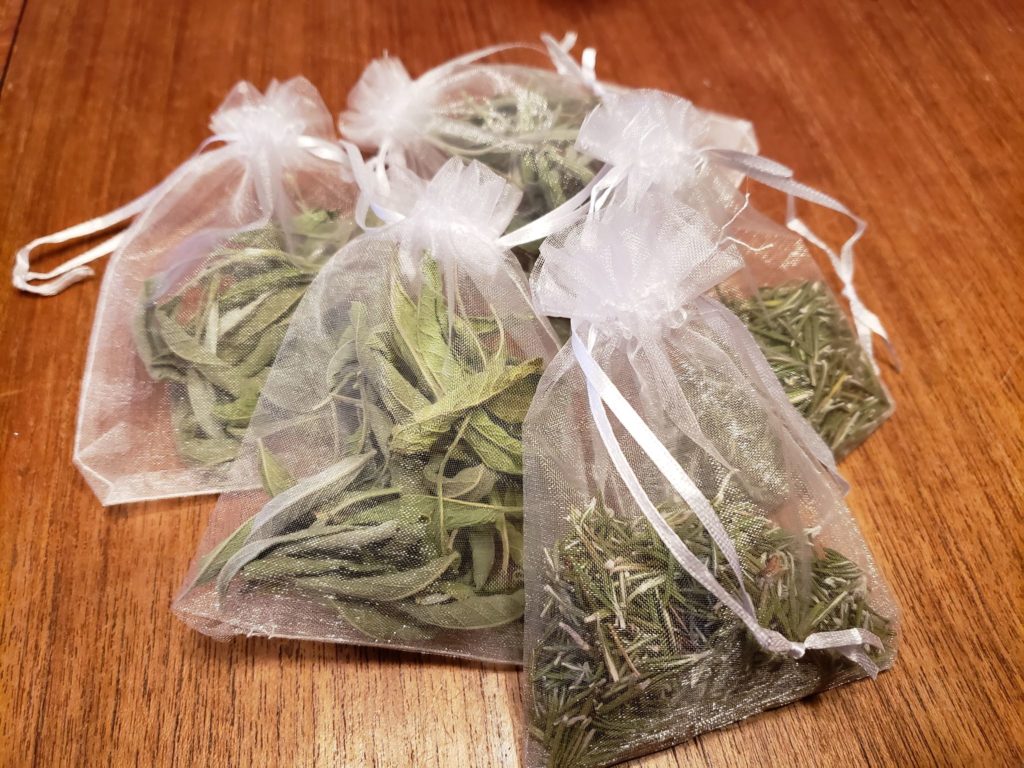
I’ve put together my little herbal thank yous (I made 15…I hope I have enough)…
*Not intended for smoking. It’s sage and rosemary from my garden in little organza baggies.
I also have my business cards (with updated blog address), binders of patterns and research materials, and a couple of pieces to give as gifts–one to Master Charles for his apprentice who is getting elevated, and one to Her Royal Highness as a gift to someone in Caid. I still need to find my table cloth–I’m thinking about going with a plain color since I’ve got so many bright colors in the basket already.
Tag…you’re it!
The only thing I’m lacking is good labeling of the pieces themselves. I put business-card size pieces of paper on them–I created them on Publisher with my arms and a brief description–but they’re too big and I don’t know how to attach them to the weaving other than stapling or pinning, which I don’t like. What I should have done earlier is put mini tags on them; small tags but with enough room to write the era and region the pattern is from–or rather, type it up, print it on a sticker and paste it on. It’s something I should have ordered days ago, but I didn’t…and now I’m wondering where I could go pick them up. A craft store? A paper store? A party store? None of those seem quite right. The paper I have here is not heavy enough, and I’m not sure what I’ve got for heavier weight paper. I mean, I could buy some paper, use a template to cut them out by hand…but that seems rather time consuming.
The last thing I need to do is make Millionaire’s Shortbread….it’s kind of a throwback to last year when a Laurel I really admire gave me the gift of a jar of Lyle’s Golden Syrup and challenged me to make some. A year has passed and I have made it a couple times before…but I need to make it either tomorrow or Friday and bring it to the event.
A deadly combination of shortbread, caramel and chocolate.
Needless to say, you can see why I’m a little panicky. I have a lot of stuff to do and not a lot of time to do it.
Hide and seek second place winner. Keys are still holding the top spot.
I’ve been searching for my copy of the Applesies and Fox Noses for a year…or more. I don’t recall how long it’s been. I was tearing the house apart and found it tucked in a bookcase, in a giant ziplock, behind a quilting pattern. So happy! I’m still looking for a set of keys that I lost almost a year ago…so that would also be nice to find.
I know…I’ve been away for some time! Lost the password, struggled with other projects, yadda yadda yadda. But I’m back. I’ll be working my way back through my projects to document what I’ve done as well as publishing new stuff.
Athenaeum is a brilliant idea from the mind of Master Charles (et al) to have an artisans’ display. Last year, they held it in a great room and artisans got a table to display all the cool stuff they make. It was a huge success! I got to display a breadth of skills (lampwork, tablet weaving, knitting, spinning, natural dyes, and Frigga the Loom). I got to chat with dozens of other artisans, share ideas, and make business arrangements (I make socks for you and you make flags for me, etc.). It was great fun and exhausting and amazing!
I signed up again this year, but asked for a small table where I will display my depth of knowledge in tablet weaving. I have been weaving up a storm, trying to recreate as many different patterns as I can find from 500 BCE to the 14th century (the art rather died out around that time due to dramatic changes in fashion).
I have learned so much in these last couple of months that I’ve been focused on this endeavor. My proudest so far is figuring out how to turn this drawing of an extant piece into a woven band.
Yes, I took this off of Pinterest. Screenshot. I’ll update it laterMy reproduction!
My biggest setback at this time is a method of display. I have a few ideas, but no idea which is going to work best. I think what I might need is a series of horizontal rods to tie or roll them onto, although I’m leaning more and more towards partially rolling and then pinning to avoid it completely unraveling.
Then labeling all the pieces…I’d love to have something small to pin on them that has my name, the date of the original, location (country), and maybe some other details, like if it was originally brocade or woven with silk or metal.
I was also asked to do a piece of tablet weaving for Her Royal Highness as a gift to someone in Caid. We discussed it with a few others (my apprentice sisters and Mistress) and decided on an Egyptian Diagonals pattern. I’m about halfway through the pattern now.
Egyptian Diagonals pattern for a distant cousin of HRH.
I’m also putting together some gifts for the Laurels, Pelicans and other dignitaries. I picked a bunch of rosemary from my garden a few days back, so I’m drying it and will bag it up. I’m also planning on making something edible to share: Millionaire’s Shortbread, from a challenge from last year’s event.