
(Originally posted 31 Jan 2014)
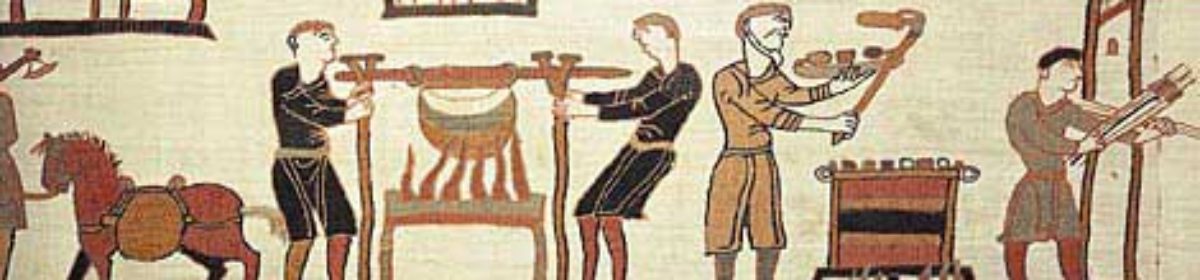
I went ahead and started on building the warp-weighted loom project today. I consulted a BUNCH of web sites and looked for sources (books) that I could consult, but the newest books on warp-weighted looms is dated from the late 70s.
Broudy, Eric. The Book of Looms. Brown University Press, 1979.
Broholm, H.C. and Hald, Margarethe. Costume in the Bronze Age in Denmark. Arnold Busck, 1940.
Hoffman, Marta. The Warp Weighted Loom. Robin and Russ Handweavers, 1974.
Trychkare, Tre. The Viking. Carver and Co., 1966.
Yeah. And I looked for the Hoffman book, which had been recommended to me, just out of curiosity. I can get a used copy for $133. Not happening on my budget. I’ll have to see if the Everett Public Library can get me a copy on inter-library loan. There appear to be a couple of newer magazine articles, so I’ll seek those out as well.
There are a lot of web sites with some research (most based on the sources above) plus looking at extant pieces and experimenting with building their own. There are differences with all of them, so other than the basic structure, there appears to be a lot of room for experimentation and setting things up so it’ll work for you. I still need to do a little more research on weaving in general–I’ve only done inkle and card weaving, but this seems to be just a giant inkle loom. There are possibilities for doing multiple sheds, though–this one I may eventually be setting up to be a 4 shed loom, although the first couple of projects will be 2-shed only.
Here is my process to building the prototype:
- Take two 2 x 4s–I would recommend using two hard wood boards for a “finished” look, although Douglas Fir is certainly more economical and lighter for transport…I grabbed two boards from the rafters, only to realize later that the darker board was, in fact, cedar. Whoops!

- Cut two 2 x 4s to 7 feet long (84″). Other directions said keep the 2 x 4s at 8 feet long and use a stool to reach when weaving. To that I say, “NO SIR!” I’m clumsy enough and being only 5 feet tall, I don’t need to risk injury. Again, this is a prototype, so if it needs to be taller after experimenting with it, I can make it so next time. I doubt it, though. In fact, I’m thinking that I might be able to make it even shorter by cutting the bottom down another 6″.
- Next, you take those 12″ pieces that you cut off and make the “crotches”. These are the pieces that the top beam rests in while you weave. It needs to be deep and wide enough for the rod to rest in. Some directions suggest that you make it vaguely “S” shaped. Vague, indeed. Seems mostly stylistic, although the thinner end at the bottom makes it easier to attach to the boards with long screws. These were shaped using the band saw…I love that toy!
- The bottom of the crotch is 16″ down from the top.
- The next step was about creating the shed rod. The top beam and heddle rod I bought were 5′ long, which determined the width of the frame. 60″ long, taking away 4″ on each side for overhang, I cut the shed rod 52″. I drilled one hole through and secured it with a bolt and wing nut. These are meant to be taken apart for transport to events. I also cut a thinner piece of wood for the top of the frame, simply for stability. Similarly, I screwed it together with wing nut and bolt (they’re WAAAY too long–I’ll have to get shorter bolts the next time I’m out at the hardware store).
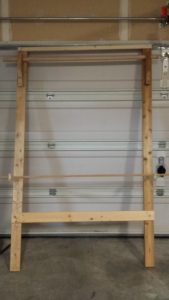
- Here she is, standing up! There are a few more steps to complete my girl, but it’s wintertime and it was just a few degrees above freezing outside.
The loom still needs heddle rods, heddle rod supports, and weights. The heddle rods can be scavenged from scraps leftover from the yurt project. They don’t need to be particularly heavy and I have 3/4″ sticks that are more than long enough. I looked for pieces of 7/8″ dowels at the hardware store, but they only had 4-foot lengths…I need 5 feet. Figures.
The heddle rod supports will be shaped from scraps in the bin. They need to be about 8-10″ long and Y shaped. I can use the band saw again and carve down the point to fit into the holes I’ll be drilling on the frame.
Weights are going to be time consuming. Some other weavers have used 1-pound bags of sand or stones for weights instead of clay circles. I may go that route, also. I’m also thinking that I may need to create some kind of support to make it free-standing and perhaps more stable. This will be a blast to take with me to Ursulmas next year!
(one sleep later…)
Made some progress on the loom, which may seem like little things, but it took some ingenuity to engineer it to work the way I need it to…still need to make some adjustments, as you will see.
 Here the crotches are screwed onto the uprights.

 This is my first go at the heddle support rods. I needed to adjust the shape of the Y where the heddle rod will rest–the first attempt, the heddle rod will barely stay in place, but one nudge and it’ll fall. I looked at a couple looms and came up with an improved shape. Now the heddle rests comfortably on there–no risk of falling off.
It needs just a couple more minor changes before it is ready to warp!
I found (again) and started watching the Sami/Norwegian video of a woman who was demonstrating how to set up the loom, starting with a woven band with weft threads that become the warp threads of a woven piece. I have a bunch of Fisherman’s wool that was given to me recently and this will be a great project to use that yarn. I think I’d like to try this…

One of the things that I realized, however, is that the woman in the video is weaving on a loom where the top beam is at her head level. The more I thought about it, the more it made sense. Anything out of reach is just silly, so I decided late today that the loom needed to be shorter. I unscrewed the crotches and top support and chopped another foot off the top. I reassembled the pieces; now the top beam is sitting at about 62″ instead of a ridiculous 78″. Now she feels right. Maybe it seems weird, but she feels alive! She even told me her name: Frigga, named after the Goddess of weaving and wisdom.
First, though, I need to finish weaving the Perle Cotton piece I have on my inkle loom. Better get on it!