My creative SCA journey on stuff I make and research I do…mostly in fibers (wool prep, spinning, weaving, tablet weaving) and glass beads, but could also include costumes, camping, cooking, and any other creative things that strike my fancy.
Ok, it might not *actually* be a snail, but it looks a little snail-like to me.
The “right” side of the pattern……and the “wrong” side! I think I like this side better.
I had asked on the community page what kind of weaving you all would like to see next, and about half of you said something different and more challenging. And I thought I found one…but I think I’ll put it off til next time. That one has 38 cards; a very random, meandering pattern; and seems to go on for days…and days…and days… In all, 182 picks to this repeat… If you want to do that weave with me, and you don’t have that many cards, this is your fair warning to stock up!
So I looked around some more and found one that I think is much more do-able, but still a bit different because it isn’t Norse and not geometric. I don’t have a lot of history on this one because, while there are some papers written on the subject… I don’t read Estonian. Sure, I could rely on Google Translate to help, but many times, as many of you may have experienced, the translations leave a lot to be desired.
The motif that I have chosen comes from a 13th or 14th century grave find in Estonia, the Siksala shawl, found in grave 200. It is currently housed in the archaeological collection at the Tallinn University Institute of History. There are more than a dozen different motifs around this woven and beaded edge, where the weaver did two or three repeats of a design, then moved onto the next one, a bit like a skip hole weaving sampler.
The shawl’s edging is largely complete—almost the entire edge remains, but the body of the shawl has mostly disintegrated.
Rather than try to chart out the entire thing (there is a book available on Ebay for under $8 US that does just that), I have chosen one very pretty motif, and its mirror image, to show you for this video. It’s got really cute snail-like curls—and I love snails!
I hunted around for a new and different piece of tablet weaving and came across a photo of a re-created piece and I absolutely fell in love with it. Unfortunately, the person who posted the image on Pinterest didn’t credit the maker (ALWAYS credit the maker!), I dug around some more and found that these photos actually belonged to my favorite weaver to stalk, Mervi Pasanen. https://hibernaatio.blogspot.com/2012/01/lautanauhaa-virosta-tablet-weaving-from.html
The next kingdom in our Laurel Kingdoms project is the Kingdom of Atlantia, created in 1981 whose borders encompass Maryland; Virginia; North and South Carolina; Augusta, Georgia & Washington DC. Their colors are blue and white. Given the oceanic theme of that region, the snail-like motifs will be a perfect fit for that Kingdom.
Don’t be afraid of the length of this pattern! It’s got the same techniques that you have already done–skip hole, turning cards forwards & backwards–it’s just a lot longer. However, you don’t have to worry about twist build up in the cards–this is a zero-twist pattern. You will need to flip your border cards every couple of repeats.
The long and skinny……or the double-wide. This one prints on an 8 1/2″ x 11″ sheet easier.
Thanks so much for joining me again! Happy weaving, a very happy and healthy Thanksgiving to all my US viewers, and hope all your lockdowns are swift and comfortable. Check on your neighbors…we all need to look out for each other.
If you were to ask me for book recommendations, and you have!, one of the books that I will recommend to every historic tablet weaver is Applesies and Fox Noses, Finnish Tabletwoven Bands from Maikki Karisto and Mervi Pasanen.
Applesies–the Finnish Tablet Weaving Bible
This is a collection of 30 patterns ranging from very easy to difficult, and includes period motifs from tablet weaving fragments found from the Finnish Iron Age, which ranges from 500 BC to 1300 AD.
The other comments I’ve gotten from the Tablet Weaving for Absolute Beginners is that the pattern was too complex. If you want to start your first tablet woven band and want a very easy pattern to start with–this is it!
Theodor Schwindt’s drawing of fragment #379.
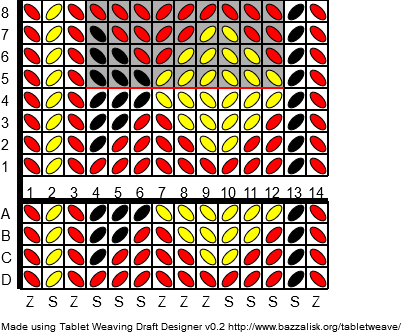
This pattern comes from a fragment found in the Kaukola Kekomaki graveyard dating from the Karelian Iron Age–as mentioned above. This three-color fragment was found on a dress, a detailed drawing of this 14 mm wide band (slightly over 1/2″) is in Theodor Schwindt’s book, Tietoja Karjalan rautakaudesta (“About the Karelian Age”), published in 1893. The item is labeled as #379.
A variation of Colorful Small Applesies from Applesies and Fox Noses, Finnish Tabletwoven Bands by Maikki Karisto and Mervi Pasanen, ISBN 978-952-5774-49-8.
Some of you may have seen this pattern or similar ones on Pinterest or come across it in Google searches. The web site for these two amazing weavers is https://hibernaatio.blogspot.com where they have several other patterns. You may panic for a moment because there are quite a lot of words you don’t recognize…yes, it’s written in Finnish. But DON’T PANIC–if you look carefully, you’ll see there is also English written in there! Not this pattern, of course, but on the web site. It’s OK.
You’ll notice that this pattern doesn’t have S and Z written under the pattern, and you’ll also see that the pattern is labeled DCBA…upside down! And the card is COUNTERCLOCKWISE! AAAAAHHHHH!
No, don’t panic. Let’s plug that into the tablet weaving draft designer: https://jamesba.github.io/tabletweave/ and make the bubbles look the same as the image.
There we go! Now, if you’ve watched my previous weaving videos, or if you’re familiar with this notation, you should be able to warp this one up! And if you’re not familiar with the Applesies charting system, you also now have the key for how their notations will translate into warping your loom.
Ansteorra where the wind comes sweeping down the plain…
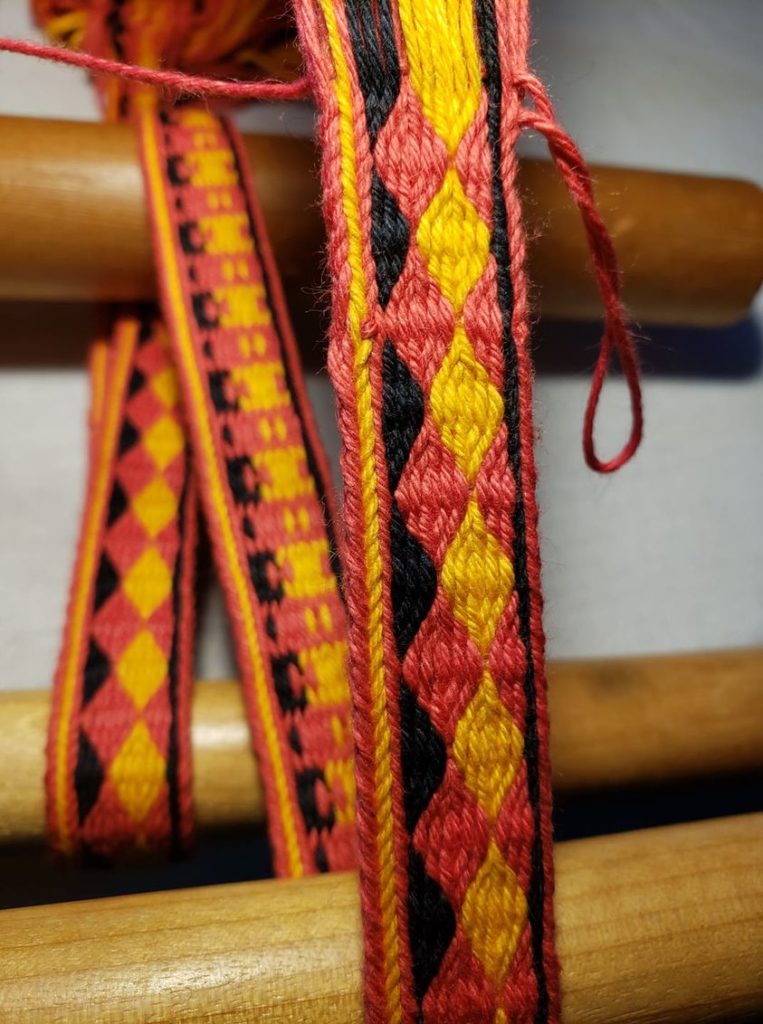
This next piece in the Laurel Kingdoms project is honoring the Kingdom of Ansteorra (which means “one star”–totally appropriate for the Lone Star State!), which was elevated from a Principality to a Kingdom in 1979, which encompasses Oklahoma and Texas. Their colors are red, black and yellow.
The progress of my woven piece. Looks pretty sharp! The finished size of this piece is 17 mm, just slightly larger than the original (14 mm).
In this video, I took a little side step to answer the question: “What do you do with all those tablet woven bands?!” (Besides drop them into a box and shove them into a closet…)
Sure, I do have a bunch that I keep as my “portfolio” for Arts & Sciences displays and for teaching, but I do occasionally use them for reenactment events and my everyday life. You don’t have to be into Medieval or Norse reenactment events to make use of your tablet weaving–you can use them in many modern applications as well. But to give you an idea what you can use them for, I came up with a short list!
Belts
Bag straps
Guitar straps
Clothing trim
Dog leashes
Winnegas
Headbands
Purses
Keychains
Lanyards
Decoration for pillowcases
Quilts and comforters
Wrapping gifts
Decorating Christmas trees
Holiday centerpieces
Gifts
AND SO MUCH MORE!
Yes, that’s quite a few more than 10, but those are just a few ideas for how you can use tablet weaving for both costumes and everyday wear.
And, as promised, here is the pattern for the lanyard (keychain-dog leash-purse strap-holiday centerpiece…). This one is about as easy as it gets–thread it according to the directions and it’s simply four turns forward and four turns back. Repeat.
Super simple–four forward and four back of all cards (except borders…where I accidentally included card 29 in the forward and back–that should just turn forward…oops.)
Thanks for checking out the video and the blog, and I will see you next time on Weave Along with Elewys!
Edit! Updated pattern!! After looking at the extant piece and my pattern, I decided that the little blue <> on the sides didn’t belong, so I adjusted it and came up with this!
Border cards are now the 4 cards on each side which will need to be flipped every few repeats to deal with the twist build up.
As the weather cools in the northern hemisphere (and life begins anew in the southern lands) we are minded of the upcoming holidays and thinking ahead for gift ideas for those we love. If you have a Medieval enthusiast on your list, I may have an idea for you! Have you been shopping for reliquaries and coming up empty handed? Vendors all out of slivers of the one true cross? Finger bones of Saints on back order? Well, never fear, fellow weavers—you can create your own relics–the sleeve of St. Bertille!
Born in the early years of the 7th century, Bertille was born to a prominant family in Soissons, France, about 60 miles/100 km northeast of Paris. As a child, she spent her time in prayer and doing “serious duties”, not wanting to spend time doing frivolous things, and as she grew up, she found the world to be tempestuous and despised it. She found comfort in prayer and conversations with God. About the year 630, shortly after it opened, her parents brought her to the Jouarre Abbey in the city of Brie, about 20 mi/30 km SE of Paris. We don’t know how old she was when she arrived, but I would guess between 15 and 20 years.
She was educated by the Abbess Thelchildis and was known for her humility and self-denial. She was committed to aiding the sick and caring for the children being educated at the monastery. When Chelles Abbey was founded, with tremendous support from Queen Bathilde in 646, Bertille was chosen to be its first Abbess. 20 years later, that Queen retired from Royal service, as her son took the throne, and moved to Chelles Abbey, where she lived until her death in 680. The Abbess died 12 years later, in 692. Both were buried at the Abbey and about 200 years later, both had been canonised as saints. Her feast day is November 5th.
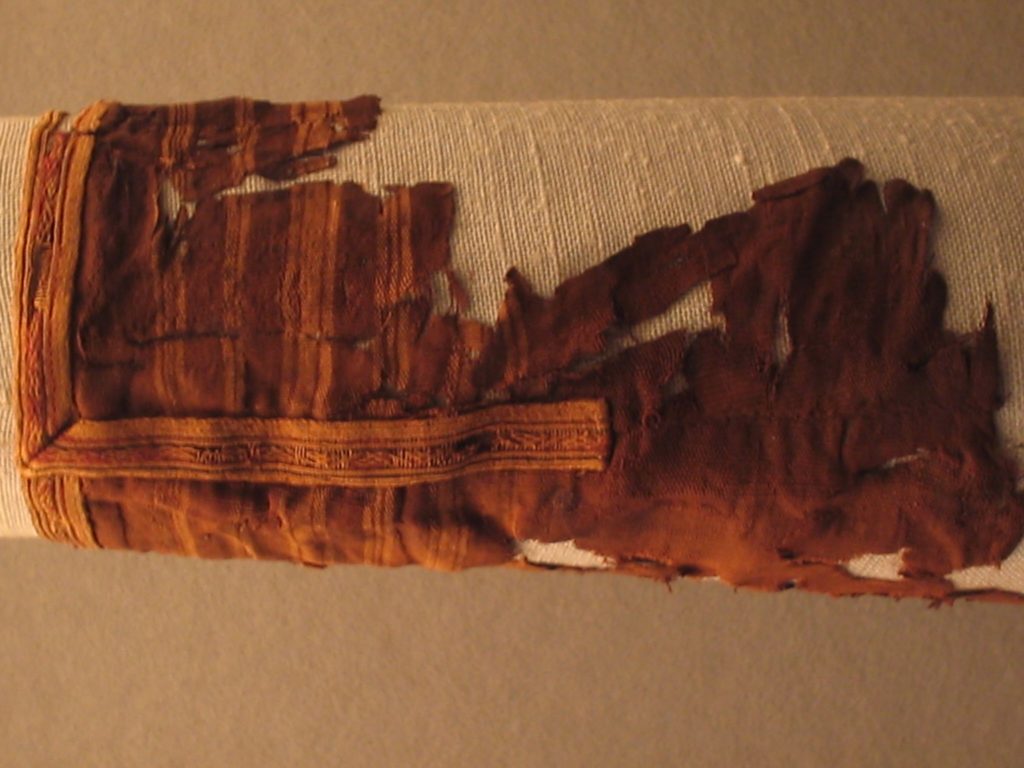
The sleeve and tablet woven trim from St. Bertille, late 7th century.
Among the textiles, at least three tablet woven pieces were found there—although, their garments were moved in the late 9th century, and displayed as saint relics for passing Pilgrims, then later moved again during the French Revolution to spare them from destruction, so we’re not really sure which woven piece belonged to which woman. Despite the rough handling, the fragments held up remarkably well, and so much detail can be seen on them. The pattern I’m going to share with you today is a bit of tablet weaving on what is presumed to be the Abbess’s sleeve. The extant piece is 9 mm wide, made from silk in red, yellow and dark brown. 2/3 of that width is border cards, so this center design is a very fine 3 mm wide.
Kingdom of Caid, created in 1978, comprises the regions of Southern CA, Southern Nevada (including Las Vegas) and Hawaii. Sounds like a party! Their colors are blue and white, but looking at their banner, it also has yellow in the laurel wreath and crown, so I’m adding a third color because this pattern lends itself well to using three colors…so let’s do that! Grab your looms and let’s get to work!
The last video for the Hallstatt 152 skip hole may have been a bit too advanced for a beginner, so here is a very easy skip hole pattern for beginners!
The original band was found in Hægebostad in the southern part of Norway and dates to about 500 A.D. The tablets in the central area were threaded with only two threads per tablet, the border tablets with four.
The three graves at the Snartemo farm were excavated over an 85 year period, between 1847 and 1933, which uncovered a number of fantastic pieces, including a sword, glass beakers, gold rings and more, dating to about 500 AD. Grave II (excavated in 1878) and Grave V appeared to be those of a warrior nobleman, both containing remarkable textiles, including the bands we know as Snartemo II and Snartemo V, the latter being significantly more complex than the former. The simpler band from grave II was woven with 17 tablets in two colors of fine wool using the skip hole technique. It measures 0.9 cm, but colors have not been determined as no dye analysis has been done. Lisa Raeder Knudsen did a study of the extant piece and said, “In Bjørn Hougen’s book “Snartemofunnene” 1935 a drawing is shown, but the analysis is not correct.” More recent in-depth studies have been done very recently; the link is below.
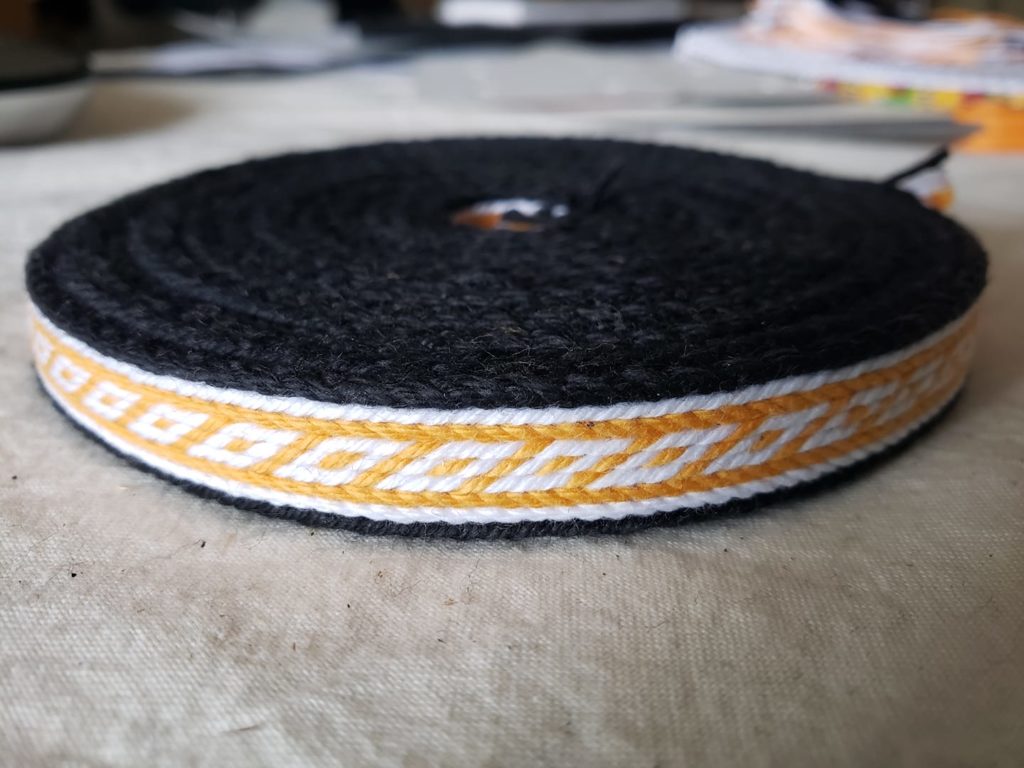
As part of my Laurel Kingdoms project, this piece is celebrating the Kingdom of Meridies, which was created in 1978 from the Kingdom of Atenveldt in the Southeast United States. Its borders currently encompass the entirety of Alabama; almost all of Georgia; a sizeable chunk of Tennessee; a bit of Florida; and small portion of Kentucky. Their colors are black and white.
This pattern is completed by simply turning all the cards forward, throwing the shuttle after each quarter-turn. When the threads become over-twisted or after a chosen number of repeats–often I switch after 12 or 16 repeats–turn all cards backwards, throwing the shuttle after each quarter-turn. Easy as that!
Now, there is the new technique that was found in a recent discovery of a rolled hem. I could type up all the directions and details, but all of that can be found at their web site here: https://www.vestagdermuseet.no/snartemo-ii-narrow-band.
I hope you’re all enjoying this series and learning a lot in your weaving escapades! Let me know if there are more patterns you want to learn!
The Kingdom of the East held its first coronation event in June 1968 (when my husband was only a month old!) It comprises most of New England and five Eastern provinces of Canada; Quebec, Prince Edward Island, Nova Scotia, New Brunswick and Newfoundland. Each year, this Kingdom raises an army to battle at Pennsic War, held in Cooper’s Lake, PA. Sadly, it was cancelled for the summer of 2020 due to plague…I mean, the pandemic. Hopefully, it will be back on schedule for 2021! As a longtime member of the SCA (30 years!), the pilgrimage to this war is long overdue.
The Second Kingdom of the SCA, East Kingdom
There is nothing sweeter for a new weaver than to find a period pattern that is attractive and easy to do! While there are several of these, one of my new favorites is the Ladoga narrow band, object #6.
There are a number of tablet weaving patterns that were created during the Norse or “Viking” era—roughly the late 8th to early 11th centuries—in a number of lands that they had contact with. This, of course, included Russia and various parts of Eastern Europe, which many researchers and re-enactors refer to as the “Viking-Rus”. These are descendants of the Swedes who raided and traded in the lands from the Baltic Sea coast to the Black Sea.
The savage and feared men of the North reigned supreme in Scandinavia and beyond—basically, anywhere they could get their boats to float, which only requires about three feet of water—that wide, shallow boat design was key. So while they were raiding and pillaging…I mean, spreading their cultural influence…they also picked up a number of customs, designs, and ornamentation which was brought back to their homes back in the north.
Straraja Ladoga is located about 70 miles east of St. Petersburg, just downriver from Lake Ladoga. Here is where we find the Ladoga Burial Mounds. It was discovered in 2010 and dating estimates are between the 10th to 12th centuries; spot on with Norse contact and influence. If you’ve developed a Norse persona for the SCA or other medieval re-creation group, LARP, or costume for Halloween or any other occasion, this is a great weave to add that perfect accent to your clothing.
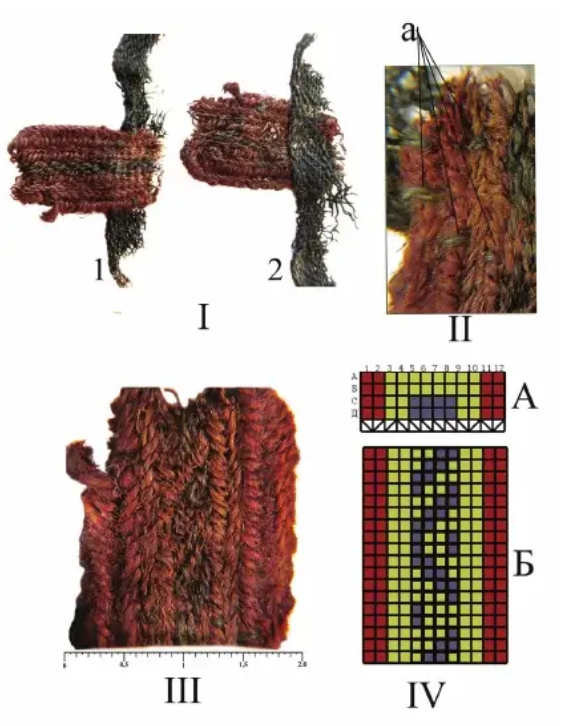
“The original piece has a blue design on a yellow background. The warp threads are red, yellow and blue wool, 0.8 mm thick, with twist S,2z. The weft threads are brown wool 0.6 mm thick with a double Z twist. This ribbon needed 12 tablets with 4 holes in each, producing a density of 27 warps and 8 weft threads per cm.” (https://www.academia.edu/30371327/Kochkurkina_Orfinskaya.Archaeological_textiles_of_the_10th_to_the_12th_century_from_the_Gaigovo_barrow_group_Russia_Leningrad_oblast._Archaeological_Textiles_Review_No._58)
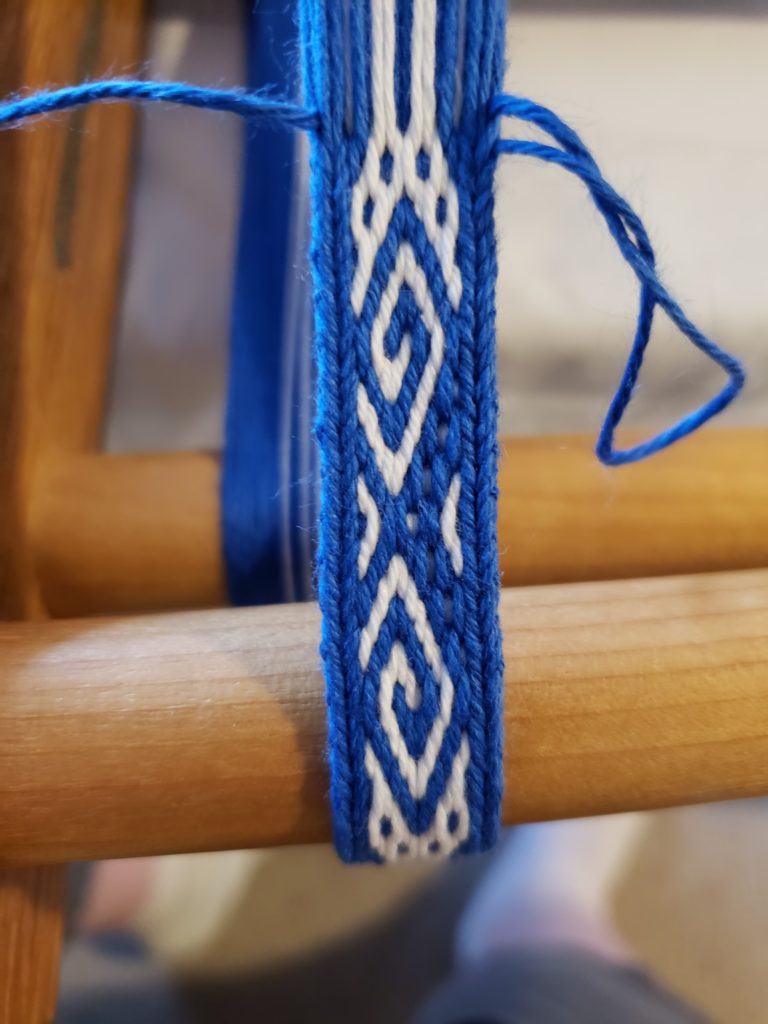
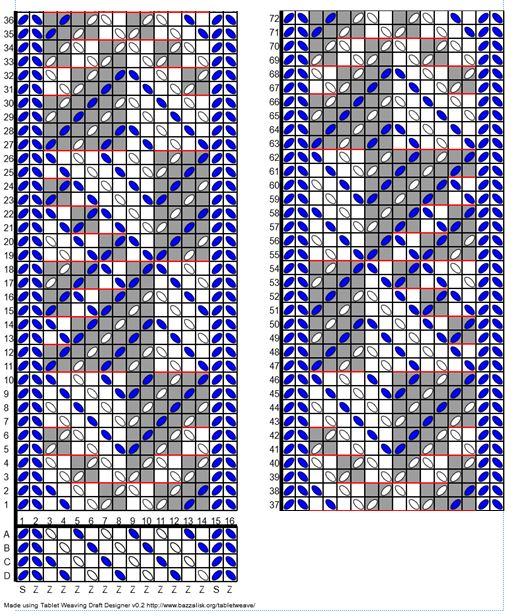
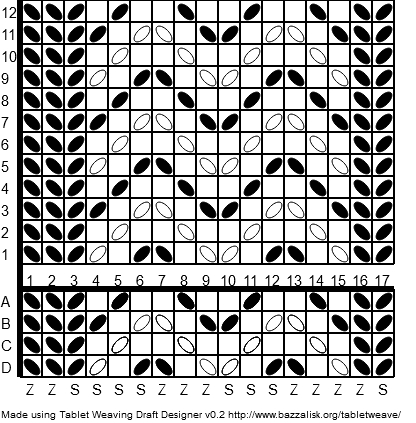
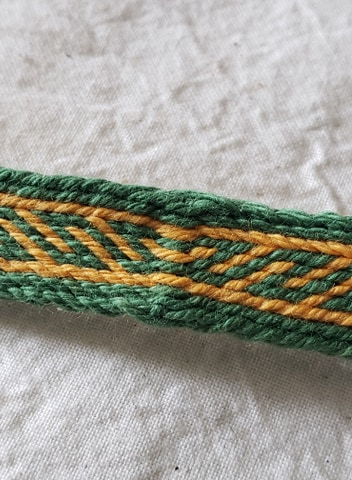
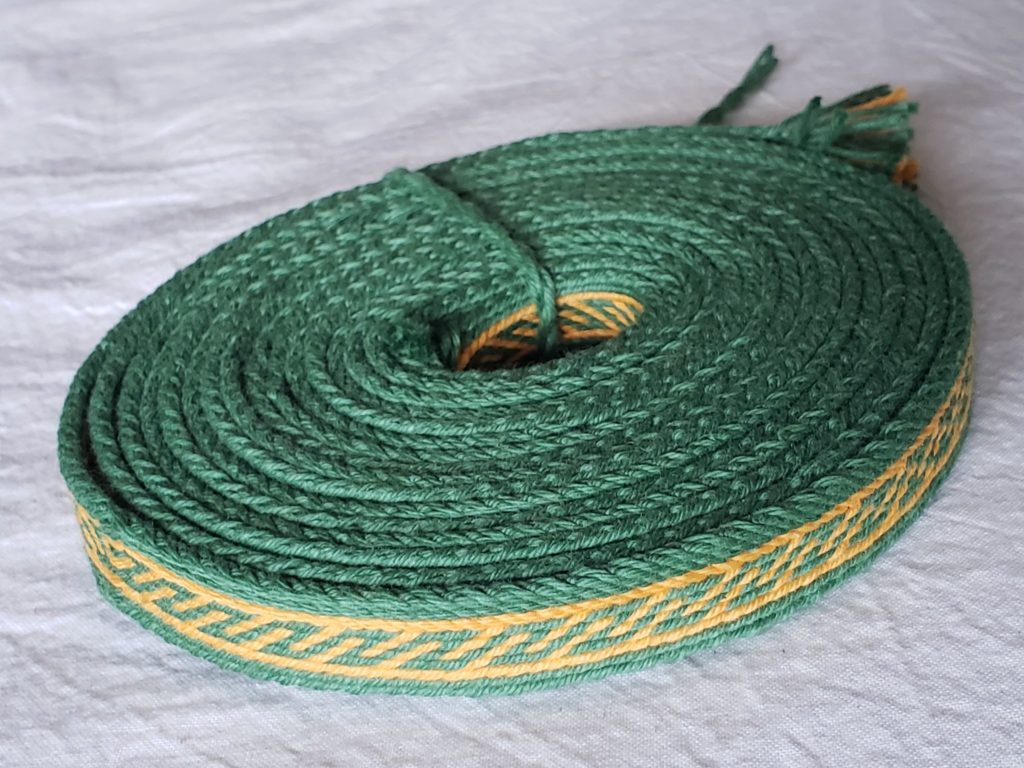
Let’s get started with the Ladoga weave! You will need 12 cards for this pattern, and can use two or three colors, depending on what color you want to use for the borders. My sample is going to use three colors, celebrating the Kingdom of the East! (*See below)
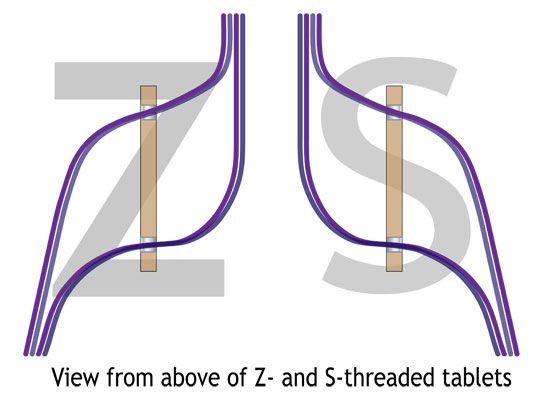
Remember to face your clockwise-labeled cards to the right (counter-clockwise to the left) and thread according to the S and Z on the chart below (S through the left side of the card; Z through the right side).
Start your cards with AD at the top and begin by turning your cards forwards–away from you–for 12 quarter-turns (three full revolutions). Then reverse the center four cards (5, 6, 7, and 8) (turning backwards) for 13 quarter-turns to get a little dot on the side, under the “mountain”.
Then reverse again, turning forward one quarter turn. The pattern will then repeat, so you will do an additional 12 quarter-turns. Essentially, you will be doing 13 quarter turns each direction, with the border cards continuing to turn only forwards. When the border threads become over-twisted, you may flip the cards or reverse direction until they are over-twisted in the opposite direction. Repeat this to the end of the warp.
Note about the border cards: If you are a new weaver and want to keep things simple, turn all the cards forwards 13 quarter-turns, then 13 quarter-turns backwards. However, each time you change direction on the border cards, you will create a funny bump, which is not as attractive.
* I must note: this is a modification from the original, which is a skip-hole design, but this modification gives the beginner an easy pattern to follow and still have a similar result. See the next post for details about the skip-hole directions.
Let me know how yours turned out and let me know if there’s anything you think I need to add to these instructions.
The first thing you’ll need to do tablet weaving is, of course, tablets or cards.
These can be made yourself with a deck of playing cards, a hole punch, sharp scissors, ruler, cutting mat, rotary cutter, template, compass, protractor, slide rule, abacus, battering ram, caffeine, and chocolate…that is, if you’re really OCD about getting the holes lined up perfectly…
OR…you just go online and buy them. They’re inexpensive and durable!
(OK, if you DO want to make your own, here’s an instructable to do it yourself: https://www.instructables.com/id/Make-Your-Own-Tablet-Weaving-Cards/. However, if you don’t have a corner trimmer, hole punch, cutting mat and all the things they ask for, it would be cheaper and easier to order some online.)
Make your own!
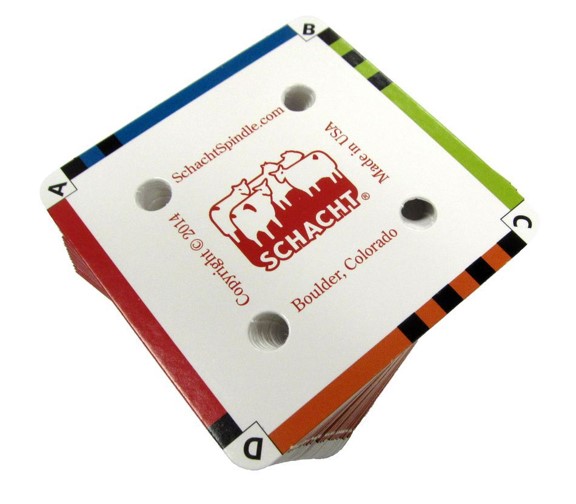
There are a number of different manufacturers of tablet weaving cards. I have at least five different varieties. I like the Schacht cards that are sold at stores like HalcyonYarn.com or the Woolery (Yarn.com). $8 for a set of 25 cards that are labeled and color coded. I’d recommend getting two sets (50 cards total) to start. The cards will last a long, long, long, long time, so no need to get hundreds, at least to start. Most patterns that we will be doing will require fewer than 25 cards, but it’s always good to have a second set on hand for larger patterns later.
Color coded sides and labeled corners make these a great choice for weaving!
Next, you’ll need to pick your fiber. For a beginner, you’ll want to work with something that is strong, but forgiving, and easy to work with…so put away the silk, linen, and wool for now. The best place to start is with cotton. It’s cheap, strong and doesn’t bind up like other fibers can.
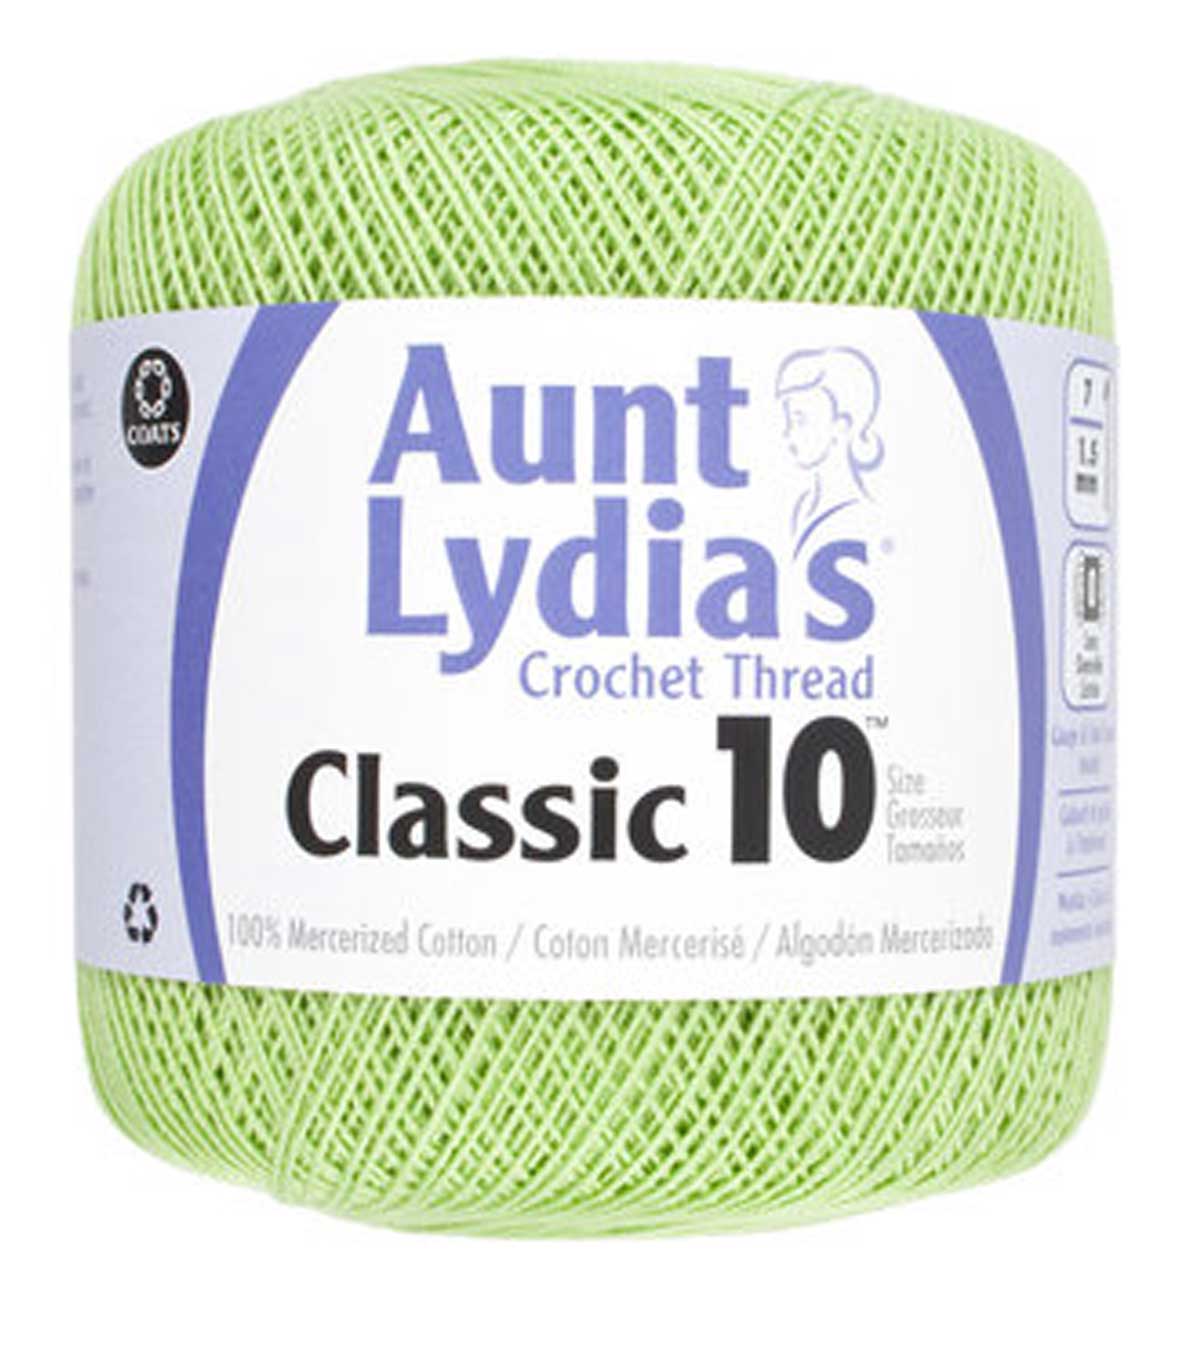
Crochet Cotton is my first pick for a beginner, for those who are looking for readily available and inexpensive materials, which you can find at your nearby hobby store. The limitation with this stuff is that they usually only have 4 or 5 colors at the store—white, baby blue, floofy pink, minty green and pale yellow. If you can find more saturated colors—red, black, dark blue…go for it! Just be sure to get contrasting colors—light and dark. Think of what colors go well together–yellow, white and black; blue, green and white; yellow and red…anything that will make one color pop against another! If you use two colors of the same intensity, the pattern may get lost.
Whatever the brand, size 10 crochet cotton is a great size to work with.
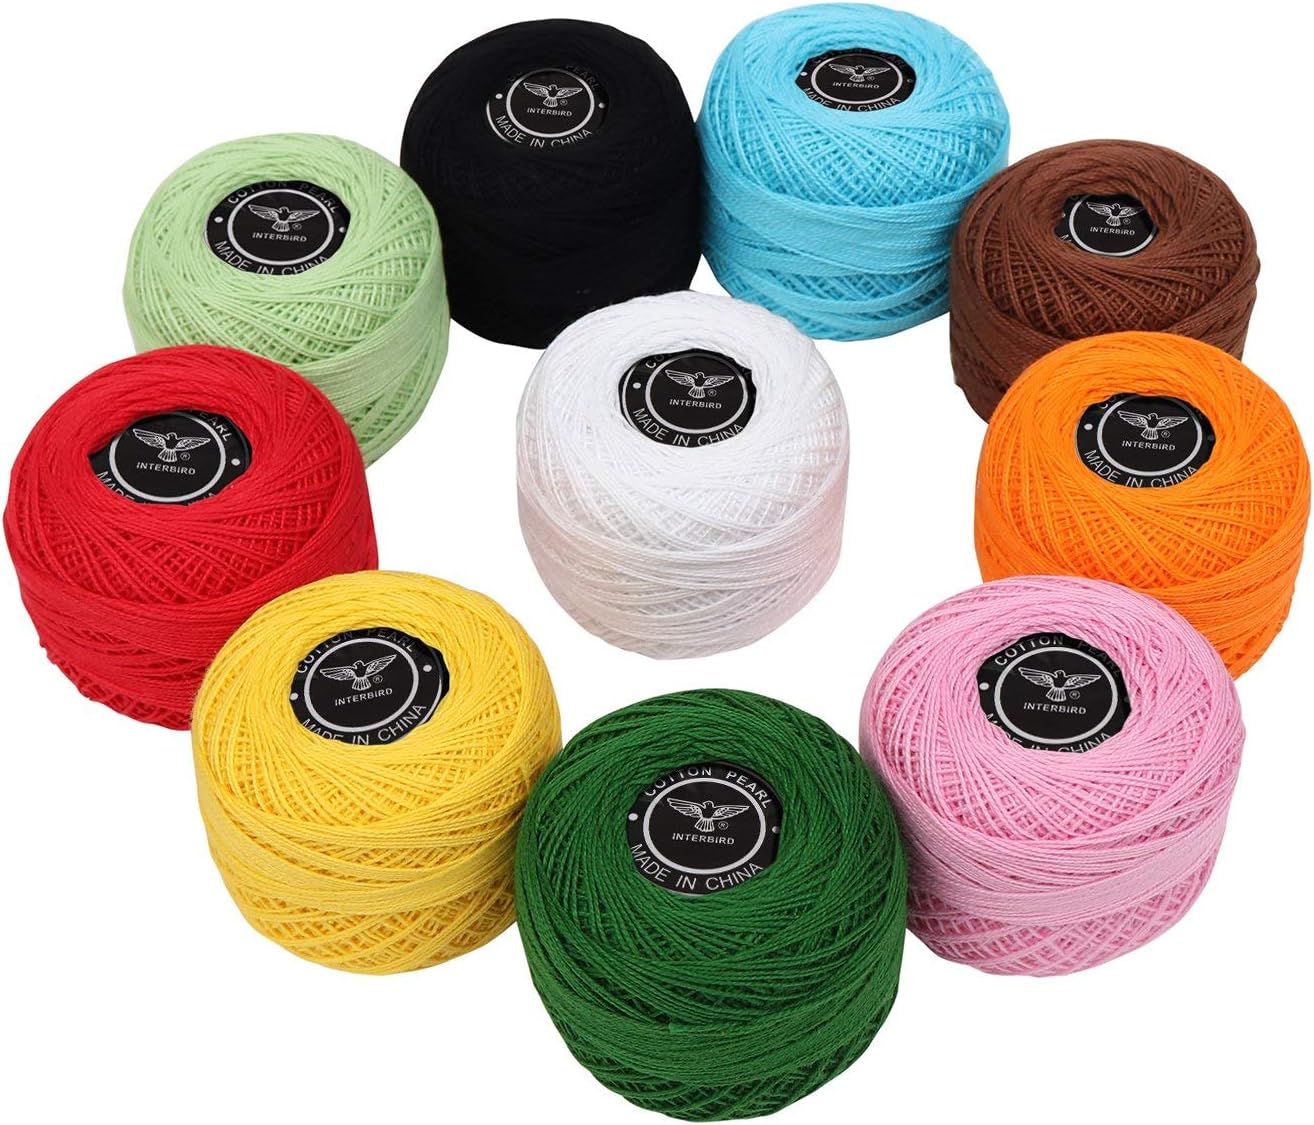
Pearl Cotton is another good choice. They come in lots of colors and work very nicely. Note: the higher the number, the finer the threads; the size 5 or 8 are best. Size 10 is fine, but might be challenging. Size 12 is too fine for a beginner. Unfortunately, they come in such small spools of about 87 yards each, so you can warp up about 5 cards per spool (depending on the length of your project). At about $3 a ball; it can run you $15-30 per project…or more. Look for large spools online at the Woolery or the Yarn Barn of Kansas, or ask if your local hobby shop can order them for you.
Little balls of pearly fun!
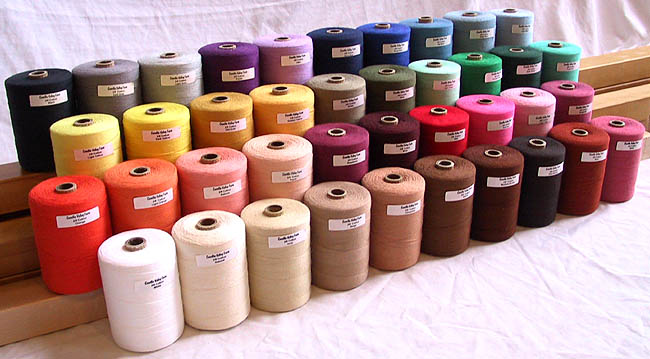
Maysville Carpet Warp has been my go-to thread. If you have a weaving store nearby, you can see if they carry it, or you want to order online. It has about 800 yards on a $9 spool, so it’s a great option. It’s a bit thicker than crochet cotton (like the size 5) and comes in about 70 different colors. Eugenetextilecenter.com, Yarn.com and the Woolery all carry it.
A rainbow of thready fun! This is only about half of the available colors.
For the upcoming videos, this is the type of yarn I’ll be using for the demonstrations.
I have created these blog posts as an addendum to the YouTube videos: Weave Along With Elewys. While some people learn very well from videos, others learn well from written directions and still images. This blog post will serve that need. I also need to have copies of the patterns that I use in the series available for weavers, and a central location to put them, so this blog will serve that need as well.
We haven’t been able to fully launch the project yet due to mundane demands (we expect it to be ready very soon). Despite the coronavirus Stay at Home orders, mundane work still gets in the way of filming and editing, especially the Intro to Tablet Weaving episode, which is going to be longer than the others as it covers all the materials and tools as well as techniques. I am struggling to do video taping while there are kids, a working husband, and birds in the house, so if you hear thumping, yelping, laughing, chirping, squawking, or another ambient noises, please forgive me. I’m doing the best I can with the resources at hand.
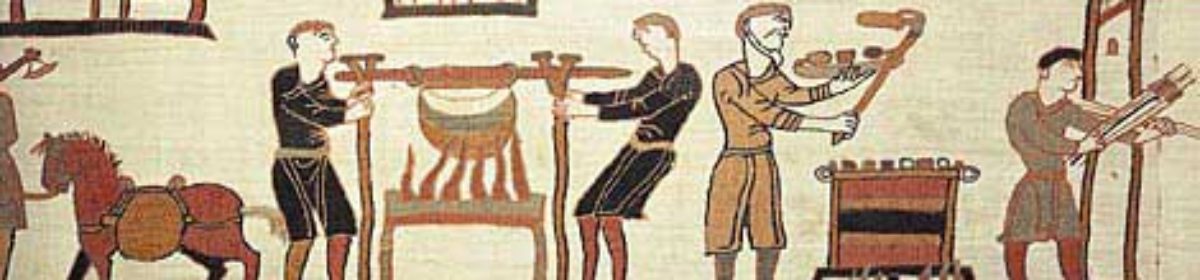
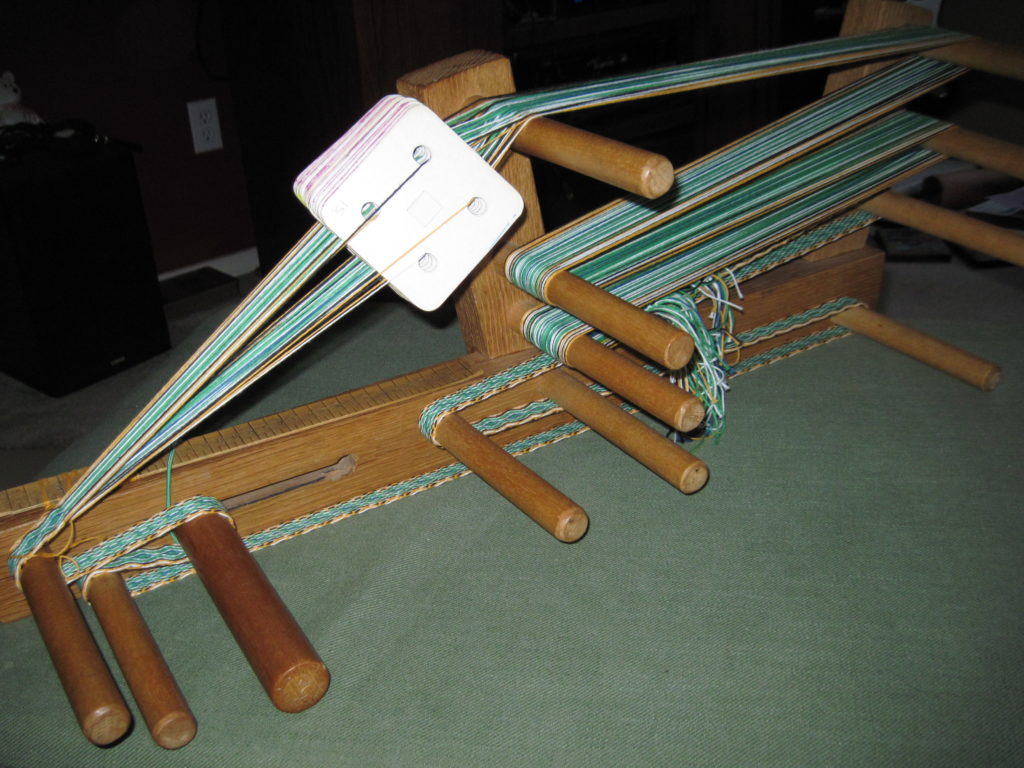
Note: one of the things that I will have to assume in this series is that the weavers are using an inkle loom. If you are using a backstrap, warp-weighted, or box loom, you may need to consult with other resources for directions on how to warp and anchor those.
Old oak inkle loom purchased second hand sometime around 1992 and has helped me produce hundreds of yards of inkle and tablet woven bands. Working on finding a name for it…
The first episode is a pattern from the Oseberg dig, dating solidly in the Norse era, 834 AD. A large burial mound was discovered at the Oseberg farm near Tønsberg in Vestfold county, Norway. The ship and some of its contents are displayed at the Viking Ship Museum at Bygdøy, Oslo. Among its finds were a loom (commonly called the Oseberg loom), weaving tablets, and a work in progress (known as 34D), as well as this silk piece. The original measured only 5 mm wide–a diminutive little weave–but we’ll do ours in a larger cotton rug warp for this demonstration.
As we have just celebrated the SCA’s 55th birthday, I decided to couple this project with a celebration of the Kingdoms of the Known World in the SCA. I’ve decided to weave 20 pieces in this series in the colors of each of the Kingdoms. The first Kingdom formed was the Kingdom of the West, in 1966. It comprises Northern California, Nevada, Alaska, Japan, Korea and the Pacific Rim. This is where it all started–with a backyard party that turned into an international medieval history organization with tens of thousands of members in 20 kingdoms. All of the Kingdoms, origin dates and colors are, in order:
The West Kingdom was created when the Society originated in 1966. Colors: green and yellow.
The Kingdom of the East was created in 1968. Colors: yellow and purple.
The Middle Kingdom was created in 1969. Colors: red, white and green.
The Kingdom of Atenveldt was created in 1971. Colors: white, yellow and blue.
The Kingdom of Meridies was created in 1978. Colors: black and white.
The Kingdom of Caid was created in 1978. Colors: blue and white.
The Kingdom of Ansteorra was created in 1979. Colors: yellow, black and red.
The Kingdom of Atlantia was created in 1981. Colors: green, white and blue.
The Kingdom of An Tir was created in 1982. Colors: yellow, white and black.
The Kingdom of Calontir was created in 1984. Colors: purple and yellow.
The Kingdom of Trimaris was created in 1985. Colors: blue and white.
The Kingdom of the Outlands was created in 1986. Colors: green and yellow.
The Kingdom of Drachenwald was created in 1993. Colors: red, yellow and black.
The Kingdom of Artemisia was created in 1997. Colors: black and yellow.
The Kingdom of Æthelmearc was created in 1997. Colors: white, red and black.
The Kingdom of Ealdormere was created in 1998. Colors: white, red and green.
The Kingdom of Lochac was created in 2002. Colors: red, white and blue.
The Kingdom of Northshield was created in 2004. Colors: White, yellow and black.
The Kingdom of Gleann Abhann was created in 2005. Colors: red, white and black.
The Kingdom of Avacal was created in 2015. Colors: red, white and yellow.
So let’s get started by celebrating the Kingdom of the West!
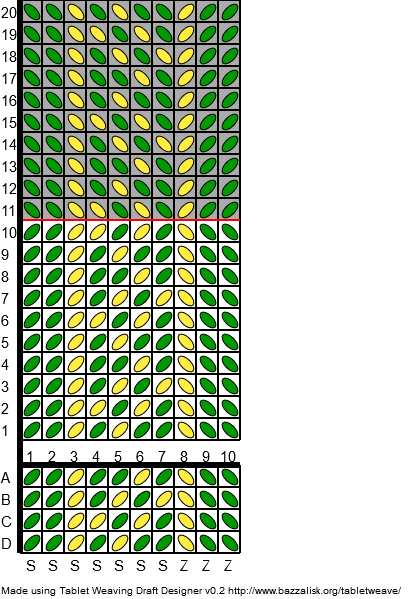
First Kingdom of the SCA! The Oseberg weave will make Os on one side and zig-zags on the other. Makes a great belt or trim on an apron dress or tunic. Alternatively, this pattern, which is more historically accurate, has boxes on both sides. It is just as easy to weave!
Reading the pattern: squares with a white background are turned forward–away from the weaver. Squares with a grey background are turned backward–towards the weaver. I marked this pattern with the reverse after 10 and 12 turns so you can see what the reverses look like, but you don’t have to reverse so soon. In this particular pattern, the cards all turn the same direction until the warp is over-twisted, then all reversed until they not only become untwisted, but over-twisted in the opposite direction….then it’s back to forward turning again. Repeat this until you reach the end of your warp.
Technique refresher:
Warp your cards with the top of the card facing to the right–this is important if your cards are labeled clockwise. If they are labeled counterclockwise (anti-clockwise), face the tops of the cards to the left.
This is my preferred brand of cards–clearly labeled and colored sides are great visual cues to me while I’m weaving.
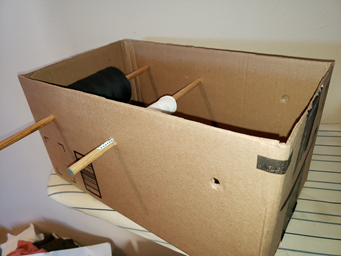
Get out your Lazy Kate (or whatever facsimile you create…mine is simply a Amazon Prime box with a couple of dowels stabbed through it) and load up your threads.
It’s not fancy, but it works.
Thread your cards, making sure to keep your S and Z diagram handy to make sure you are going through the cards correctly.
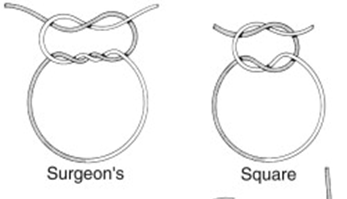
It’s easiest to tie the four threads together for each card, using a surgeon’s knot. It’s similar to a square knot, but has a double throw for the first pass, rather than a single. This makes it easier to untie to adjust tension or to correct mistakes–and trust me, you will make mistakes…we all do.
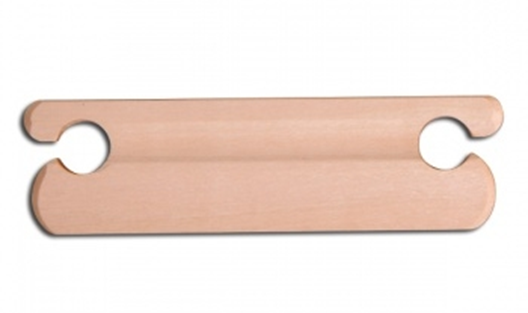
Once all your cards are threaded, double check your work to make sure they are correctly S and Z threaded and that the colors are in the correct hole. Once you have given it the final inspection, ready your shuttle! I wrap a bunch of warp around the top of the shuttle, in a figure 8 pattern, to keep the thickness of the shuttle to a minimum.
Your belt shuttle only needs to be 5″ or 6″ long, and works best if it has a tapered edge for beating.
I begin by setting all the cards with AD at the top and slip the tail through the shed so the shuttle is on the left and a 4″ tail is on the right. Turn the cards forward (away from you) and throw the shuttle and the tail in opposite directions, criss-crossing through the shed. This will help anchor the tail and prevent unraveling later. Turn the cards again, beating the weave, and throwing the shuttle, leaving a loop behind. On the next pass, turn the cards, snug up the weft, beat and pull the shuttle through. Don’t be over-zealous on the weft; gently pull the weft thread to pull the warp threads together. Do four turns total so that AD is back at the top again. The first few passes are going to look a hot mess…don’t panic. It’ll get better as you go, and your tension gets more consistent with practice.
Keep weaving along until the twist gets too tight, or every so often (maybe every 10 or 20 repeats, or whenever it moves you), then reverse direction to untwist. You will develop a funny little bump on the edge of the weave–don’t panic…it’s completely normal. The finer the threads you use, the less noticeable it is.
When the pattern changes directions, the threads on the border cards leave an odd lump. This is less noticeable using finer threads.
Every so often, you will need to release the tension on the loom, and shift it to continue your work. As you work, you will notice that the length of the weave is getting shorter and shorter…you will lose up to 20% of the warp length from start to finish.
When you get to the end of the warp, you will have 6″ or 8″ left between the end of the weave and the knots tied…remember you will also have the width of the cards and the shuttle between the beginning and end…so if you want to get a minimum length of weaving for a project, you will need to factor that into your warp length.
Some weavers carefully untie all their knots and tie up the ends in a variety of ways. I used to twist and knot the threads, but lately, I’ve decided that it’s far more effort than it’s worth, so I just leave a half inch of fringe and chop off the excess. If you plan on sewing it down as part of trim on a garment, it will likely have the ends tucked inside the seams. It hasn’t unraveled yet, at least using the carpet warp or wool, but finer threads like silk might be more trouble.
I hope this has been a helpful tutorial, and I hope you find the videos helpful as well. I look forward to hearing about my fellow weavers’ projects and anything that I have presented that you, and I’d love to see your completed projects!
Oseberg Weave finished!The alternate pattern
I also wanted to give a shout out and direct you all to a tablet weaving generator that I use a lot, created by a British woman named Catherine. It is both super useful and periodically updated (other generators like GTT haven’t been updated in more than a decade). It can be found at: https://jamesba.github.io/tabletweave/.