My creative SCA journey on stuff I make and research I do…mostly in fibers (wool prep, spinning, weaving, tablet weaving) and glass beads, but could also include costumes, camping, cooking, and any other creative things that strike my fancy.
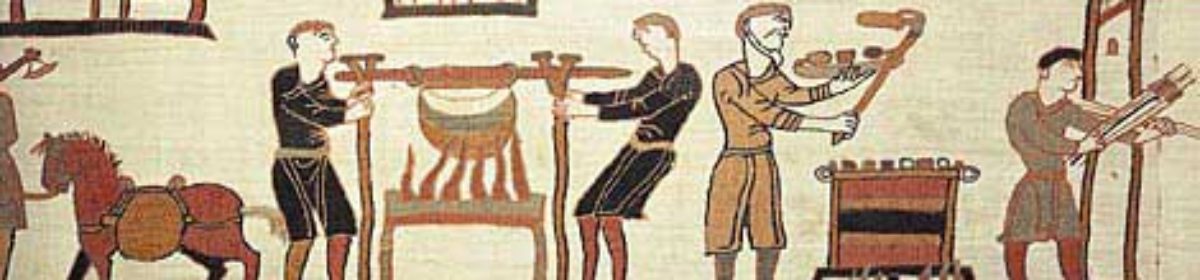
I had planned to do a woven piece in celebration of Atenveldt, but I had a commission to work on and it seemed perfect to do a video and blog post on another Birka tablet woven piece!
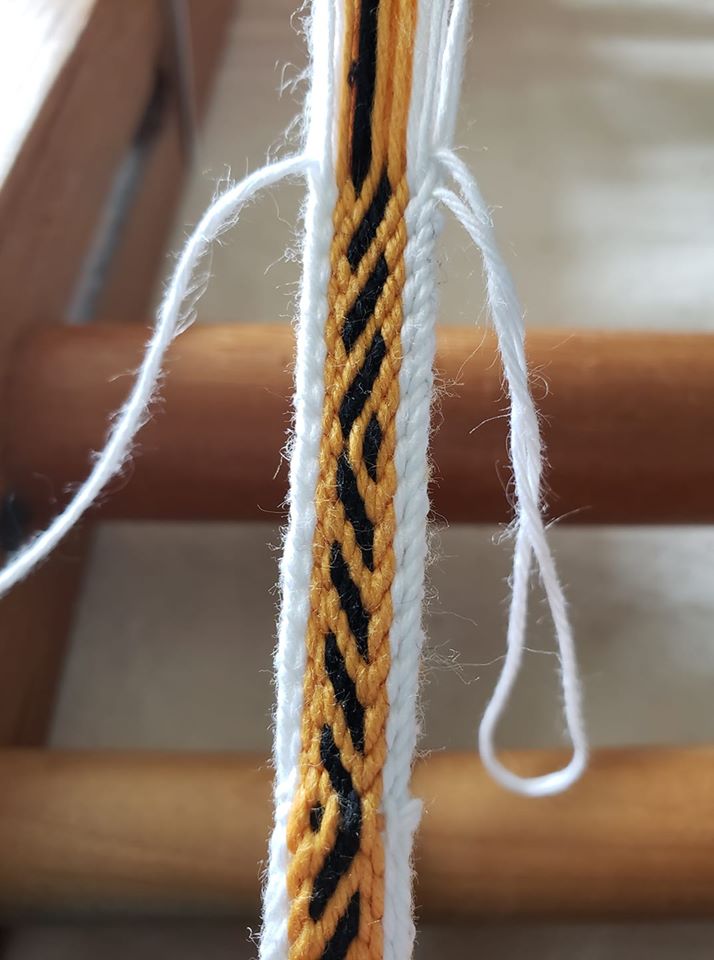
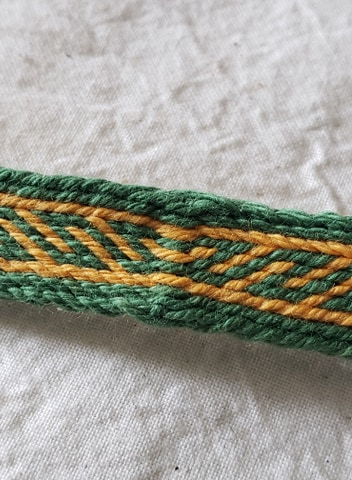
This one was found in grave 824 and is known as Birka 22. It’s a brocaded tablet woven piece that dates from the 8th to 10th centuries.
This piece was one of several that were found in graves from that time period.
There have been several threaded in patterns that have been around the internet (Pinterest) but they seemed rather complicated. I then found one from Maikki Karisto and Mervi Pasanen (of Applesies and Fox Noses fame) that is much more simple!
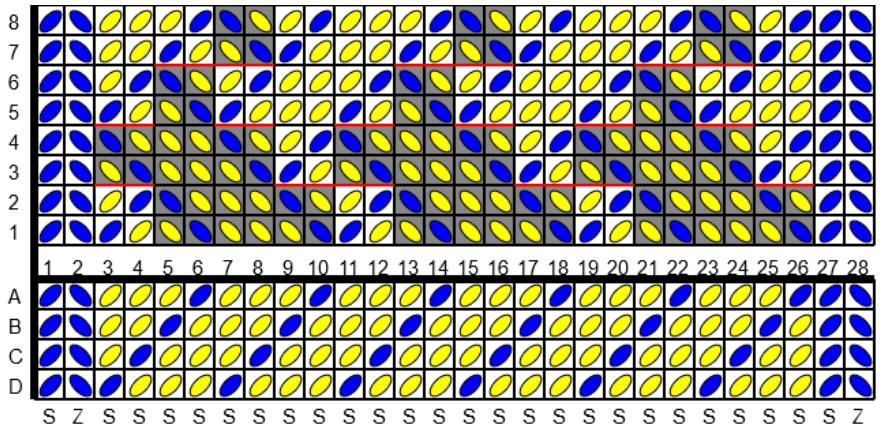
Note that the cards are labeled counter-clockwise and the slashes indicate the angle of the card, the rows are labeled DCBA…so this can be confusing to beginners.
I used that layout and put it into the tablet weaving pattern generator that I use so that the pattern is consistent with the way I’ve been teaching it. I love this pattern generator–it’s easy to use, doesn’t require a download, and it’s free!
Remember, the white backgrounds turn forward–away from the weaver–and the grey backgrounds turn backward–toward the weaver.
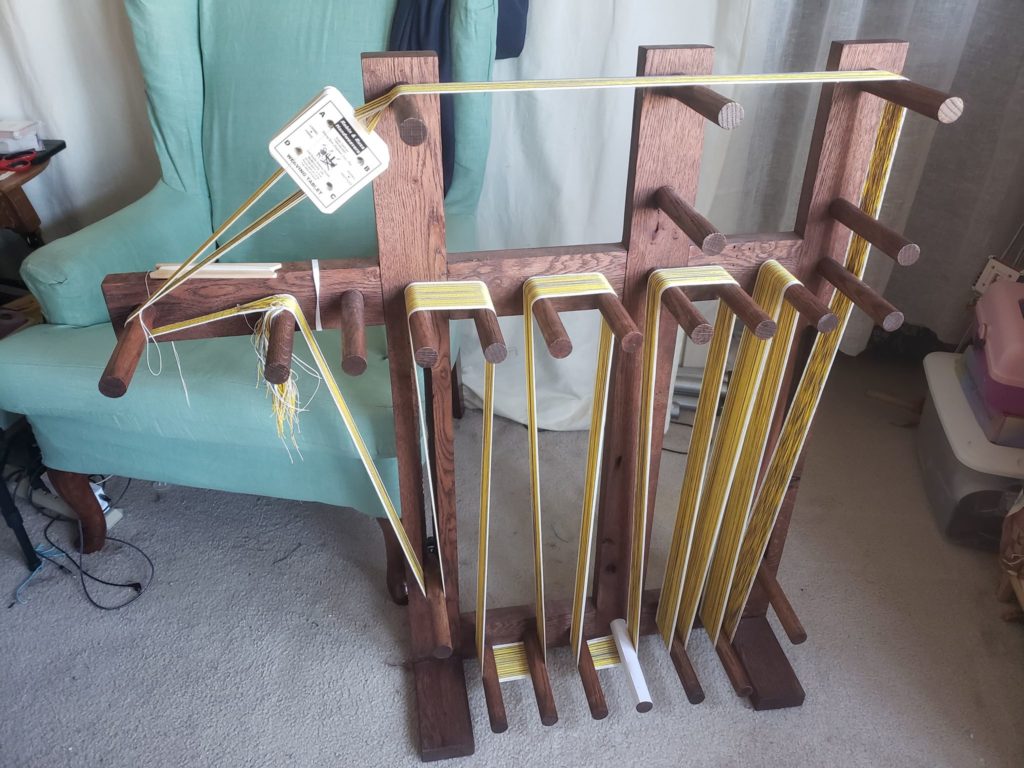
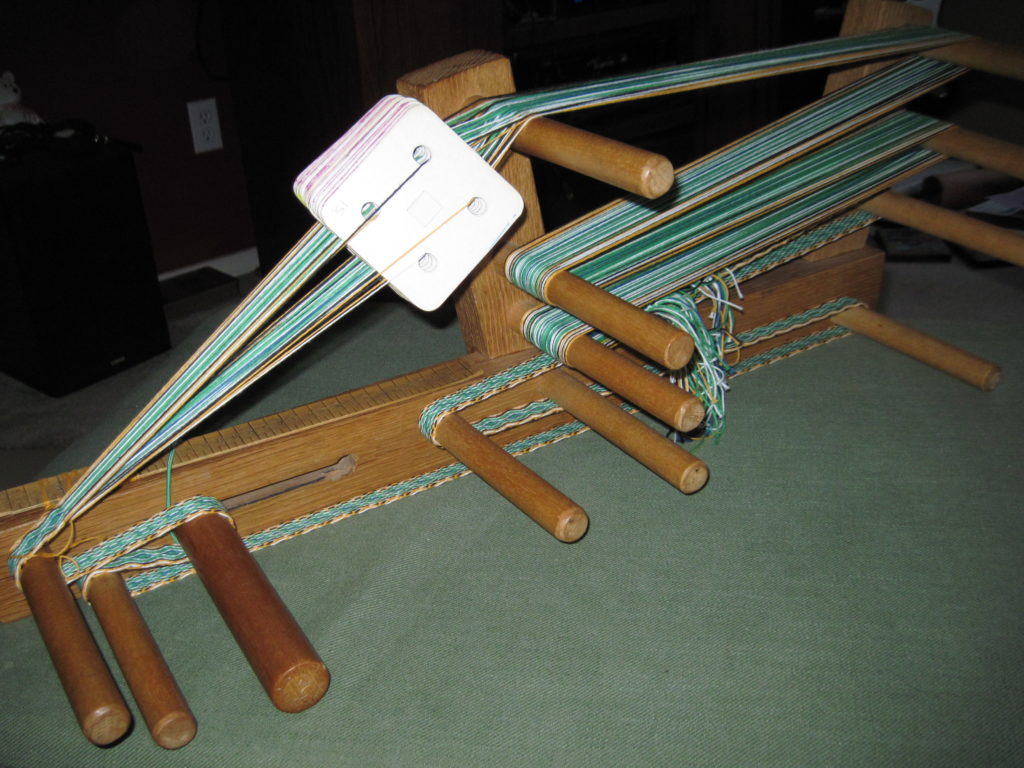
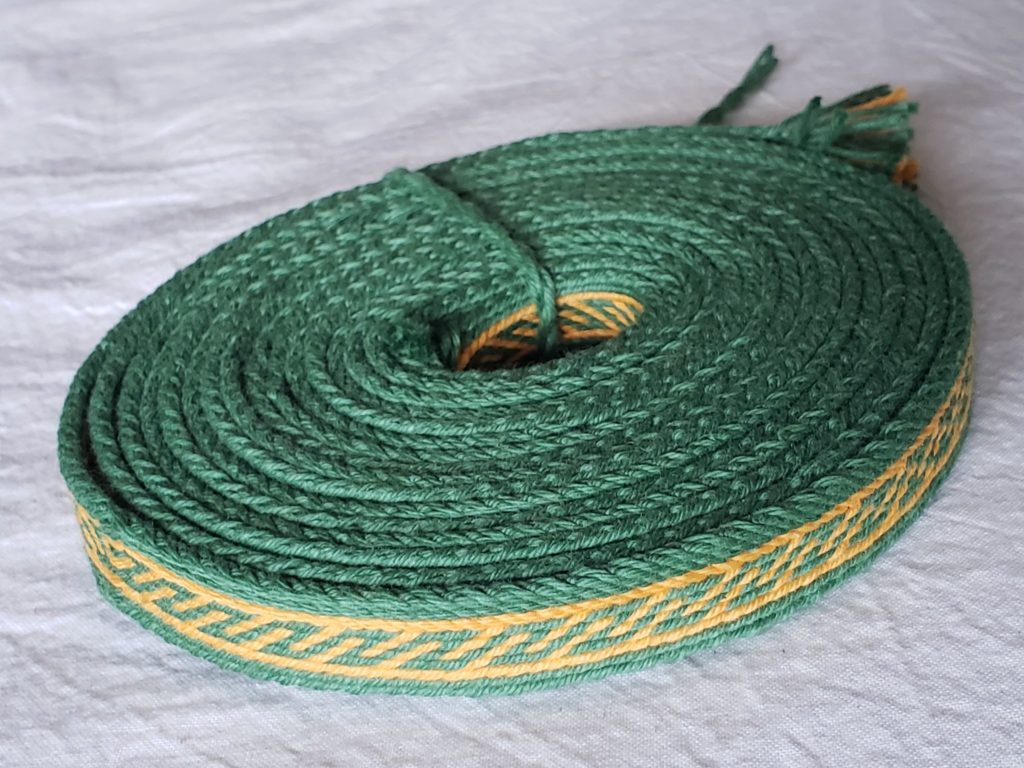
I warped this one up with 20/2 silk as it is to fulfill a trade with a woodworker to made a lovely Monster Loom for me! It holds over 13 yards (I haven’t actually measured it out yet), and it’s very flexible for doing any lengths of weaving over 3 yards. This is great for those longer commissions that I sometimes get.
I’ve named him Mike Wazowski.
You’ll notice that there are several pegs that were missed, which would add 25″ of length for each vertical space, plus the zig zag around the upper pegs. There are 100 different ways for warping the thing, and two tension bars, so lots of options.
When you get doing, you can do each repeat of the pattern in about 2 minutes, which means in about 21 1/3 hours, I’ll be done. If I work 4 hours a day, I can get it done in under a week…we’ll see how long it really takes.
Every once in a while, you’ll present a woven bit with documentation and someone will say, “Uhhh…that’s not quite right.”
So that just happened.
Luckily, it was presented in a very respectful manner by an influential tablet weaver that I admire…so it’s all good! Thank you, Aisling!
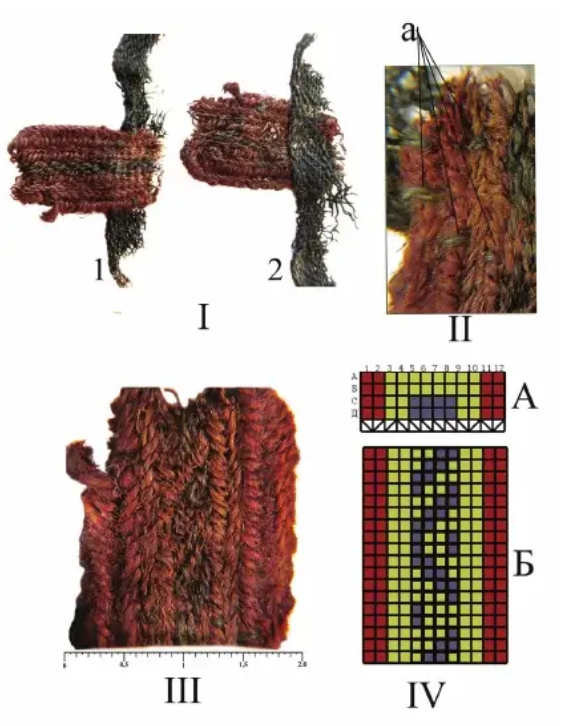
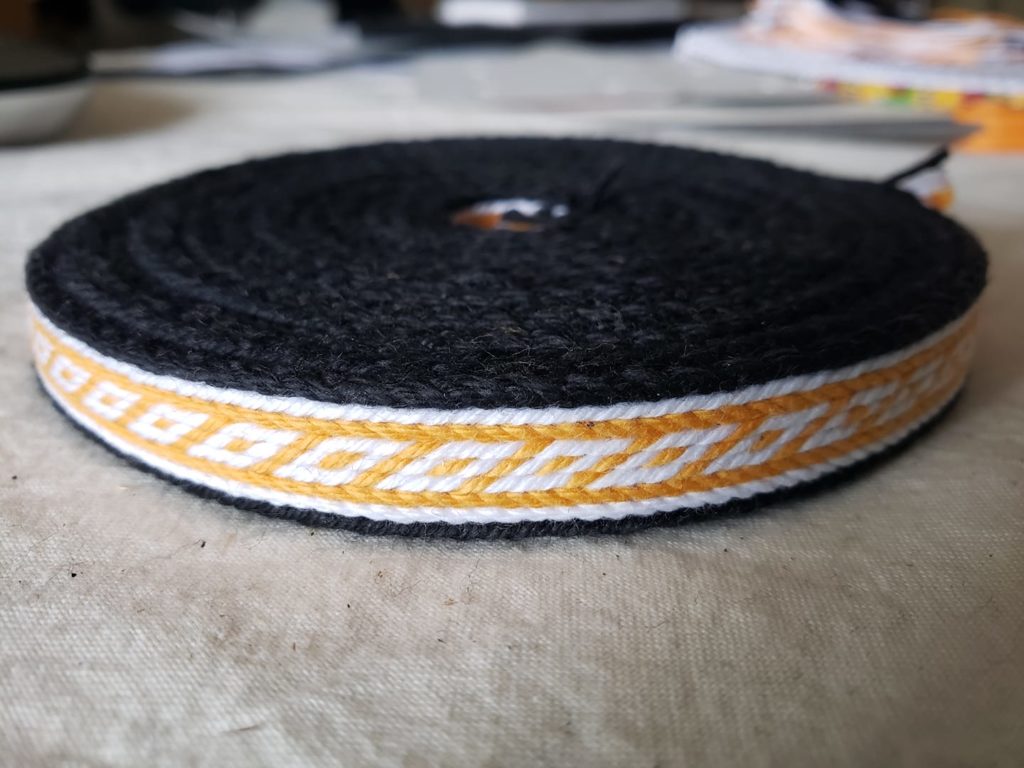
The Ladoga bands appear to be *skip hole* woven, not 4 threads per card. Despite the archaeological sketches and patterns provided in the research, the pattern that was provided doesn’t match the findings. You can see in the text of the Academia.edu paper that it was woven on twelve 4-hole cards with 27 warp threads total. Yeah, 12 times 4 is not 27…. so clearly something was amiss from the beginning. However, unless you add a third thread to one of the cards, you’re not going to come up with an odd number… 12 x 2 is 24; the extra four threads are for border cards; each get 4 threads, which results in 28 warp threads. Perhaps the archaeologists miscounted, or there was some other error in transcription.
So I got back on the tablet weaving generator and worked up a pattern. I warped up my loom (while my German tablet weaving friend slept) and had the pattern and weaving underway by the time she was up and checking her email. She confirmed that I got the pattern right and I was delighted! (Although I later was dissatisfied with it and made a few more alterations…) The result is this new pattern:
Skip hole technique means exactly what you think it does–some of the holes are skipped, that is, left empty, in the threading. If the box is empty, so is that hole. Now it looks correct!
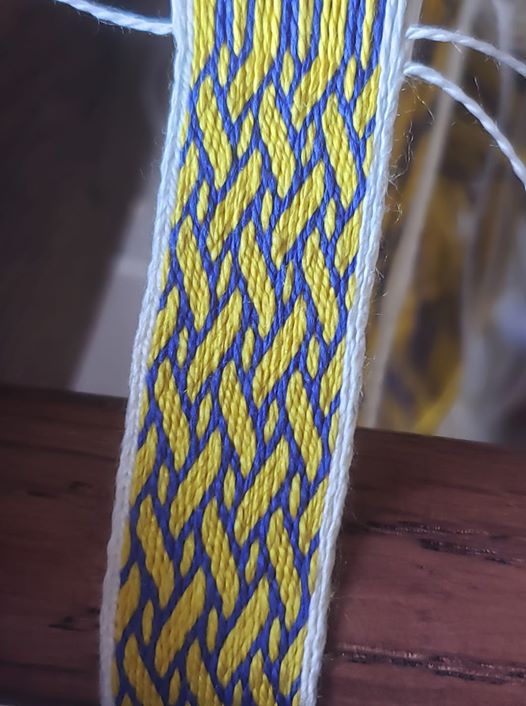
The result is a very dainty band that measures just under 1 cm wide, even with this 8/4 cotton carpet warp.
Are you confused? Overwhelmed? Not ready for this pattern?
Don’t be cast down, dear weaver; the 4-threads-per-card pattern *works* and gets approximately the right design, but the technique is not period-correct. As a beginner, this is FINE…you get the same look while learning the ropes, but now you know that the period technique is slightly different…and more difficult, so don’t fret if you’re not ready for skip hole. You’ll get there…in this series, even!
The first episode of the YouTube video is in the final stages of editing (it was very long and complex for the Getting Started video–the next ones should come out much more quickly).
The Kingdom of the East held its first coronation event in June 1968 (when my husband was only a month old!) It comprises most of New England and five Eastern provinces of Canada; Quebec, Prince Edward Island, Nova Scotia, New Brunswick and Newfoundland. Each year, this Kingdom raises an army to battle at Pennsic War, held in Cooper’s Lake, PA. Sadly, it was cancelled for the summer of 2020 due to plague…I mean, the pandemic. Hopefully, it will be back on schedule for 2021! As a longtime member of the SCA (30 years!), the pilgrimage to this war is long overdue.
The Second Kingdom of the SCA, East Kingdom
There is nothing sweeter for a new weaver than to find a period pattern that is attractive and easy to do! While there are several of these, one of my new favorites is the Ladoga narrow band, object #6.
There are a number of tablet weaving patterns that were created during the Norse or “Viking” era—roughly the late 8th to early 11th centuries—in a number of lands that they had contact with. This, of course, included Russia and various parts of Eastern Europe, which many researchers and re-enactors refer to as the “Viking-Rus”. These are descendants of the Swedes who raided and traded in the lands from the Baltic Sea coast to the Black Sea.
The savage and feared men of the North reigned supreme in Scandinavia and beyond—basically, anywhere they could get their boats to float, which only requires about three feet of water—that wide, shallow boat design was key. So while they were raiding and pillaging…I mean, spreading their cultural influence…they also picked up a number of customs, designs, and ornamentation which was brought back to their homes back in the north.
Straraja Ladoga is located about 70 miles east of St. Petersburg, just downriver from Lake Ladoga. Here is where we find the Ladoga Burial Mounds. It was discovered in 2010 and dating estimates are between the 10th to 12th centuries; spot on with Norse contact and influence. If you’ve developed a Norse persona for the SCA or other medieval re-creation group, LARP, or costume for Halloween or any other occasion, this is a great weave to add that perfect accent to your clothing.
“The original piece has a blue design on a yellow background. The warp threads are red, yellow and blue wool, 0.8 mm thick, with twist S,2z. The weft threads are brown wool 0.6 mm thick with a double Z twist. This ribbon needed 12 tablets with 4 holes in each, producing a density of 27 warps and 8 weft threads per cm.” (https://www.academia.edu/30371327/Kochkurkina_Orfinskaya.Archaeological_textiles_of_the_10th_to_the_12th_century_from_the_Gaigovo_barrow_group_Russia_Leningrad_oblast._Archaeological_Textiles_Review_No._58)
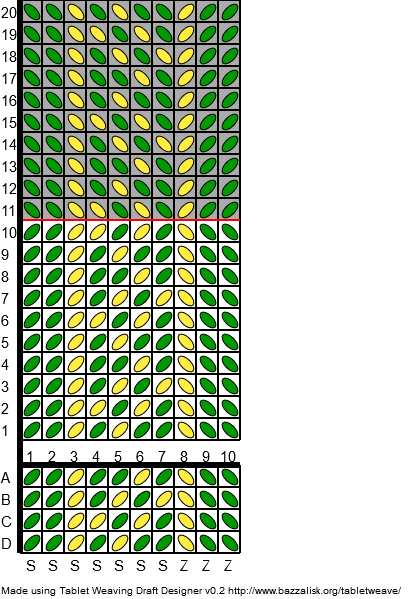
Let’s get started with the Ladoga weave! You will need 12 cards for this pattern, and can use two or three colors, depending on what color you want to use for the borders. My sample is going to use three colors, celebrating the Kingdom of the East! (*See below)
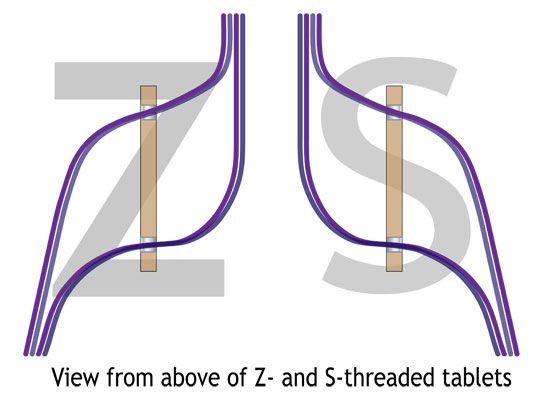
Remember to face your clockwise-labeled cards to the right (counter-clockwise to the left) and thread according to the S and Z on the chart below (S through the left side of the card; Z through the right side).
Start your cards with AD at the top and begin by turning your cards forwards–away from you–for 12 quarter-turns (three full revolutions). Then reverse the center four cards (5, 6, 7, and 8) (turning backwards) for 13 quarter-turns to get a little dot on the side, under the “mountain”.
Then reverse again, turning forward one quarter turn. The pattern will then repeat, so you will do an additional 12 quarter-turns. Essentially, you will be doing 13 quarter turns each direction, with the border cards continuing to turn only forwards. When the border threads become over-twisted, you may flip the cards or reverse direction until they are over-twisted in the opposite direction. Repeat this to the end of the warp.
Note about the border cards: If you are a new weaver and want to keep things simple, turn all the cards forwards 13 quarter-turns, then 13 quarter-turns backwards. However, each time you change direction on the border cards, you will create a funny bump, which is not as attractive.
* I must note: this is a modification from the original, which is a skip-hole design, but this modification gives the beginner an easy pattern to follow and still have a similar result. See the next post for details about the skip-hole directions.
Let me know how yours turned out and let me know if there’s anything you think I need to add to these instructions.
I have created these blog posts as an addendum to the YouTube videos: Weave Along With Elewys. While some people learn very well from videos, others learn well from written directions and still images. This blog post will serve that need. I also need to have copies of the patterns that I use in the series available for weavers, and a central location to put them, so this blog will serve that need as well.
We haven’t been able to fully launch the project yet due to mundane demands (we expect it to be ready very soon). Despite the coronavirus Stay at Home orders, mundane work still gets in the way of filming and editing, especially the Intro to Tablet Weaving episode, which is going to be longer than the others as it covers all the materials and tools as well as techniques. I am struggling to do video taping while there are kids, a working husband, and birds in the house, so if you hear thumping, yelping, laughing, chirping, squawking, or another ambient noises, please forgive me. I’m doing the best I can with the resources at hand.
Note: one of the things that I will have to assume in this series is that the weavers are using an inkle loom. If you are using a backstrap, warp-weighted, or box loom, you may need to consult with other resources for directions on how to warp and anchor those.
Old oak inkle loom purchased second hand sometime around 1992 and has helped me produce hundreds of yards of inkle and tablet woven bands. Working on finding a name for it…
The first episode is a pattern from the Oseberg dig, dating solidly in the Norse era, 834 AD. A large burial mound was discovered at the Oseberg farm near Tønsberg in Vestfold county, Norway. The ship and some of its contents are displayed at the Viking Ship Museum at Bygdøy, Oslo. Among its finds were a loom (commonly called the Oseberg loom), weaving tablets, and a work in progress (known as 34D), as well as this silk piece. The original measured only 5 mm wide–a diminutive little weave–but we’ll do ours in a larger cotton rug warp for this demonstration.
As we have just celebrated the SCA’s 55th birthday, I decided to couple this project with a celebration of the Kingdoms of the Known World in the SCA. I’ve decided to weave 20 pieces in this series in the colors of each of the Kingdoms. The first Kingdom formed was the Kingdom of the West, in 1966. It comprises Northern California, Nevada, Alaska, Japan, Korea and the Pacific Rim. This is where it all started–with a backyard party that turned into an international medieval history organization with tens of thousands of members in 20 kingdoms. All of the Kingdoms, origin dates and colors are, in order:
The West Kingdom was created when the Society originated in 1966. Colors: green and yellow.
The Kingdom of the East was created in 1968. Colors: yellow and purple.
The Middle Kingdom was created in 1969. Colors: red, white and green.
The Kingdom of Atenveldt was created in 1971. Colors: white, yellow and blue.
The Kingdom of Meridies was created in 1978. Colors: black and white.
The Kingdom of Caid was created in 1978. Colors: blue and white.
The Kingdom of Ansteorra was created in 1979. Colors: yellow, black and red.
The Kingdom of Atlantia was created in 1981. Colors: green, white and blue.
The Kingdom of An Tir was created in 1982. Colors: yellow, white and black.
The Kingdom of Calontir was created in 1984. Colors: purple and yellow.
The Kingdom of Trimaris was created in 1985. Colors: blue and white.
The Kingdom of the Outlands was created in 1986. Colors: green and yellow.
The Kingdom of Drachenwald was created in 1993. Colors: red, yellow and black.
The Kingdom of Artemisia was created in 1997. Colors: black and yellow.
The Kingdom of Æthelmearc was created in 1997. Colors: white, red and black.
The Kingdom of Ealdormere was created in 1998. Colors: white, red and green.
The Kingdom of Lochac was created in 2002. Colors: red, white and blue.
The Kingdom of Northshield was created in 2004. Colors: White, yellow and black.
The Kingdom of Gleann Abhann was created in 2005. Colors: red, white and black.
The Kingdom of Avacal was created in 2015. Colors: red, white and yellow.
So let’s get started by celebrating the Kingdom of the West!
First Kingdom of the SCA! The Oseberg weave will make Os on one side and zig-zags on the other. Makes a great belt or trim on an apron dress or tunic. Alternatively, this pattern, which is more historically accurate, has boxes on both sides. It is just as easy to weave!
Reading the pattern: squares with a white background are turned forward–away from the weaver. Squares with a grey background are turned backward–towards the weaver. I marked this pattern with the reverse after 10 and 12 turns so you can see what the reverses look like, but you don’t have to reverse so soon. In this particular pattern, the cards all turn the same direction until the warp is over-twisted, then all reversed until they not only become untwisted, but over-twisted in the opposite direction….then it’s back to forward turning again. Repeat this until you reach the end of your warp.
Technique refresher:
Warp your cards with the top of the card facing to the right–this is important if your cards are labeled clockwise. If they are labeled counterclockwise (anti-clockwise), face the tops of the cards to the left.
This is my preferred brand of cards–clearly labeled and colored sides are great visual cues to me while I’m weaving.
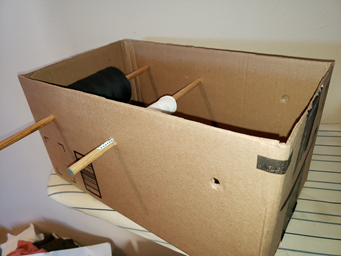
Get out your Lazy Kate (or whatever facsimile you create…mine is simply a Amazon Prime box with a couple of dowels stabbed through it) and load up your threads.
It’s not fancy, but it works.
Thread your cards, making sure to keep your S and Z diagram handy to make sure you are going through the cards correctly.
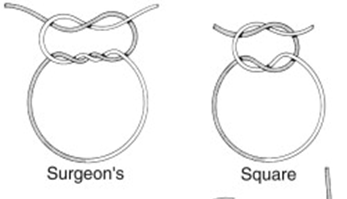
It’s easiest to tie the four threads together for each card, using a surgeon’s knot. It’s similar to a square knot, but has a double throw for the first pass, rather than a single. This makes it easier to untie to adjust tension or to correct mistakes–and trust me, you will make mistakes…we all do.
Once all your cards are threaded, double check your work to make sure they are correctly S and Z threaded and that the colors are in the correct hole. Once you have given it the final inspection, ready your shuttle! I wrap a bunch of warp around the top of the shuttle, in a figure 8 pattern, to keep the thickness of the shuttle to a minimum.
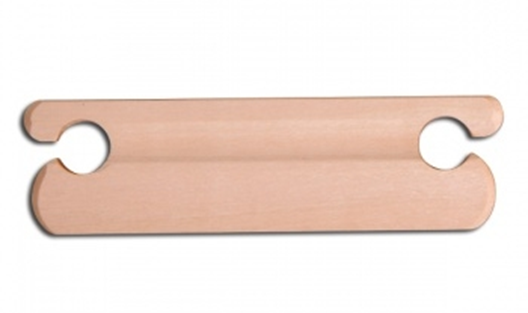
Your belt shuttle only needs to be 5″ or 6″ long, and works best if it has a tapered edge for beating.
I begin by setting all the cards with AD at the top and slip the tail through the shed so the shuttle is on the left and a 4″ tail is on the right. Turn the cards forward (away from you) and throw the shuttle and the tail in opposite directions, criss-crossing through the shed. This will help anchor the tail and prevent unraveling later. Turn the cards again, beating the weave, and throwing the shuttle, leaving a loop behind. On the next pass, turn the cards, snug up the weft, beat and pull the shuttle through. Don’t be over-zealous on the weft; gently pull the weft thread to pull the warp threads together. Do four turns total so that AD is back at the top again. The first few passes are going to look a hot mess…don’t panic. It’ll get better as you go, and your tension gets more consistent with practice.
Keep weaving along until the twist gets too tight, or every so often (maybe every 10 or 20 repeats, or whenever it moves you), then reverse direction to untwist. You will develop a funny little bump on the edge of the weave–don’t panic…it’s completely normal. The finer the threads you use, the less noticeable it is.
When the pattern changes directions, the threads on the border cards leave an odd lump. This is less noticeable using finer threads.
Every so often, you will need to release the tension on the loom, and shift it to continue your work. As you work, you will notice that the length of the weave is getting shorter and shorter…you will lose up to 20% of the warp length from start to finish.
When you get to the end of the warp, you will have 6″ or 8″ left between the end of the weave and the knots tied…remember you will also have the width of the cards and the shuttle between the beginning and end…so if you want to get a minimum length of weaving for a project, you will need to factor that into your warp length.
Some weavers carefully untie all their knots and tie up the ends in a variety of ways. I used to twist and knot the threads, but lately, I’ve decided that it’s far more effort than it’s worth, so I just leave a half inch of fringe and chop off the excess. If you plan on sewing it down as part of trim on a garment, it will likely have the ends tucked inside the seams. It hasn’t unraveled yet, at least using the carpet warp or wool, but finer threads like silk might be more trouble.
I hope this has been a helpful tutorial, and I hope you find the videos helpful as well. I look forward to hearing about my fellow weavers’ projects and anything that I have presented that you, and I’d love to see your completed projects!
Oseberg Weave finished!The alternate pattern
I also wanted to give a shout out and direct you all to a tablet weaving generator that I use a lot, created by a British woman named Catherine. It is both super useful and periodically updated (other generators like GTT haven’t been updated in more than a decade). It can be found at: https://jamesba.github.io/tabletweave/.
After I finished the last couple of feet of sewing on the coat, I decided the next item to make is an apron dress. I normally wouldn’t build a wardrobe from the outside in, but nothing is as it should be this year.
Sorry about the crud and boxes around–I am still in the midst of re-arranging the sewing room. Being in quarantine means that I can’t get out to donate the stuff I have to get rid of.
I “interviewed” three fabric candidates. Two were too small and one was *just* about big enough (if I reduced the length of the dress by 3″), but it’s got a very subtle stripe to it and has a right and wrong side…but only noticeable if you’re looking very closely.
You’ll note the fine white chalk marks for the pattern as well as the fine grey pinstripes in the wool. I debated about using it, but thought that since they can definitely date plaids to this era, stripes aren’t a big stretch for plausibility.
I laid out and marked the fabric using the “no waste” apron dress pattern. Mistress Disa i Birkalundi has a YouTube class on how to measure and mark your fabric for this pattern.
I ended up assembling mine a little differently because I was being difficult and dumb, but also because the fabric has a right side and a wrong side; if you sew the two half side panels together, one will be reversed.
Anyway, it looks fine from the front, and that’s what’s important.
I plan on adding the Oseberg tablet weaving to it (the purpley-red in the weave matches the purpley-red in the fabric almost perfectly).
Because I had to make it a bit shorter, I will be adding some dark grey wool at the bottom and trimming the top with it as well. I also need to make shoulder straps, so those will be in grey as well–here’s hoping I have enough! (PS – I do!)
Before the grey trimmings
Meanwhile, the garden is expanding, we moved the compost bins, and hubby has invested in a rain barrel. I’m looking into the possibility of growing potatoes in buckets, but it looks like 5 gallon buckets have rather small yields–maybe 2 lbs. per bucket. A 20 gallon bucket yields about 8 lbs…so about the same yield per gallon.