Celebrating East Kingdom!
The Kingdom of the East held its first coronation event in June 1968 (when my husband was only a month old!) It comprises most of New England and five Eastern provinces of Canada; Quebec, Prince Edward Island, Nova Scotia, New Brunswick and Newfoundland. Each year, this Kingdom raises an army to battle at Pennsic War, held in Cooper’s Lake, PA. Sadly, it was cancelled for the summer of 2020 due to plague…I mean, the pandemic. Hopefully, it will be back on schedule for 2021! As a longtime member of the SCA (30 years!), the pilgrimage to this war is long overdue.

There is nothing sweeter for a new weaver than to find a period pattern that is attractive and easy to do! While there are several of these, one of my new favorites is the Ladoga narrow band, object #6.
There are a number of tablet weaving patterns that were created during the Norse or “Viking” era—roughly the late 8th to early 11th centuries—in a number of lands that they had contact with. This, of course, included Russia and various parts of Eastern Europe, which many researchers and re-enactors refer to as the “Viking-Rus”. These are descendants of the Swedes who raided and traded in the lands from the Baltic Sea coast to the Black Sea.
The savage and feared men of the North reigned supreme in Scandinavia and beyond—basically, anywhere they could get their boats to float, which only requires about three feet of water—that wide, shallow boat design was key. So while they were raiding and pillaging…I mean, spreading their cultural influence…they also picked up a number of customs, designs, and ornamentation which was brought back to their homes back in the north.
Straraja Ladoga is located about 70 miles east of St. Petersburg, just downriver from Lake Ladoga. Here is where we find the Ladoga Burial Mounds. It was discovered in 2010 and dating estimates are between the 10th to 12th centuries; spot on with Norse contact and influence. If you’ve developed a Norse persona for the SCA or other medieval re-creation group, LARP, or costume for Halloween or any other occasion, this is a great weave to add that perfect accent to your clothing.
“The original piece has a blue design on a yellow background. The warp threads are red, yellow and blue wool, 0.8 mm thick, with twist S,2z. The weft threads are brown wool 0.6 mm thick with a double Z twist. This ribbon needed 12 tablets with 4 holes in each, producing a density of 27 warps and 8 weft threads per cm.” (https://www.academia.edu/30371327/Kochkurkina_Orfinskaya.Archaeological_textiles_of_the_10th_to_the_12th_century_from_the_Gaigovo_barrow_group_Russia_Leningrad_oblast._Archaeological_Textiles_Review_No._58)

Let’s get started with the Ladoga weave! You will need 12 cards for this pattern, and can use two or three colors, depending on what color you want to use for the borders. My sample is going to use three colors, celebrating the Kingdom of the East! (*See below)

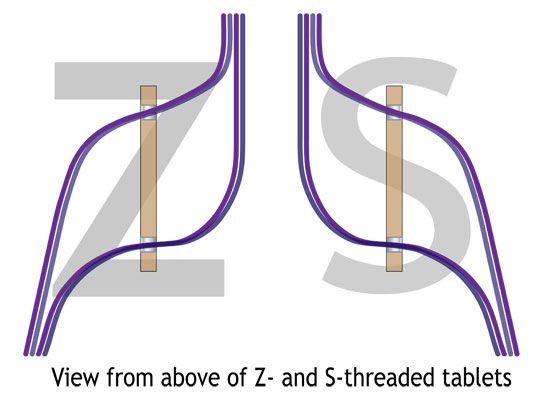
Remember to face your clockwise-labeled cards to the right (counter-clockwise to the left) and thread according to the S and Z on the chart below (S through the left side of the card; Z through the right side).

Start your cards with AD at the top and begin by turning your cards forwards–away from you–for 12 quarter-turns (three full revolutions). Then reverse the center four cards (5, 6, 7, and 8) (turning backwards) for 13 quarter-turns to get a little dot on the side, under the “mountain”.

Then reverse again, turning forward one quarter turn. The pattern will then repeat, so you will do an additional 12 quarter-turns. Essentially, you will be doing 13 quarter turns each direction, with the border cards continuing to turn only forwards. When the border threads become over-twisted, you may flip the cards or reverse direction until they are over-twisted in the opposite direction. Repeat this to the end of the warp.
Note about the border cards: If you are a new weaver and want to keep things simple, turn all the cards forwards 13 quarter-turns, then 13 quarter-turns backwards. However, each time you change direction on the border cards, you will create a funny bump, which is not as attractive.
* I must note: this is a modification from the original, which is a skip-hole design, but this modification gives the beginner an easy pattern to follow and still have a similar result. See the next post for details about the skip-hole directions.
Let me know how yours turned out and let me know if there’s anything you think I need to add to these instructions.
Thanks for joining me!
Elewys

