My creative SCA journey on stuff I make and research I do…mostly in fibers (wool prep, spinning, weaving, tablet weaving) and glass beads, but could also include costumes, camping, cooking, and any other creative things that strike my fancy.
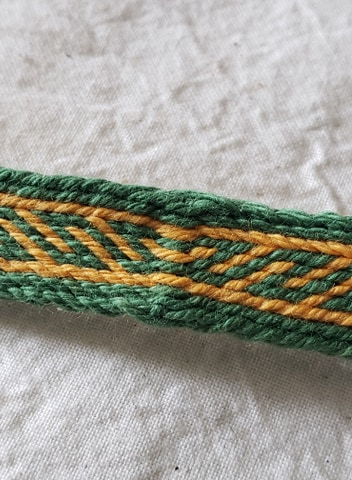
This piece is one of my favorites, not just because it’s attractive and easy to weave, but it’s one of the oldest ones on record!
photo by Mervi Pasanen
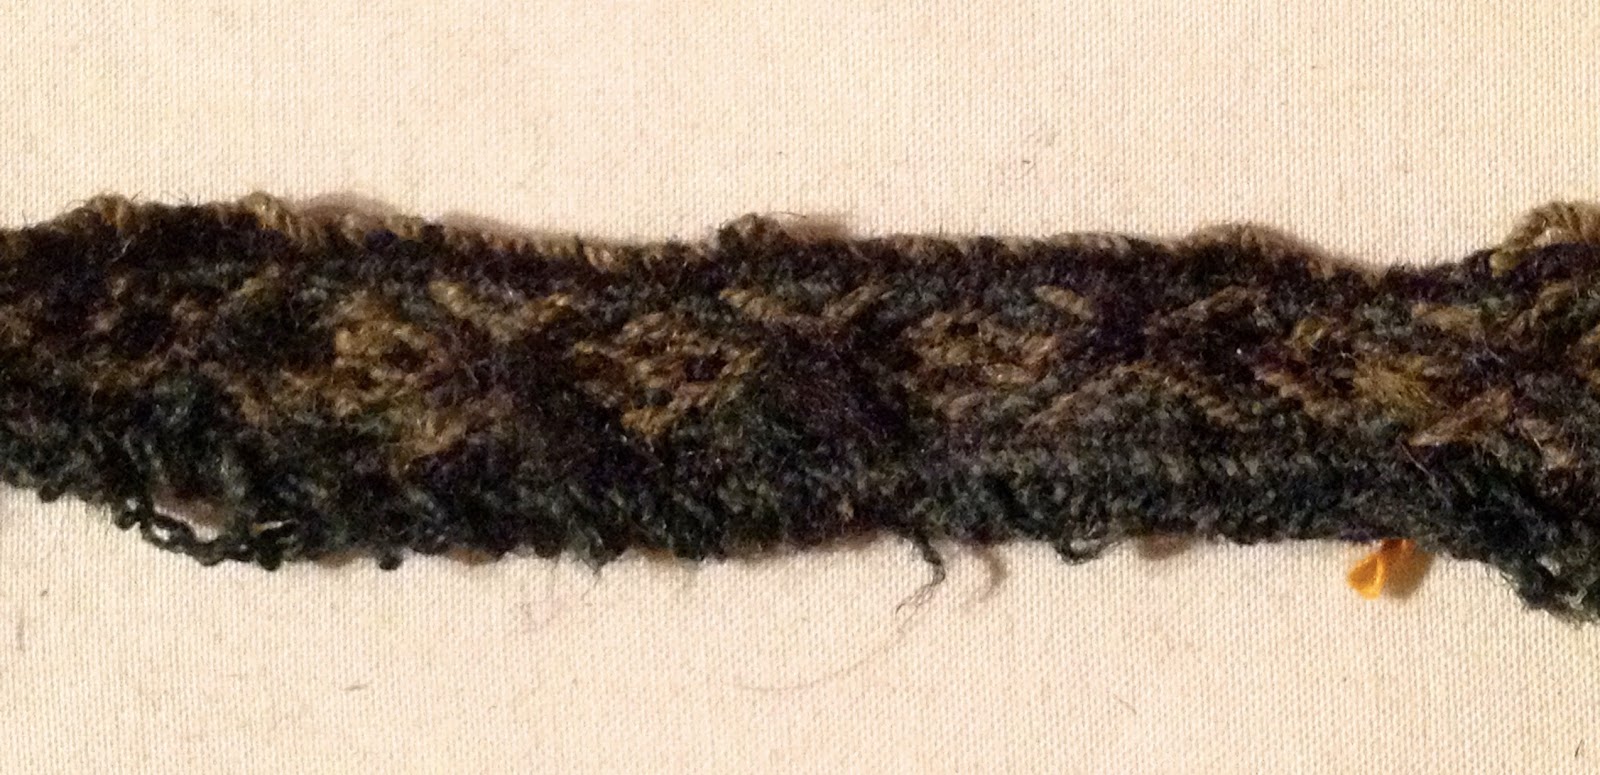
It was found in 1991 in the Kernverwasserungswerk part of the salt mine in Austria. The salty environment kills single-celled bacteria that would cause the decomposition of organic materials. It is currently housed at the National History Museum in Vienna.
The archaeologists determined that the date for the piece is somewhere between 800 and 400 BCE (before current era). You read that right–FOUR HUNDRED BC! So sometime between the beginning of the Etruscan civilization and the Egyptians overthrowing Persian rule, some iron age miner dropped some woven fragments in a salt mine in Austria. Or really, one of several miners who left behind at least six pieces of tablet weaving. The oldest of the woven pieces, HallTex 288, a band of simple blue stripes, dates back to 1500-1200 BCE, which is about the time of the super-awesome rule of Queen Hatshepsut in Egypt. Objects 43 and 136 are also made with simple stripes. The other pieces, 123, 152, and 186 have more intricate patterns with meandering lines, solid triangles, and diamonds.
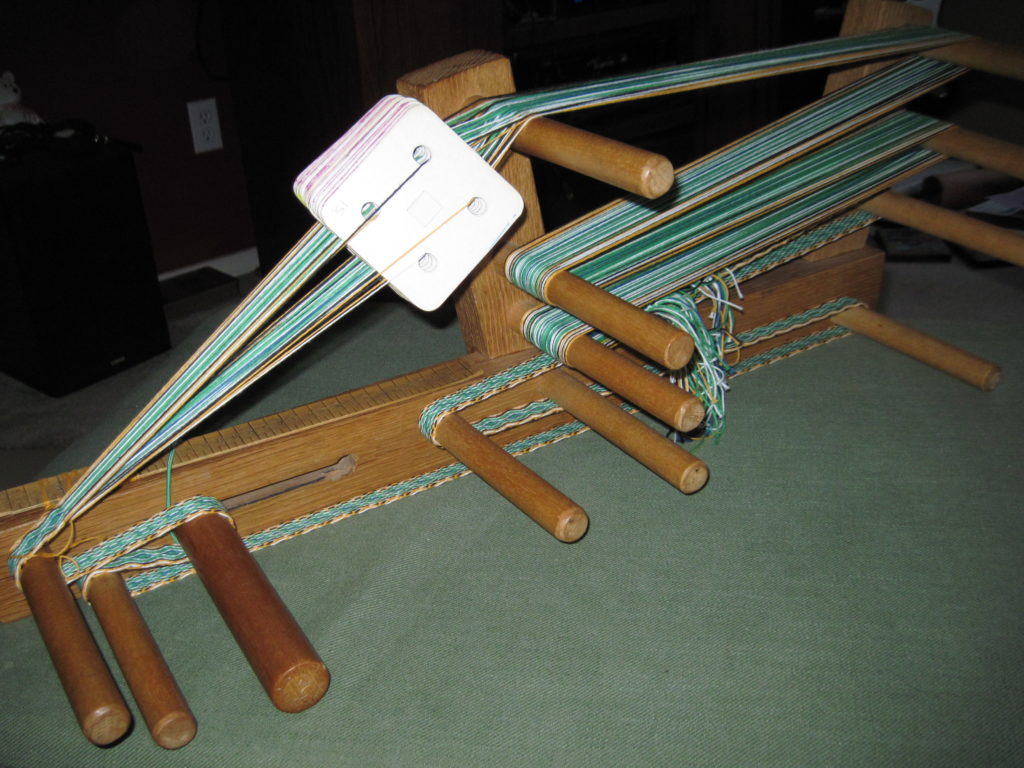
After the piece was found in 1991, a pattern was designed to recreate this piece, which is called HallTex 152, and is an easy beginner pattern.
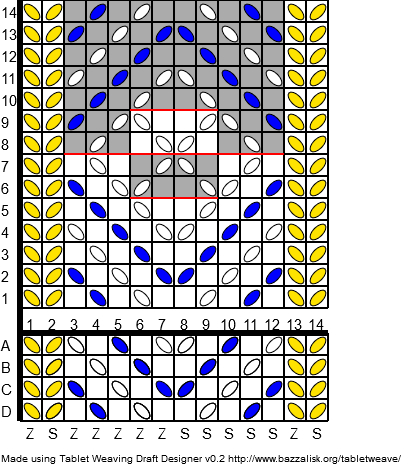
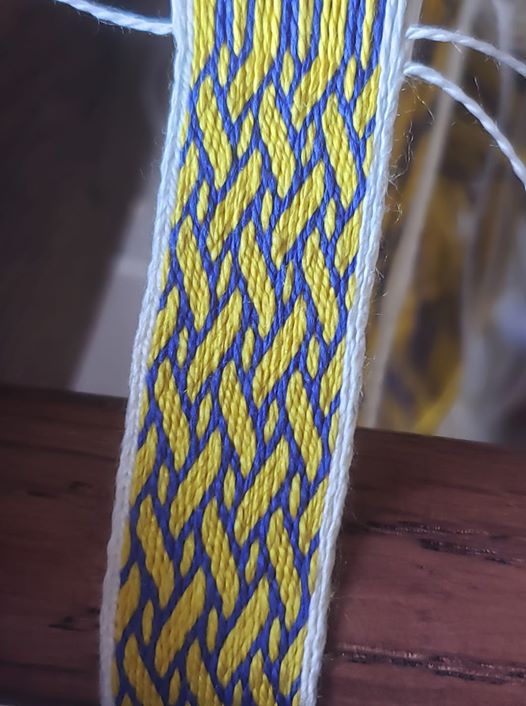
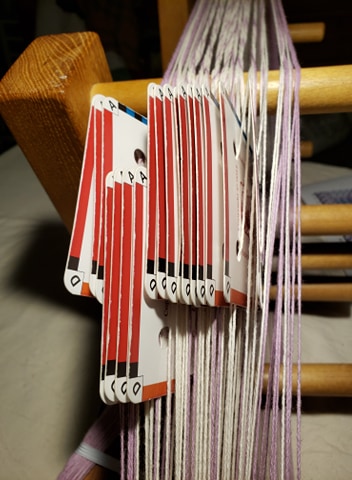
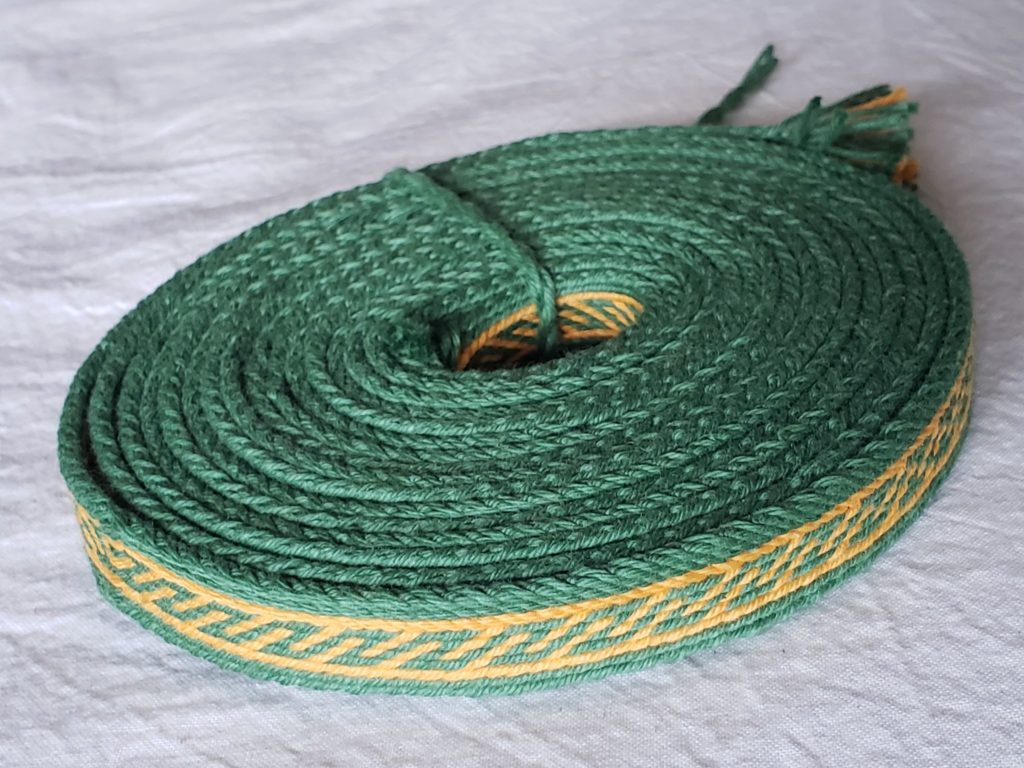
I will create it for you today in the colors to celebrate the Kingdom of Atenveldt! This one is the pattern I’m using–I’ll call it option 1:
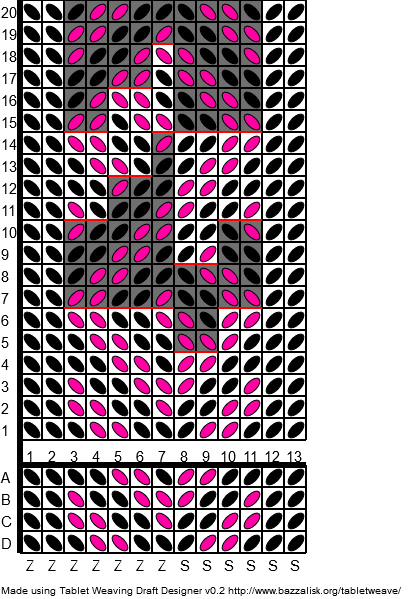
This is option 2:
This piece was woven using Option 2.
About 25 years after this piece was found, Maikki Karisto and Karina Gromer did a deep dive into researching the piece to see if the pattern was accurate. Looking at photos of the front and back of the extant piece, the weavers determined that this was more likely a skip-hole woven piece and did a number of test weaves before coming up with a new-and-improved pattern.
They determined that the yarns used are .4 mm, both Z and S plied wool. The extant piece is 12.5 cm long and 1.2 cm wide. The original colors may have changed a bit, but the salt in the mine helped preserve the colors quite well. They appear to be yellow-tan, brown and olive green.
For consistency, this is the pattern drawn up on the pattern drafter I use.
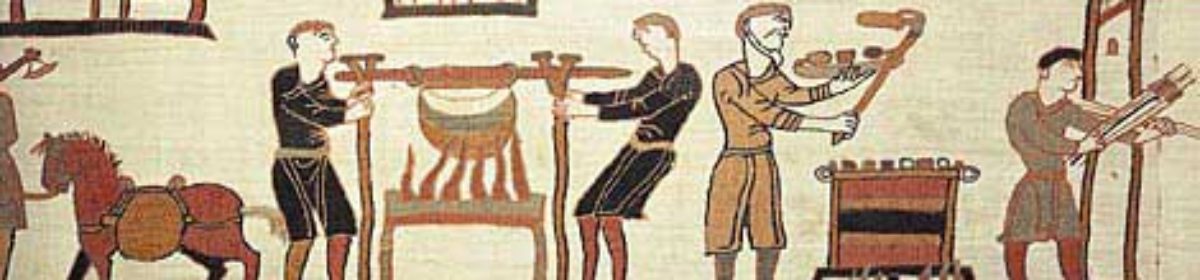
First of all, card weaving and tablet weaving–same thing. The terms are used interchangeably depending on where in the world you’re from. It is a form of narrow band weaving using tablets to form a shed (the space between the top threads and bottom threads), and a method of weaving that can create complex patterns. This not only shifts threads from top to bottom, but twists them around each other creating a very strong woven band.
A Bit of History
The oldest woven piece was found in a salt mine in Austria between 1200 – 1500 BCE. This means it’s quite possibly contemporary with Queen Hatshepsut of Egypt. Several more pieces were found in that same salt mine–the atmosphere of which helped preserve the fibers–which date from 400-800 BCE. Many of them were very complex patterns and the details of these have been analyzed for thread size, twist, color and method of construction, so we know exactly how it was made!
Tablet weaving continued to be a popular way of decorating clothing and household goods until about the 15th century when people started using beads, gems, embroidery and precious metals as decoration.
Looms & Weaving Methods
There are a number of ways that you can do tablet weaving, and you really have to try a few (or all) of them to figure out which is best for you.
Backstrap
This is a favorite among many weavers–the ability to weave almost anywhere, as long as they have a belt and a stationary object to attach to. This could be a pole, railing, banister, door knob, heavy chair, a very patient friend, or even a stick that is held under your feet. If, however, you find that you need to set down your weaving to chase after small children or animals, this may not be a very convenient method for you.
Applesies author, Mervi Pasanen.
Oseberg
The Oseberg loom was found in the Oseberg burial, dating to about 800 AD. It consists of two upright poles, about 3 feet high (1 m) set about 6 feet apart (2 m). There is a crossbar between them and your weaving is affixed between the two posts. You sit at a bench to weave. This is a beautiful image to see at recreation events–Norse, SCA, or even high Middle Ages. You can even design them to disassemble for transport to and from events.
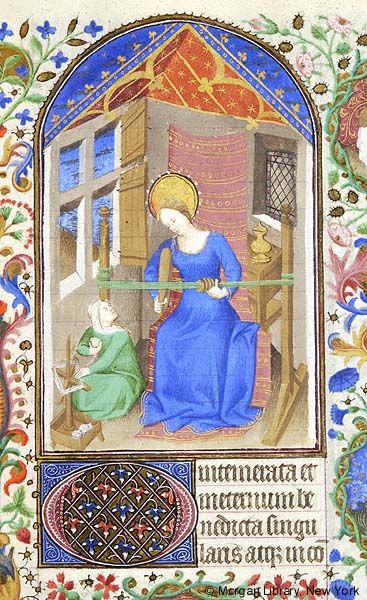
The book of hours and hours and hours of weaving! France, Paris, ca. 1425-1430 MS M.453 fol. 24rThe Crack-Your-Head edition
Modified Oseberg
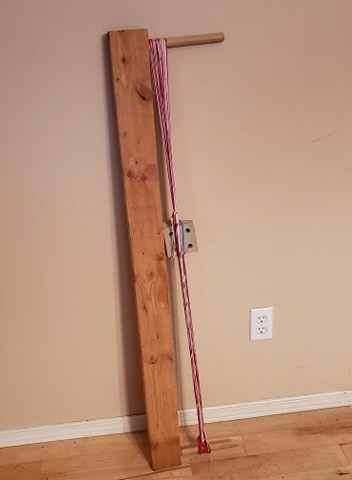
If space is a consideration, you can make a modified version with simply a 2 x 4 and a couple of thick dowels. This sits on a table and can be worked just as easily. You may need to clamp it to the table to avoid it sliding around.
Box Loom
For later periods, the box loom was the way to do narrow bands. These are perfect for having a small loom that can be set on a table top or even on your lap. It has a warp beam (the back rod for the unwoven strings) and the cloth beam (the front rod, for the finished weaving). This warps up like many rigid heddle or floor looms and may require assistance to get the proper tension, or some very creative methods of adding tension to the strings as you warp them onto the warp beam–a stack of heavy books or a moderately heavy chair, maybe.
The Surfboard Loom
A poor cousin to the Oseberg loom and perhaps a first-cousin once removed to the box loom, this simple set up is another great option.
It can be built using a few simple tools and is small and portable.
Inkle Loom
This loom is the youngest of the bunch, presumably designed well after the Middle Ages (patented in the 1930s!), but it does act as both warping board and loom, keeps even tension and keeps threads organized. Of all the methods, this is my favorite, causing me the least amount of consternation and irritability. It is, however, limited on how long you can make each of your woven pieces. Most weave between 1 to 3 yards depending on the loom design…but don’t let that stop you…you can always design a bigger loom…
Monster Loom
When three yards isn’t enough…
This was not warped to its full capacity, but yielded nearly 8 yards of finished silk tablet weaving.
Weaving Yarn
There are several options for weavers to look for weaving yarns. Here are some ideas for what to look for, and what to avoid:
Wool: Wool hairs are made with little barbs that snag each other to form yarn when spun. Different methods of spinning can give different final products. You can have a very light, fluffy yarn that is soft on the skin, but doesn’t have the strength to be warped; it’s best used as a knitting yarn. You can also have a strong, smooth yarn with a lot of strength, which would be great as a weaving yarn. This is all based on how it’s carded and spun. So wool can be a great option, but you should look for a strong worsted weight wool. If you have some wool lying around, give it a test-tug. If it snaps fairly easily, it will likely snap under tension while weaving and you will cry. You should also check to see if the yarn is really…grabby. I don’t know what the technical term is, but if the wool threads stick to each other like velcro, they will do this while weaving and it will require a lot of extra patience.
Linen: A plant-based fiber that is reputed to be very nice to work with. I haven’t actually used linen yet, so I can’t offer any good advice on that. There are lots of beautiful colors and the fibers are known for being very durable and having a lovely sheen. I will be placing an order for a couple spools, just to try it out, and there are a bunch of colors here on big cones.
Crochet Cotton: This comes in a huge variety of colors in a few different sizes. I’ve done projects in just about every size available, but my favorite–and one that is close to period-accurate–is the size 8 pearl cotton that comes in the little balls (I’m sure someone, somewhere has big cones of the stuff…still looking for a good source). Most craft stores have this in stock–Ben Franklin carries quite a number of colors. Be sure to check color numbers on the spools to make sure they match. I once got several balls of red, only to discover later that I had two different shades of red (I didn’t notice it in the store, but sure noticed it when I got home!).
A gross of colors! $43 on Amazon.
Cotton Carpet Warp: The Maysville 8/4 yarns are heavier than the crochet cotton–by about double–but it makes a nice, robust weave. If you’re making a woven piece for a cloak, a bag, a guitar strap or a dog leash, this is a great material to work with. It has over 80 colors to choose from and the big spools are under $10 each, so you can do quite a number of woven pieces using just a few basic colors.
SILK: There is nothing bad to say about using silk! There are two sizes available from my favorite Etsy dealer; the 60/2 — a really fine thread — and the 20/2 — about the size of the size 8 pearl cotton. The silk has a luster and sheen that is unmatched by other fibers, it’s a dream to work with, and it’s strong! You can get large cones for $30 each or small 100 yard spools for $5. I got some of the small ones initially to see how well it worked, and within a couple weeks, was ordering cones. I won’t be using it for every project, of course, but for those special pieces, absolutely.
Cards / Tablets
Period cards were made from a variety of products including bone, horn, antler, wood, and leather. There are a variety of sizes that they came in, the Oseberg tablets being about 2 1/2″ (6.5 cm).
Most of the cards I use are of the 3 1/4″ (9 cm) cardboard variety–it’s what I learned on and what I’m used to working with, and several people cleaned out their craft rooms and their cards kept getting rehomed with me–which is great for when I teach classes! I have hundreds of them and don’t have a need to add to the collection. However, my husband just bought himself a 3D printer and has kindly printed some smaller 2 1/2″ (6.5 cm) cards that I’m going to try out. They might be a little thick–I prescribed the dimensions for them–the cardboard cards are about .6 mm each and these plastic ones are 1 mm. There are a few different designs for tablet weaving cards available on Thingiverse, including some Oseberg reproductions, so if you have access to a 3D printer–or know someone that does–maybe they can print some for you!
If you don’t have that kind of technology at hand, you can always make your own cards. You will need some heavy paper stock–like cereal boxes or cracker boxes–or even a deck of playing cards. Here’s a link to some instructions on how to make your own: https://www.instructables.com/id/Make-Your-Own-Tablet-Weaving-Cards/.
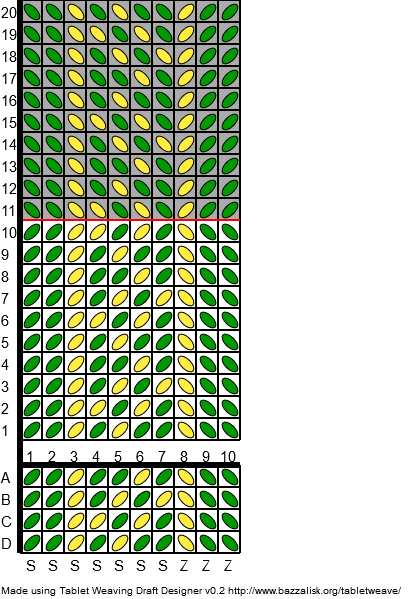
Reading the Pattern
As easy as A-B-C and 1-2-3! And S and Z…
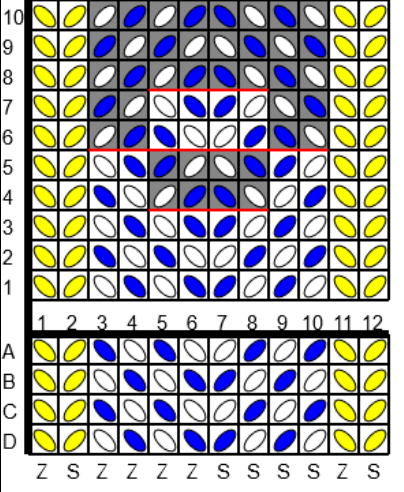
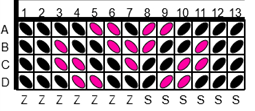
There are a few things you need to be able to understand. Looking at the pattern, you will see the numbers–1 through 13. These are the numbers of cards–one for each column. Best plan to write numbers on the backs of each card, which you will need to reference for many patterns.
Along the side are the letters A, B, C, and D. This indicates what threads go into what hole on which card. For example, card 5, hole A is pink; hole B is black and so on.
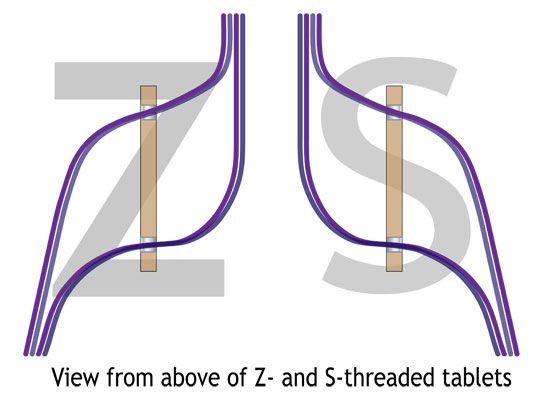
S & Z Threading
This is one of the most disputed items–is S and Z…does it mean the direction of the thread or the direction of the cards? Well, as long as you know how the pattern’s notation is written, you can do it how you choose.
My method is this–if you have clockwise lettering on your cards, face it to the right. If your letters are counter-clockwise (anti-clockwise), face them to the left.
From there, the patterns I use this threading method:
Z threads go in the right side; S threads go through the left side.
Shuttles
There are a number of shuttle options–I’ve purchased belt shuttles (6″ to 8″ long with a tapered edge) & short stick shuttles, made shuttles from scrap wood in the garage, and even a wooden ruler I found in the school supply box. Use what you have and experiment to find what you like the best.
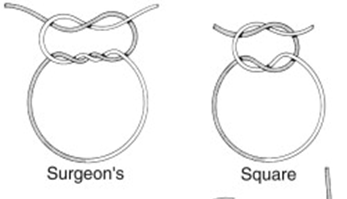
Warping the loom–at least for circular warps like on the Inkle loom–requires the ends to be tied together. I use a surgeon’s knot so that it’s secure and easier to untie if/when you make a mistake.
Getting Started
While it’s difficult to describe what a weaver needs to do for tablet weaving, I will note that I start with the shuttle on the left and the tail through the shed, hanging out to the right. This is just my personal choice as I try to finish weaving at the end of a repeat and put the shuttle under a piece of elastic so the shuttle doesn’t fall on the floor…which had happened about 12 too many times before it occurred to me to tether that sucker down.
So the shuttle is on the left, the tail is through the shed to the right with a long tail (5″ or more long). Turn the cards forward once, and throw your shuttle through to the right and bring the tail through the shed to the left. The cross-cross of this weft thread helps anchor the weaving. Turn the cards again, throw the shuttle, pausing to lightly beat the weaving. Do then you can start to tighten up your weft threads to draw the band together. Repeat the turns for 2 to 6 more times, depending on how well you like the look of the tension. This takes practice…
Begin the pattern with AD at the top. You may want to view the video for further instruction:
Zip ahead to about the 27 minute mark for weaving instruction.
Flipping Your Edge Cards
One thing to note is that this pattern is a zero-twist pattern–that is, as you weave, you don’t build up a twist like some patterns do, forcing you to either untie and untwist, use fishing swivels, or weave the pattern in reverse to untwist the warp. In this one, the only cards that build up the twist are the border cards. This can be easily fixed by either reversing the direction of the border cards–backwards instead of forwards–or flipping the cards from Z to S or S to Z, and continuing to follow the pattern as before.
Thanks for joining me! I hope you’re enjoying your weaving journey. Feel free to drop me a note on the YouTube comments if you have any questions.
One thing that tablet weavers experience frequently is twist in the warp that builds up until *something* has to be done about it. There are a few options that a weaver can consider.
You can untie and comb out the twist and re-tie…but that can create some exceptionally bad tension problems.
You can use a warp-weighted system that will untwist your warp as you go, but that is somewhat less portable.
Or you could try using fishing swivels, which is fine for a shorter warp, but when you’re doing upwards of 7 yards, like I am for this project, chasing the twist through a dozen or more pegs means you need another plan.
I’m sure that there’s a term for it…mirror image weaving…flip card weaving…or…untwist weaving…but I’m calling it Weaving in Reverse! This method weaves out the twist while still maintaining the pattern. Sure, it has a small variation in it, but it’s virtually invisible at first glance.
Here was my first attempt at changing direction. It has…elbows. Sure, it works, but it’s not hard to spot. I wasn’t really happy with it, so I experimented a bit…
And this is what I came up with!
A virtually invisible…or at least excellently camouflaged…design!
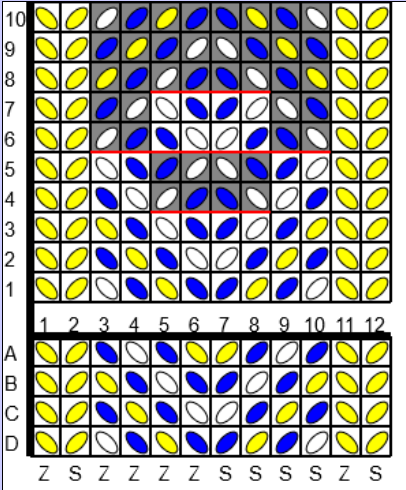
And this is how it’s done. First, you’ll be weaving the pattern from bottom to top:
When you finish this sequence, weaving 1 through 8, loosen the tension on your warp a bit and flip all your cards–S will become Z and Z becomes S. Then retighten your tension on your warp.
Then you need to weave four picks of a transition, which are rows 4, 3, 2, and 1, in that order. You will only need to do this once.
Then weave the pattern from top to bottom–8 down to 1–and repeat. The white squares are still forwards; the grey squares are still backwards.
When your warp has twisted too tightly in the opposite direction, you can transition back. After you finish your 8-1 sequence, you will need to flip your cards again, and your transition sequence is picks 5, 6, 7 and 8…then start at pick 1 and proceed through to 8.
Give it a try! Let me know how it works for you! If you have any questions, of course, feel free to reach out and ask questions.
I had planned to do a woven piece in celebration of Atenveldt, but I had a commission to work on and it seemed perfect to do a video and blog post on another Birka tablet woven piece!
This one was found in grave 824 and is known as Birka 22. It’s a brocaded tablet woven piece that dates from the 8th to 10th centuries.
This piece was one of several that were found in graves from that time period.
There have been several threaded in patterns that have been around the internet (Pinterest) but they seemed rather complicated. I then found one from Maikki Karisto and Mervi Pasanen (of Applesies and Fox Noses fame) that is much more simple!
Note that the cards are labeled counter-clockwise and the slashes indicate the angle of the card, the rows are labeled DCBA…so this can be confusing to beginners.
I used that layout and put it into the tablet weaving pattern generator that I use so that the pattern is consistent with the way I’ve been teaching it. I love this pattern generator–it’s easy to use, doesn’t require a download, and it’s free!
Remember, the white backgrounds turn forward–away from the weaver–and the grey backgrounds turn backward–toward the weaver.
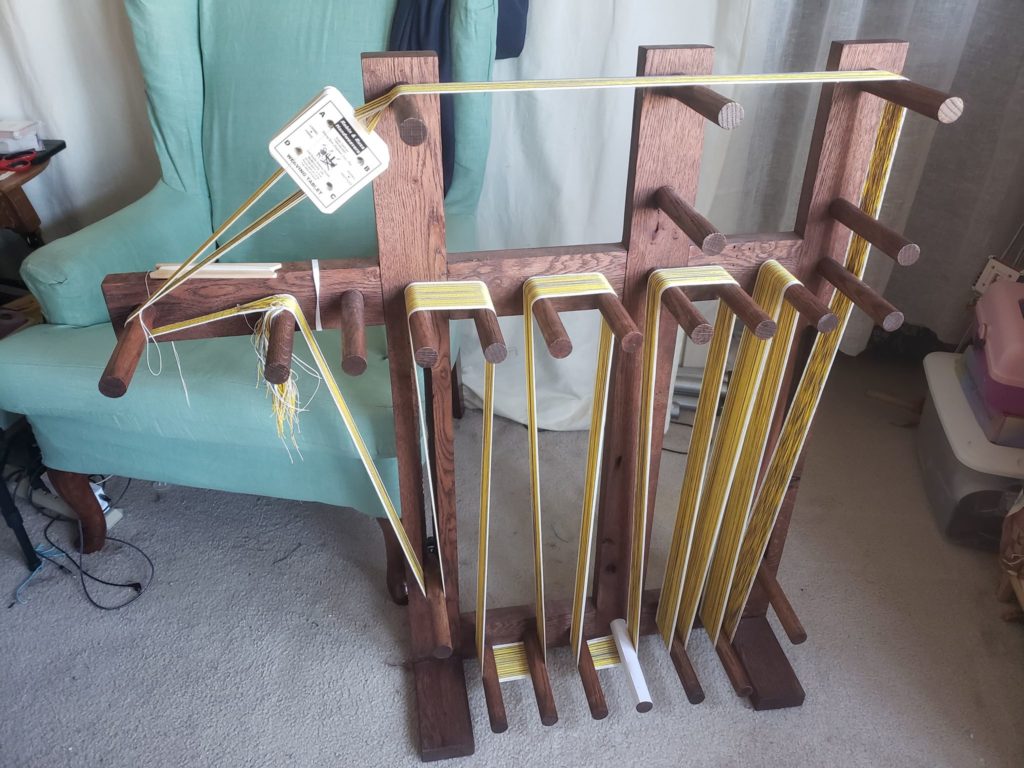
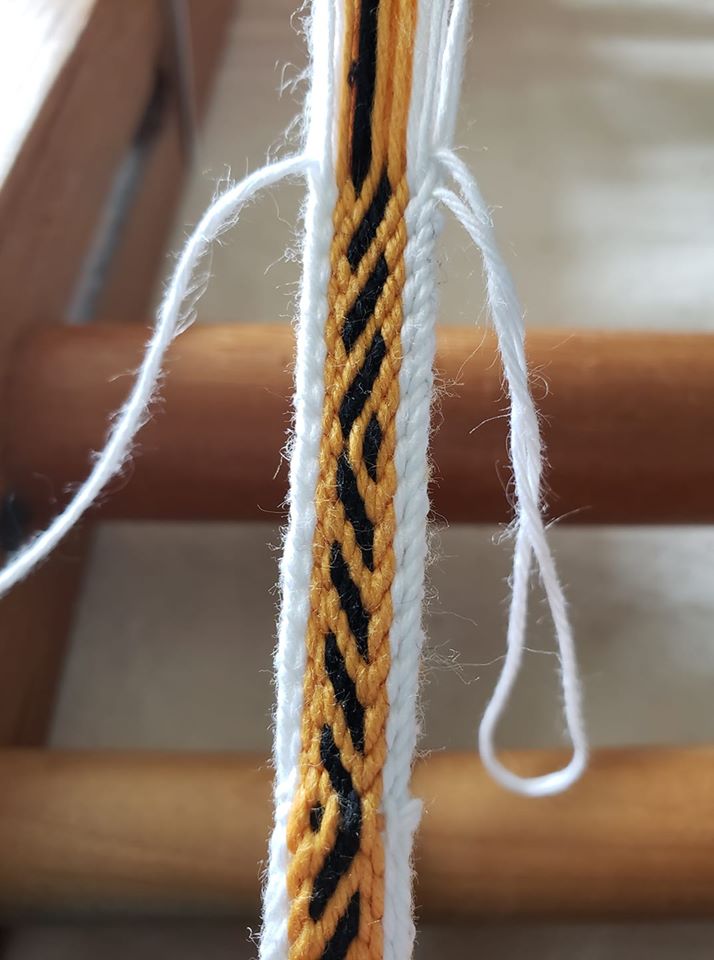
I warped this one up with 20/2 silk as it is to fulfill a trade with a woodworker to made a lovely Monster Loom for me! It holds over 13 yards (I haven’t actually measured it out yet), and it’s very flexible for doing any lengths of weaving over 3 yards. This is great for those longer commissions that I sometimes get.
I’ve named him Mike Wazowski.
You’ll notice that there are several pegs that were missed, which would add 25″ of length for each vertical space, plus the zig zag around the upper pegs. There are 100 different ways for warping the thing, and two tension bars, so lots of options.
When you get doing, you can do each repeat of the pattern in about 2 minutes, which means in about 21 1/3 hours, I’ll be done. If I work 4 hours a day, I can get it done in under a week…we’ll see how long it really takes.
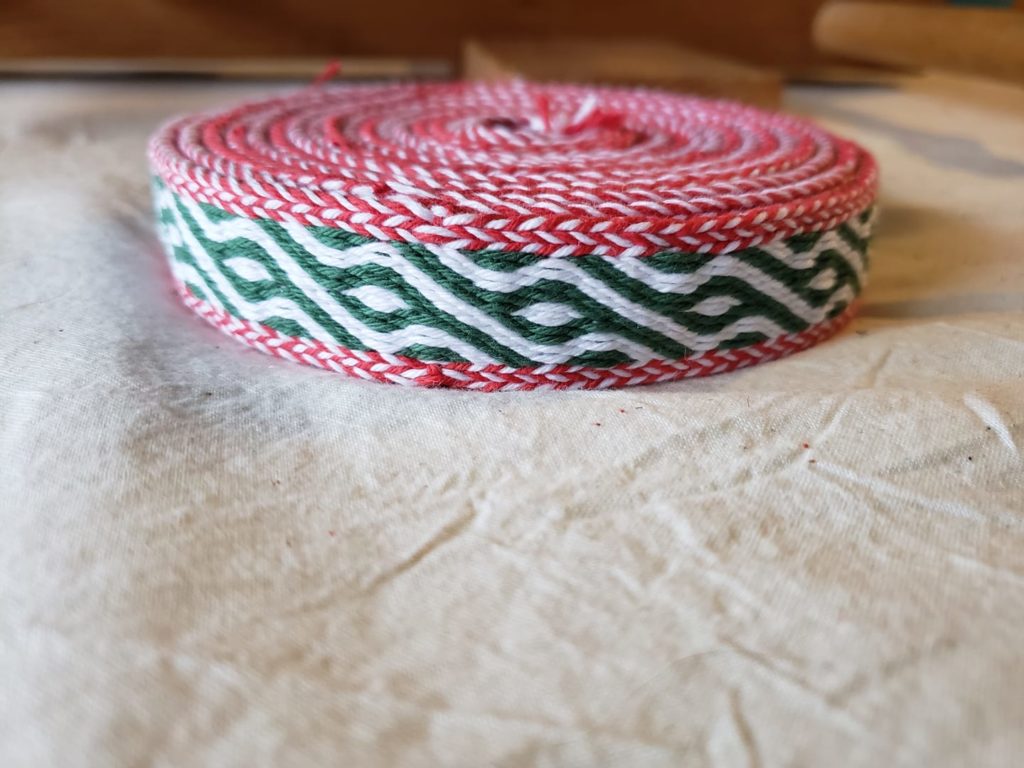
Welcome back! We’re jumping right into the next weave for the MIDDLE KINGDOM!
Midrealm, or Middle Kingdom, formed in 1969, currently comprises Michigan, Ohio, Indiana, Illinois, Scott County in Iowa, most of Kentucky (except the southwest counties), and Essex County and Windsor in Ontario, Canada.
The Birka (or Björkö) digs are some of the most famous of Norse historical finds because they are SO PLENTIFUL and have items from all over Europe! Located 30 km West of Stockholm, this trading city was founded in 750 AD and was under the protection of the King of Sweden, whose home was just a couple miles away. During the 200 years the island saw trade activity, goods came from all over Europe, as far away as the Middle East, as evidenced by a silver ring from a Viking-era grave with an Arabic inscription from that era found in Scandinavia. They have also found rare items like Chinese silk, Byzantine embroidery, pottery from Rhineland, furs and antler combs from the Sami people in Finland and Russia, and a number of silver Islamic coins called Dirhams. The trading center at Birka closed rather suddenly around 960 AD, and trade activity relocated to Sigtuna, though the reasons for the shift are disputed. Some suggest that it may have been due to land rebound from the post-glacial period; that the topography changed significantly enough to make Birka difficult to access by sea. The complete collection of archaeological finds from the excavations on Björkö are held by The Swedish History Museum in Stockholm, and many of the artifacts are on display there.
Quite a number of tablet woven fragments were found in the excavations, including today’s project, known as Birka 12, grave find 735.
Many of the bands were done in a style known as brocaded card weaving, where precious metals were woven into the surface of the tablet weaving, creating a beautiful (and shiny) pattern. Some of the pieces have rotted almost completely away, leaving only the metal threads, which still bear the impressions of the patterns on top.
From these finds, designs sketched up as to what the patterns may have looked like 1200 years ago.
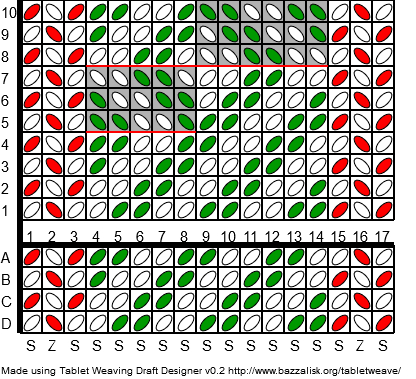
The one we are working on is located in the bottom row, labeled “i”.
However brocaded card weaving is a very advanced form of weaving, and other tablet weavers have created patterns using the threaded in technique based on these designs. This is the pattern for the one we will be doing today. I have also added a lovely braided border on the edge for a little extra fun!
So get your 17 cards and either 2 or 3 colors of yarn, and let’s get warped!
Remember to face your clockwise-labeled cards to the right (counter-clockwise to the left) and thread according to the S and Z on the chart below (S through the left side of the card; Z through the right side).
Once your cards are all threaded according to the pattern, begin by turning all the cards forwards, throwing the shutting through the shed after each pick. Tighten up your weft threads after a couple of passes until the warp threads are snug against each other, but not misshapen.
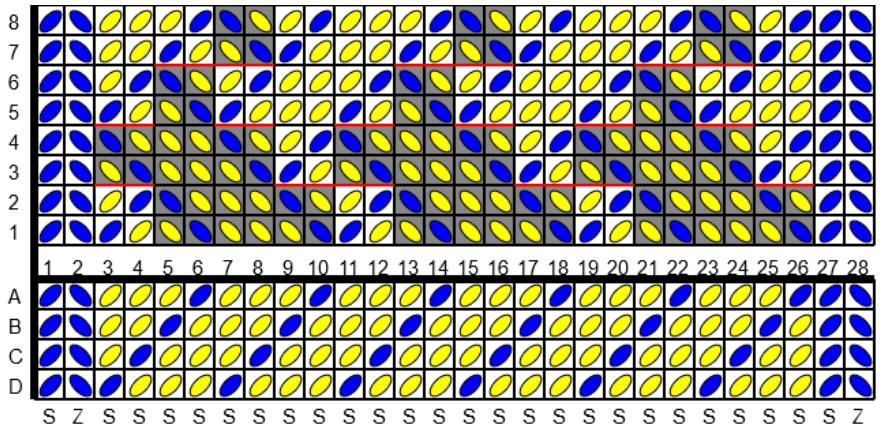
Start your cards with AD at the top for this pattern (like most of them out there) and begin by turning your cards forwards–away from you– for four quarter turns.
Then separate your cards into two packs–cards numbered 4-8 slid towards you, and the rest of the cards away from you. Turn those cards in opposite directions (1-3 and 9-17 forwards; 4-8 backwards) for three quarter turns, throwing the shuttle after each pick.
Then change directions for those inner cards–1-8 and 15-17 will turn forwards and 9-14 will turn backwards for 3 quarter-turns. Once all the cards are in their ‘home’ position (AD at the top), repeat the pattern by turning all cards forwards 4 quarter-turns.
Then the border threads become over-twisted, flip the cards (so S becomes Z, and Z becomes S) and continue weaving as before.
Note the funny bump on the border where the cards changed direction.
If you want a bigger challenge, you can try the skip hole version, found in “A Simplified Guide to Historical Tablet Weaving.” by Dagný Svensdóttir and Bjorn Sæmundarson. I’ll be doing this one in An Tir colors! (As I do not yet have permission to publish the pattern, I cannot supply it here at this time.)
Every once in a while, you’ll present a woven bit with documentation and someone will say, “Uhhh…that’s not quite right.”
So that just happened.
Luckily, it was presented in a very respectful manner by an influential tablet weaver that I admire…so it’s all good! Thank you, Aisling!
The Ladoga bands appear to be *skip hole* woven, not 4 threads per card. Despite the archaeological sketches and patterns provided in the research, the pattern that was provided doesn’t match the findings. You can see in the text of the Academia.edu paper that it was woven on twelve 4-hole cards with 27 warp threads total. Yeah, 12 times 4 is not 27…. so clearly something was amiss from the beginning. However, unless you add a third thread to one of the cards, you’re not going to come up with an odd number… 12 x 2 is 24; the extra four threads are for border cards; each get 4 threads, which results in 28 warp threads. Perhaps the archaeologists miscounted, or there was some other error in transcription.
So I got back on the tablet weaving generator and worked up a pattern. I warped up my loom (while my German tablet weaving friend slept) and had the pattern and weaving underway by the time she was up and checking her email. She confirmed that I got the pattern right and I was delighted! (Although I later was dissatisfied with it and made a few more alterations…) The result is this new pattern:
Skip hole technique means exactly what you think it does–some of the holes are skipped, that is, left empty, in the threading. If the box is empty, so is that hole. Now it looks correct!
The result is a very dainty band that measures just under 1 cm wide, even with this 8/4 cotton carpet warp.
Are you confused? Overwhelmed? Not ready for this pattern?
Don’t be cast down, dear weaver; the 4-threads-per-card pattern *works* and gets approximately the right design, but the technique is not period-correct. As a beginner, this is FINE…you get the same look while learning the ropes, but now you know that the period technique is slightly different…and more difficult, so don’t fret if you’re not ready for skip hole. You’ll get there…in this series, even!
The first episode of the YouTube video is in the final stages of editing (it was very long and complex for the Getting Started video–the next ones should come out much more quickly).
The Kingdom of the East held its first coronation event in June 1968 (when my husband was only a month old!) It comprises most of New England and five Eastern provinces of Canada; Quebec, Prince Edward Island, Nova Scotia, New Brunswick and Newfoundland. Each year, this Kingdom raises an army to battle at Pennsic War, held in Cooper’s Lake, PA. Sadly, it was cancelled for the summer of 2020 due to plague…I mean, the pandemic. Hopefully, it will be back on schedule for 2021! As a longtime member of the SCA (30 years!), the pilgrimage to this war is long overdue.
The Second Kingdom of the SCA, East Kingdom
There is nothing sweeter for a new weaver than to find a period pattern that is attractive and easy to do! While there are several of these, one of my new favorites is the Ladoga narrow band, object #6.
There are a number of tablet weaving patterns that were created during the Norse or “Viking” era—roughly the late 8th to early 11th centuries—in a number of lands that they had contact with. This, of course, included Russia and various parts of Eastern Europe, which many researchers and re-enactors refer to as the “Viking-Rus”. These are descendants of the Swedes who raided and traded in the lands from the Baltic Sea coast to the Black Sea.
The savage and feared men of the North reigned supreme in Scandinavia and beyond—basically, anywhere they could get their boats to float, which only requires about three feet of water—that wide, shallow boat design was key. So while they were raiding and pillaging…I mean, spreading their cultural influence…they also picked up a number of customs, designs, and ornamentation which was brought back to their homes back in the north.
Straraja Ladoga is located about 70 miles east of St. Petersburg, just downriver from Lake Ladoga. Here is where we find the Ladoga Burial Mounds. It was discovered in 2010 and dating estimates are between the 10th to 12th centuries; spot on with Norse contact and influence. If you’ve developed a Norse persona for the SCA or other medieval re-creation group, LARP, or costume for Halloween or any other occasion, this is a great weave to add that perfect accent to your clothing.
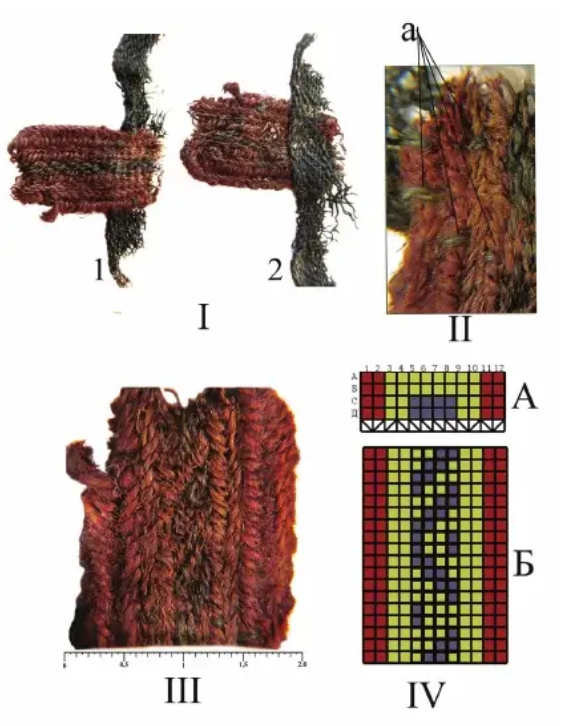
“The original piece has a blue design on a yellow background. The warp threads are red, yellow and blue wool, 0.8 mm thick, with twist S,2z. The weft threads are brown wool 0.6 mm thick with a double Z twist. This ribbon needed 12 tablets with 4 holes in each, producing a density of 27 warps and 8 weft threads per cm.” (https://www.academia.edu/30371327/Kochkurkina_Orfinskaya.Archaeological_textiles_of_the_10th_to_the_12th_century_from_the_Gaigovo_barrow_group_Russia_Leningrad_oblast._Archaeological_Textiles_Review_No._58)
Let’s get started with the Ladoga weave! You will need 12 cards for this pattern, and can use two or three colors, depending on what color you want to use for the borders. My sample is going to use three colors, celebrating the Kingdom of the East! (*See below)
Remember to face your clockwise-labeled cards to the right (counter-clockwise to the left) and thread according to the S and Z on the chart below (S through the left side of the card; Z through the right side).
Start your cards with AD at the top and begin by turning your cards forwards–away from you–for 12 quarter-turns (three full revolutions). Then reverse the center four cards (5, 6, 7, and 8) (turning backwards) for 13 quarter-turns to get a little dot on the side, under the “mountain”.
Then reverse again, turning forward one quarter turn. The pattern will then repeat, so you will do an additional 12 quarter-turns. Essentially, you will be doing 13 quarter turns each direction, with the border cards continuing to turn only forwards. When the border threads become over-twisted, you may flip the cards or reverse direction until they are over-twisted in the opposite direction. Repeat this to the end of the warp.
Note about the border cards: If you are a new weaver and want to keep things simple, turn all the cards forwards 13 quarter-turns, then 13 quarter-turns backwards. However, each time you change direction on the border cards, you will create a funny bump, which is not as attractive.
* I must note: this is a modification from the original, which is a skip-hole design, but this modification gives the beginner an easy pattern to follow and still have a similar result. See the next post for details about the skip-hole directions.
Let me know how yours turned out and let me know if there’s anything you think I need to add to these instructions.
The first thing you’ll need to do tablet weaving is, of course, tablets or cards.
These can be made yourself with a deck of playing cards, a hole punch, sharp scissors, ruler, cutting mat, rotary cutter, template, compass, protractor, slide rule, abacus, battering ram, caffeine, and chocolate…that is, if you’re really OCD about getting the holes lined up perfectly…
OR…you just go online and buy them. They’re inexpensive and durable!
(OK, if you DO want to make your own, here’s an instructable to do it yourself: https://www.instructables.com/id/Make-Your-Own-Tablet-Weaving-Cards/. However, if you don’t have a corner trimmer, hole punch, cutting mat and all the things they ask for, it would be cheaper and easier to order some online.)
Make your own!
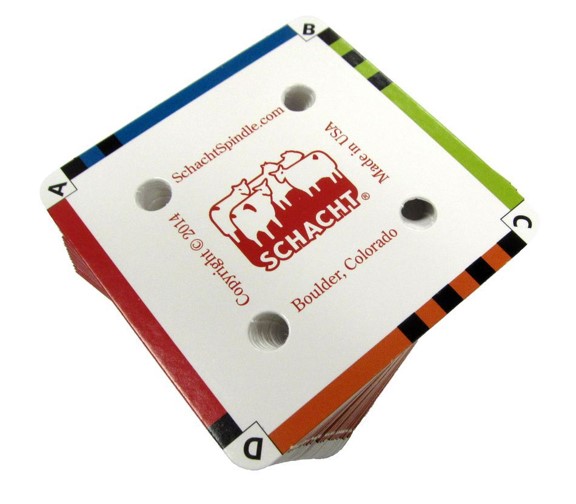
There are a number of different manufacturers of tablet weaving cards. I have at least five different varieties. I like the Schacht cards that are sold at stores like HalcyonYarn.com or the Woolery (Yarn.com). $8 for a set of 25 cards that are labeled and color coded. I’d recommend getting two sets (50 cards total) to start. The cards will last a long, long, long, long time, so no need to get hundreds, at least to start. Most patterns that we will be doing will require fewer than 25 cards, but it’s always good to have a second set on hand for larger patterns later.
Color coded sides and labeled corners make these a great choice for weaving!
Next, you’ll need to pick your fiber. For a beginner, you’ll want to work with something that is strong, but forgiving, and easy to work with…so put away the silk, linen, and wool for now. The best place to start is with cotton. It’s cheap, strong and doesn’t bind up like other fibers can.
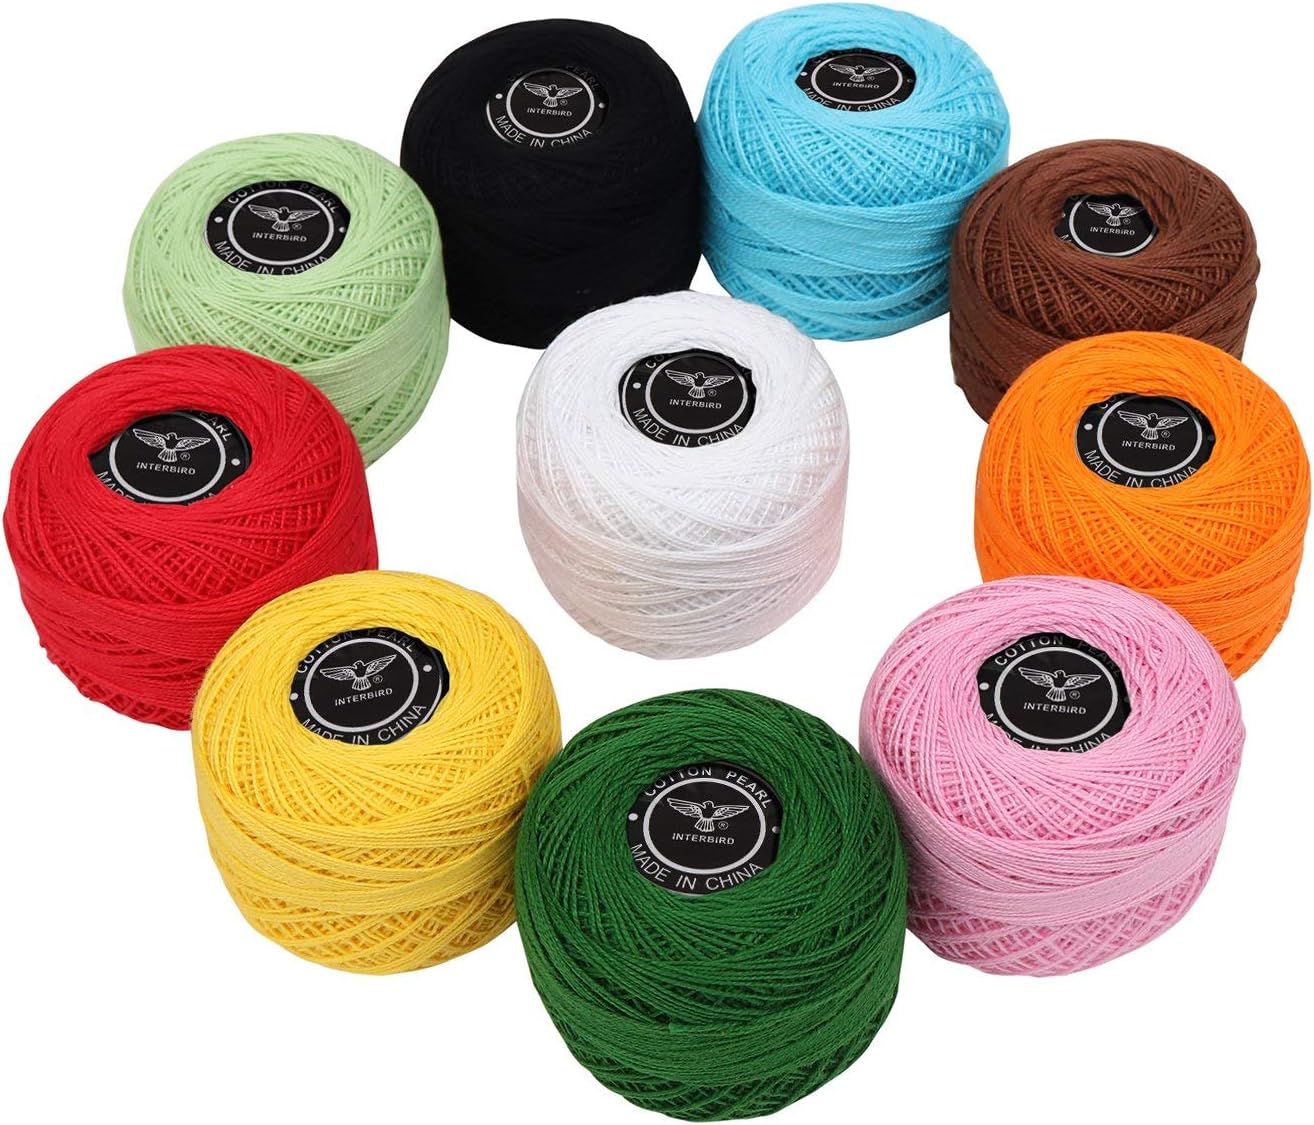
Crochet Cotton is my first pick for a beginner, for those who are looking for readily available and inexpensive materials, which you can find at your nearby hobby store. The limitation with this stuff is that they usually only have 4 or 5 colors at the store—white, baby blue, floofy pink, minty green and pale yellow. If you can find more saturated colors—red, black, dark blue…go for it! Just be sure to get contrasting colors—light and dark. Think of what colors go well together–yellow, white and black; blue, green and white; yellow and red…anything that will make one color pop against another! If you use two colors of the same intensity, the pattern may get lost.
Whatever the brand, size 10 crochet cotton is a great size to work with.
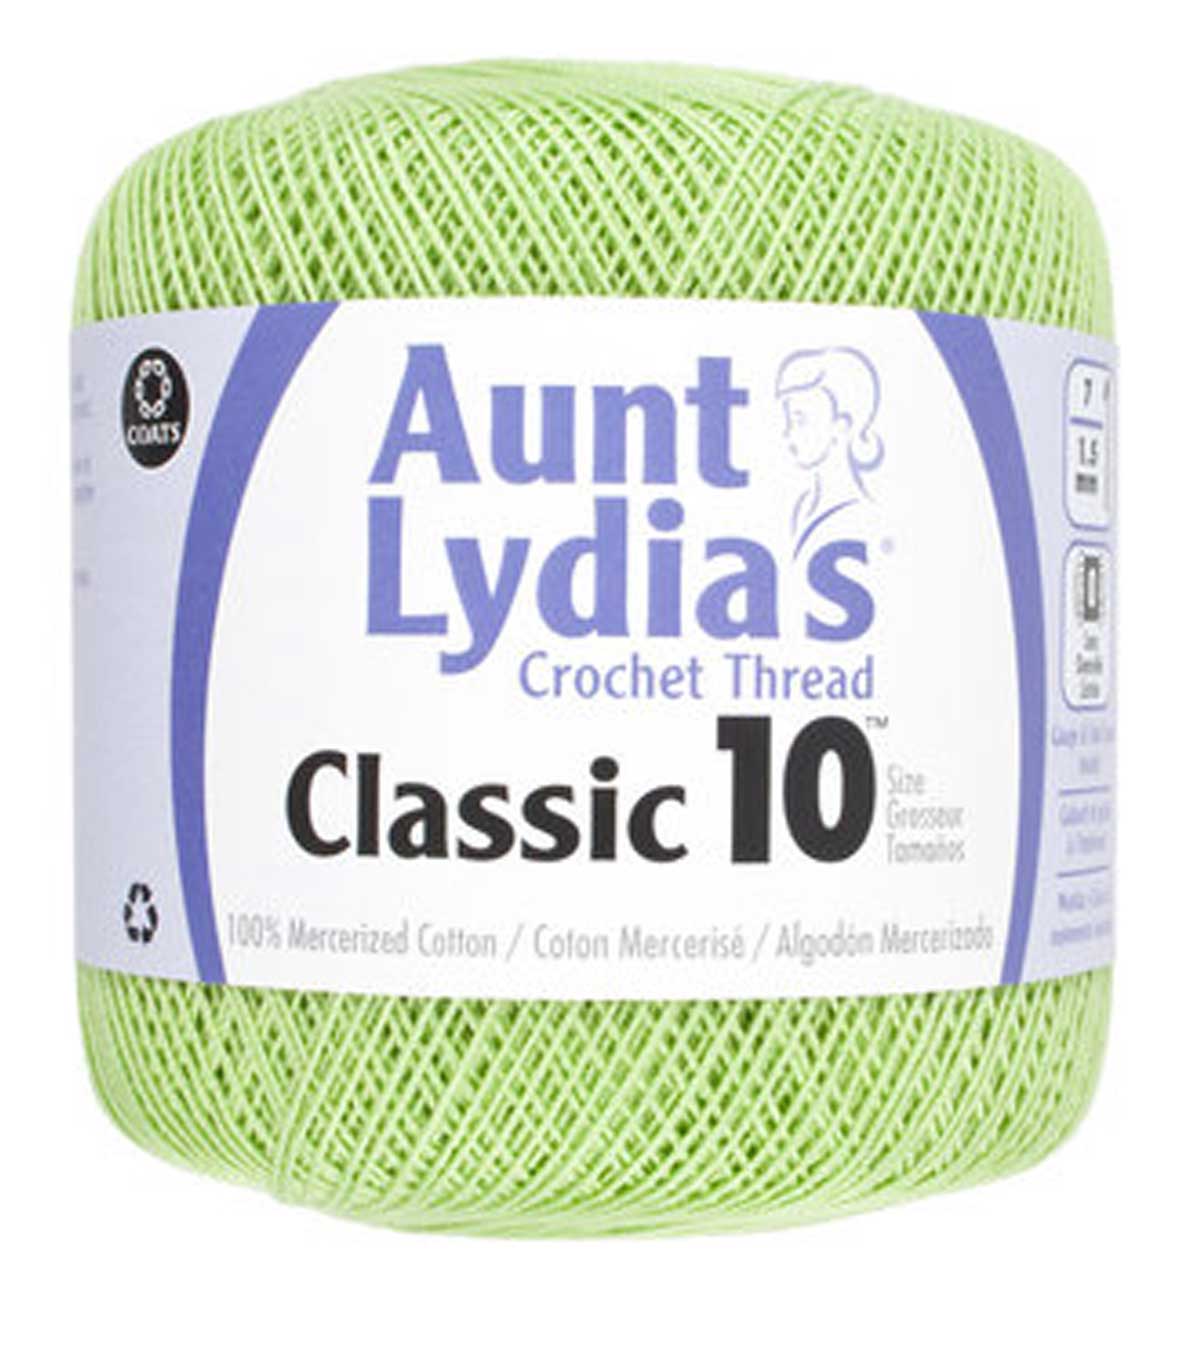
Pearl Cotton is another good choice. They come in lots of colors and work very nicely. Note: the higher the number, the finer the threads; the size 5 or 8 are best. Size 10 is fine, but might be challenging. Size 12 is too fine for a beginner. Unfortunately, they come in such small spools of about 87 yards each, so you can warp up about 5 cards per spool (depending on the length of your project). At about $3 a ball; it can run you $15-30 per project…or more. Look for large spools online at the Woolery or the Yarn Barn of Kansas, or ask if your local hobby shop can order them for you.
Little balls of pearly fun!
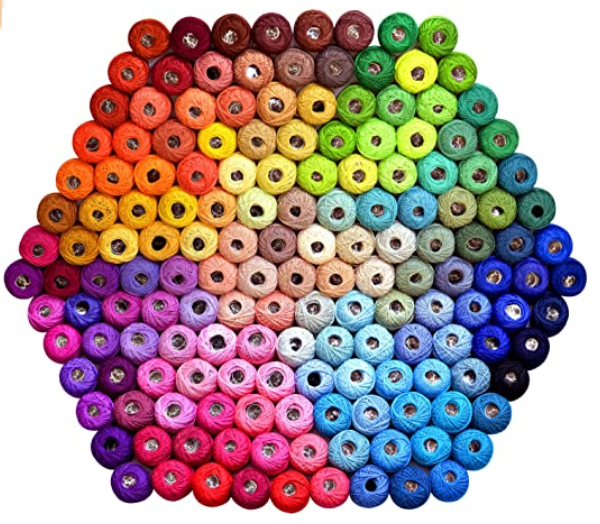
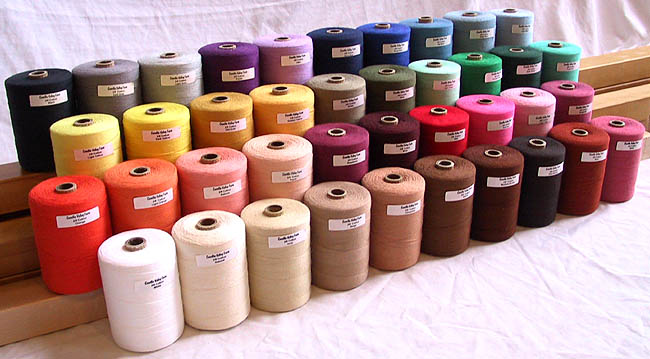
Maysville Carpet Warp has been my go-to thread. If you have a weaving store nearby, you can see if they carry it, or you want to order online. It has about 800 yards on a $9 spool, so it’s a great option. It’s a bit thicker than crochet cotton (like the size 5) and comes in about 70 different colors. Eugenetextilecenter.com, Yarn.com and the Woolery all carry it.
A rainbow of thready fun! This is only about half of the available colors.
For the upcoming videos, this is the type of yarn I’ll be using for the demonstrations.
I have created these blog posts as an addendum to the YouTube videos: Weave Along With Elewys. While some people learn very well from videos, others learn well from written directions and still images. This blog post will serve that need. I also need to have copies of the patterns that I use in the series available for weavers, and a central location to put them, so this blog will serve that need as well.
We haven’t been able to fully launch the project yet due to mundane demands (we expect it to be ready very soon). Despite the coronavirus Stay at Home orders, mundane work still gets in the way of filming and editing, especially the Intro to Tablet Weaving episode, which is going to be longer than the others as it covers all the materials and tools as well as techniques. I am struggling to do video taping while there are kids, a working husband, and birds in the house, so if you hear thumping, yelping, laughing, chirping, squawking, or another ambient noises, please forgive me. I’m doing the best I can with the resources at hand.
Note: one of the things that I will have to assume in this series is that the weavers are using an inkle loom. If you are using a backstrap, warp-weighted, or box loom, you may need to consult with other resources for directions on how to warp and anchor those.
Old oak inkle loom purchased second hand sometime around 1992 and has helped me produce hundreds of yards of inkle and tablet woven bands. Working on finding a name for it…
The first episode is a pattern from the Oseberg dig, dating solidly in the Norse era, 834 AD. A large burial mound was discovered at the Oseberg farm near Tønsberg in Vestfold county, Norway. The ship and some of its contents are displayed at the Viking Ship Museum at Bygdøy, Oslo. Among its finds were a loom (commonly called the Oseberg loom), weaving tablets, and a work in progress (known as 34D), as well as this silk piece. The original measured only 5 mm wide–a diminutive little weave–but we’ll do ours in a larger cotton rug warp for this demonstration.
As we have just celebrated the SCA’s 55th birthday, I decided to couple this project with a celebration of the Kingdoms of the Known World in the SCA. I’ve decided to weave 20 pieces in this series in the colors of each of the Kingdoms. The first Kingdom formed was the Kingdom of the West, in 1966. It comprises Northern California, Nevada, Alaska, Japan, Korea and the Pacific Rim. This is where it all started–with a backyard party that turned into an international medieval history organization with tens of thousands of members in 20 kingdoms. All of the Kingdoms, origin dates and colors are, in order:
The West Kingdom was created when the Society originated in 1966. Colors: green and yellow.
The Kingdom of the East was created in 1968. Colors: yellow and purple.
The Middle Kingdom was created in 1969. Colors: red, white and green.
The Kingdom of Atenveldt was created in 1971. Colors: white, yellow and blue.
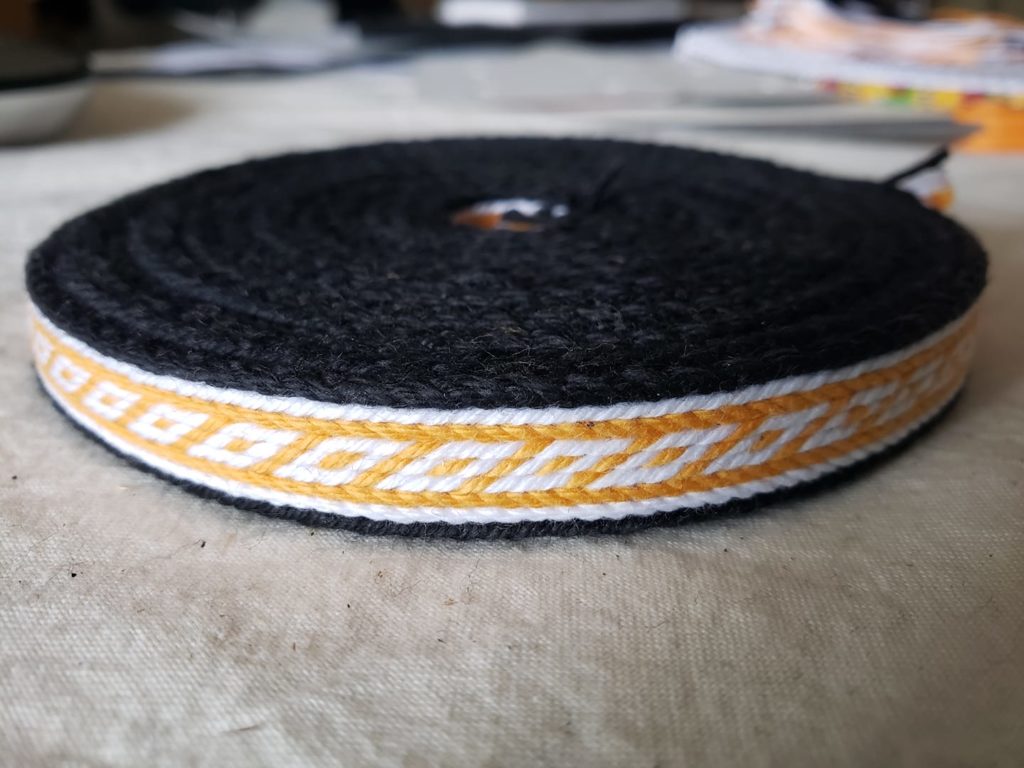
The Kingdom of Meridies was created in 1978. Colors: black and white.
The Kingdom of Caid was created in 1978. Colors: blue and white.
The Kingdom of Ansteorra was created in 1979. Colors: yellow, black and red.
The Kingdom of Atlantia was created in 1981. Colors: green, white and blue.
The Kingdom of An Tir was created in 1982. Colors: yellow, white and black.
The Kingdom of Calontir was created in 1984. Colors: purple and yellow.
The Kingdom of Trimaris was created in 1985. Colors: blue and white.
The Kingdom of the Outlands was created in 1986. Colors: green and yellow.
The Kingdom of Drachenwald was created in 1993. Colors: red, yellow and black.
The Kingdom of Artemisia was created in 1997. Colors: black and yellow.
The Kingdom of Æthelmearc was created in 1997. Colors: white, red and black.
The Kingdom of Ealdormere was created in 1998. Colors: white, red and green.
The Kingdom of Lochac was created in 2002. Colors: red, white and blue.
The Kingdom of Northshield was created in 2004. Colors: White, yellow and black.
The Kingdom of Gleann Abhann was created in 2005. Colors: red, white and black.
The Kingdom of Avacal was created in 2015. Colors: red, white and yellow.
So let’s get started by celebrating the Kingdom of the West!
First Kingdom of the SCA! The Oseberg weave will make Os on one side and zig-zags on the other. Makes a great belt or trim on an apron dress or tunic. Alternatively, this pattern, which is more historically accurate, has boxes on both sides. It is just as easy to weave!
Reading the pattern: squares with a white background are turned forward–away from the weaver. Squares with a grey background are turned backward–towards the weaver. I marked this pattern with the reverse after 10 and 12 turns so you can see what the reverses look like, but you don’t have to reverse so soon. In this particular pattern, the cards all turn the same direction until the warp is over-twisted, then all reversed until they not only become untwisted, but over-twisted in the opposite direction….then it’s back to forward turning again. Repeat this until you reach the end of your warp.
Technique refresher:
Warp your cards with the top of the card facing to the right–this is important if your cards are labeled clockwise. If they are labeled counterclockwise (anti-clockwise), face the tops of the cards to the left.
This is my preferred brand of cards–clearly labeled and colored sides are great visual cues to me while I’m weaving.
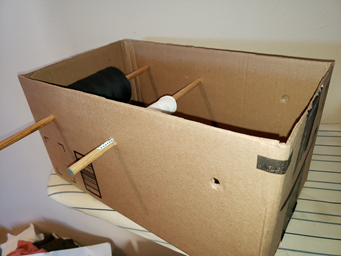
Get out your Lazy Kate (or whatever facsimile you create…mine is simply a Amazon Prime box with a couple of dowels stabbed through it) and load up your threads.
It’s not fancy, but it works.
Thread your cards, making sure to keep your S and Z diagram handy to make sure you are going through the cards correctly.
It’s easiest to tie the four threads together for each card, using a surgeon’s knot. It’s similar to a square knot, but has a double throw for the first pass, rather than a single. This makes it easier to untie to adjust tension or to correct mistakes–and trust me, you will make mistakes…we all do.
Once all your cards are threaded, double check your work to make sure they are correctly S and Z threaded and that the colors are in the correct hole. Once you have given it the final inspection, ready your shuttle! I wrap a bunch of warp around the top of the shuttle, in a figure 8 pattern, to keep the thickness of the shuttle to a minimum.
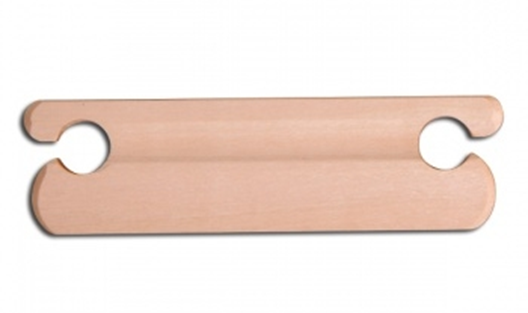
Your belt shuttle only needs to be 5″ or 6″ long, and works best if it has a tapered edge for beating.
I begin by setting all the cards with AD at the top and slip the tail through the shed so the shuttle is on the left and a 4″ tail is on the right. Turn the cards forward (away from you) and throw the shuttle and the tail in opposite directions, criss-crossing through the shed. This will help anchor the tail and prevent unraveling later. Turn the cards again, beating the weave, and throwing the shuttle, leaving a loop behind. On the next pass, turn the cards, snug up the weft, beat and pull the shuttle through. Don’t be over-zealous on the weft; gently pull the weft thread to pull the warp threads together. Do four turns total so that AD is back at the top again. The first few passes are going to look a hot mess…don’t panic. It’ll get better as you go, and your tension gets more consistent with practice.
Keep weaving along until the twist gets too tight, or every so often (maybe every 10 or 20 repeats, or whenever it moves you), then reverse direction to untwist. You will develop a funny little bump on the edge of the weave–don’t panic…it’s completely normal. The finer the threads you use, the less noticeable it is.
When the pattern changes directions, the threads on the border cards leave an odd lump. This is less noticeable using finer threads.
Every so often, you will need to release the tension on the loom, and shift it to continue your work. As you work, you will notice that the length of the weave is getting shorter and shorter…you will lose up to 20% of the warp length from start to finish.
When you get to the end of the warp, you will have 6″ or 8″ left between the end of the weave and the knots tied…remember you will also have the width of the cards and the shuttle between the beginning and end…so if you want to get a minimum length of weaving for a project, you will need to factor that into your warp length.
Some weavers carefully untie all their knots and tie up the ends in a variety of ways. I used to twist and knot the threads, but lately, I’ve decided that it’s far more effort than it’s worth, so I just leave a half inch of fringe and chop off the excess. If you plan on sewing it down as part of trim on a garment, it will likely have the ends tucked inside the seams. It hasn’t unraveled yet, at least using the carpet warp or wool, but finer threads like silk might be more trouble.
I hope this has been a helpful tutorial, and I hope you find the videos helpful as well. I look forward to hearing about my fellow weavers’ projects and anything that I have presented that you, and I’d love to see your completed projects!
Oseberg Weave finished!The alternate pattern
I also wanted to give a shout out and direct you all to a tablet weaving generator that I use a lot, created by a British woman named Catherine. It is both super useful and periodically updated (other generators like GTT haven’t been updated in more than a decade). It can be found at: https://jamesba.github.io/tabletweave/.
After I finished the last couple of feet of sewing on the coat, I decided the next item to make is an apron dress. I normally wouldn’t build a wardrobe from the outside in, but nothing is as it should be this year.
Sorry about the crud and boxes around–I am still in the midst of re-arranging the sewing room. Being in quarantine means that I can’t get out to donate the stuff I have to get rid of.
I “interviewed” three fabric candidates. Two were too small and one was *just* about big enough (if I reduced the length of the dress by 3″), but it’s got a very subtle stripe to it and has a right and wrong side…but only noticeable if you’re looking very closely.
You’ll note the fine white chalk marks for the pattern as well as the fine grey pinstripes in the wool. I debated about using it, but thought that since they can definitely date plaids to this era, stripes aren’t a big stretch for plausibility.
I laid out and marked the fabric using the “no waste” apron dress pattern. Mistress Disa i Birkalundi has a YouTube class on how to measure and mark your fabric for this pattern.
I ended up assembling mine a little differently because I was being difficult and dumb, but also because the fabric has a right side and a wrong side; if you sew the two half side panels together, one will be reversed.
Anyway, it looks fine from the front, and that’s what’s important.
I plan on adding the Oseberg tablet weaving to it (the purpley-red in the weave matches the purpley-red in the fabric almost perfectly).
Because I had to make it a bit shorter, I will be adding some dark grey wool at the bottom and trimming the top with it as well. I also need to make shoulder straps, so those will be in grey as well–here’s hoping I have enough! (PS – I do!)
Before the grey trimmings
Meanwhile, the garden is expanding, we moved the compost bins, and hubby has invested in a rain barrel. I’m looking into the possibility of growing potatoes in buckets, but it looks like 5 gallon buckets have rather small yields–maybe 2 lbs. per bucket. A 20 gallon bucket yields about 8 lbs…so about the same yield per gallon.